 Keep
AC Frozen Up? Thaw It Fully, Then Prove Which of the Two Real Causes Did It
 Daniel Mercer · Editor & Researcher·
Published November 16, 2026·
Updated November 16, 2026
It usually starts as a feeling rather than a fact. The house is not cooling the way it did last week. The air from the vents feels thin and lukewarm, the system runs and runs, and the thermostat number refuses to move. Then you look closer — at the thick copper line running into the indoor unit, or inside the air handler if you open the panel — and there it is: ice. White, glittering, and completely out of place in the middle of summer, growing over the coil and sometimes out along the insulated line.
Your first instinct is probably wrong, which is to keep the system running and hope it pushes through, or to attack the ice with something sharp. Both make it worse. A frozen coil is one of the most diagnosable problems in a house, and it is also one of the few where doing nothing for a few hours is literally the first step of the repair. This guide walks the whole path: the thaw, the two families of causes and how to prove which one you have, the water problem hiding inside the ice problem, and the point where the job stops being yours and becomes a certified technician's.
One clarification before anything else, because the two searches borrow each other's readers: this guide is about a central air conditioner icing at the indoor coil in cooling mode, where ice is never normal. If you have a heat pump and the outdoor unit is icing in winter, that is a different machine behaviour with a normal defrost cycle built in — read Heat Pump Icing Up? What's Normal Frost, What's a Problem, and What to Do instead, and come back here in July.
First move: cooling off, fan on, and let it thaw completely
Set the thermostat to Off for cooling and the fan to On — not Auto. The blower will keep moving warm house air across the coil, which is the safest thawing tool you own. Then leave it alone for hours. A light frost film clears in 2–4 hours. A coil that has been freezing quietly for days can be a solid block that takes 8–12 hours, sometimes a full day, to melt out completely. If you can still see ice on the coil or frost on the big copper line, it is not thawed, whatever the clock says.
Why the insistence on switching off? Because a frozen system is not merely inefficient, it is dangerous to itself. The compressor at the heart of the outdoor unit is built to squeeze refrigerant gas. When the indoor coil is a block of ice it cannot boil the refrigerant fully back into gas, so liquid refrigerant can travel down the line and reach the compressor — and liquid does not compress. Technicians call it slugging, and it is how a problem that started as a dirty filter ends as a compressor replacement in the $1,200–$2,800 range. Meanwhile the blower is straining against a wall of ice and moving almost no air, so every hour of "let it run" buys full electricity costs and no cooling at all. Off is not giving up. Off is the repair's first step.
And never chip, pry or stab at the ice. The coil is copper tubing wrapped in aluminium fins about as sturdy as a drinks can. Bent fins restrict airflow — one of the causes you are trying to eliminate — and one punctured tube converts your airflow problem into a refrigerant leak. A hair dryer on its lowest setting, kept moving and a foot away, is the only shortcut allowed, and honestly the fan does the job nearly as well.
Why a coil freezes at all
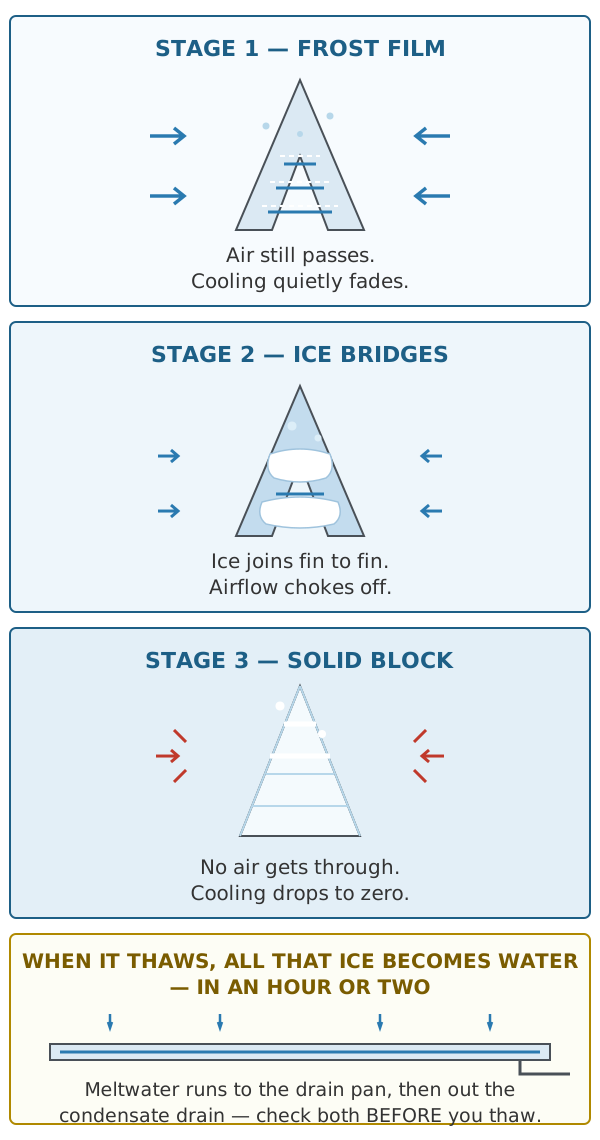
The physics fits in one paragraph. The evaporator coil is designed to run cold — just above freezing — while a full stream of warm house air flows over it, giving up heat and dropping its moisture as liquid condensate that runs down into a drain pan. Ice forms when that balance breaks: the coil surface falls below 32°F, and the moisture freezes onto the fins instead of condensing. Worse, ice is self-feeding. The first frost roughens and narrows the air passages, less air gets through, the coil gets colder still, and the frost thickens into bridging ice and finally a solid block. Cooling fades long before the block looks dramatic, which is why the house feels wrong days before you ever see ice.
Everything that breaks the balance belongs to one of two families, plus one weather trigger.
Family one: the air slowed down
Warm air is the coil's only source of heat, so anything that reduces airflow lets the coil fall below freezing:
- A clogged filter is the single most common cause in houses like yours. A filter that looks merely grey can cut airflow drastically. If you are not sure of your schedule, How Often to Change Your HVAC Filter (It Depends on the Filter You Have) will settle it — but during a freeze investigation, a filter older than a month of heavy summer running is guilty until proven innocent.
- Blocked or closed returns and supply vents. Returns covered by furniture, rugs or stored boxes starve the whole system. Closing supply vents in unused rooms — a popular money-saving myth — raises pressure and reduces total airflow rather than saving anything.
- A weakening blower. A tired blower motor, a failing blower capacitor, or a blower wheel caked in dust moves less air than the coil was sized for. The system cools "a bit less each summer" until one hot week it crosses the line into freezing.
- Dirty coil fins or crushed fins from an earlier owner's careful maintenance, which choke the passages the air has to thread.
Family two: the refrigerant ran low
Refrigerant is the other half of the balance. When the charge drops — and refrigerant is never "used up," a low charge means a leak, full stop — the pressure in the coil falls, and with it the coil temperature. Parts of the coil drop well below freezing even with perfect airflow. The signature differs from airflow freezing: ice often starts at one section of the coil or along the line set, the system may cool weakly but noticeably rather than barely at all, and — the decisive trait — after a complete thaw the freeze comes back fast, within hours of running, because the cause never left.
The third trigger: cold nights
Running air conditioning when the outdoor temperature falls below roughly 60°F — a cool night after a hot day, an early-autumn cold snap with the thermostat still in Cool — can freeze a healthy system. Low outdoor temperature drops pressures in the same direction as a low charge. If your freeze happened on the first cold night of the season and the system then runs clean for weeks of hot weather, you may have no fault at all, just physics. Note it in the freeze diary described below and watch.
One related myth deserves a sentence while we are here: setting the thermostat very low does not, by itself, freeze a healthy system. A sound system cycles or runs at its designed coil temperature regardless of whether you asked for 72°F or 64°F. A low setpoint only extends the run time — which gives a marginal system, one already short on airflow or charge, more hours in which to cross into icing. The setpoint is the messenger, not the cause.
The freeze in three stages. Cooling is already dying at stage 2, while the ice still looks modest — and everything you see in stage 3 is about to become meltwater.
Where to look for ice on a central system
Most of the guides that rank for this symptom are written about window and portable units. Yours is a split system, and the ice hides in specific places. Check, in this order, with the system off:
- The big copper line where it enters the indoor unit — the suction line, the thicker of the two, usually wrapped in black foam insulation. Frost on the copper itself, or on the insulation, is the classic first sighting. Peel back a small section of insulation if you need to confirm.
- The coil face. The evaporator sits in the air handler or furnace cabinet, usually as an A-frame (an A-coil) or a flat slab. Shine a torch through the access panel or filter slot: you are looking for the difference between a uniform frost film, ice bridging between the fins in patches, and a solid white block.
- The outdoor line set, near the condenser, where heavy freezing sometimes shows at the service valves.
How much ice you find is information, not just mess. A coil frozen into one solid block has usually been starving for days. Patchy ice — one slab of the A iced, the other clear — leans toward a refrigerant or distribution problem rather than simple airflow, and is worth photographing for the technician.
The coil's shape sets your thaw expectations. Most split systems use an A-coil: two slabs leaning together in the plenum above the furnace, with a lot of surface packed into a small box. It ices thoroughly and thaws slowly — the inside faces of the A hold ice long after the outer faces look clear, which is why "it looks thawed" restarts fail. A slab coil, a single flat panel common in horizontal attic air handlers, carries less ice and clears faster, but it lies flat, so its meltwater has nowhere to fall except straight into the pan — the meltwater checks below matter most on exactly this layout. Either way, judge the thaw by the suction line as well as the coil: when the thick copper line is fully bare, dry and merely cool to the touch along its whole run, and the drain has stopped running, the system is genuinely clear and the diagnosis sequence can start.
The diagnosis sequence: prove the cause before anyone sells you a repair
Do not start spending yet. Work this sequence in order, because the early steps are free and they clear the majority of cases.
Step 1 — Thaw completely. Not mostly. Completely, per the timings above. Every later test is meaningless on a half-frozen coil.
Step 2 — The filter. Pull it and hold it up to the light. If you cannot see light through it, it was restricting airflow whether or not it is the whole story. Replace it; do not shake it out and reinstall it.
Step 3 — Walk the air path. Open every supply vent in the house, including the rooms you do not use. Move anything sitting on or in front of return grilles. Look at the blower wheel through the access panel if yours allows it: a wheel whose curved blades are furred with dust is moving a fraction of its rated air.
Step 4 — Run it and start the freeze diary. With the thaw complete, the filter new and the air path open, restart the cooling and note the time. Now watch, over the next hours and days, and write down three things: when cooling felt normal, when it first faded, and when you saw frost again on the suction line. This little diary is the most valuable diagnostic tool in this guide, because the speed of the refreeze separates the two families:
- Re-freeze within hours — airflow is now verifiably open, so the coil is still getting too cold for another reason. That points hard at low refrigerant from a leak, or a blower still not delivering despite appearances. This is technician territory.
- Re-freeze over days — the classic slow airflow pattern: a filter loading up fast in a dusty house, a return that is still partly strangled, a blower on its way out. Re-walk step 3 before paying anyone.
- No refreeze at all — the filter or the blocked return was the whole story, or it was a cold-night freeze. Keep the diary going for a week of hot weather, then file it with your home records.
A technician who arrives to your diary — "thawed fully Tuesday, new filter, all vents open, frost back on the line by Wednesday evening" — starts halfway through the diagnosis. One who arrives to "it froze, I turned it off and on a few times" starts from zero, on your hourly rate.
The thermometer check: measuring what the coil is doing
One measurement sharpens the diary further, and it needs only a kitchen thermometer. With the system running steadily for at least 15 minutes on a fully thawed coil, measure the air temperature at a return grille, then at the nearest supply vent. A healthy system delivers air roughly 15–20°F cooler than the air it took in. Much less than that — a split of 8 or 10 degrees — means air is moving but heat is not: the signature of a coil beginning to ice, a charge going low, or both. A split that starts near normal and shrinks over an hour of running is the freeze forming in real time, and noting when it starts to fall gives the refreeze timing without anyone opening a panel. Record the split in the diary alongside the times. It is the home version of the first measurement a technician takes, and it turns "it doesn't feel cold" into a number two people can discuss on the phone.
The water hiding inside the ice problem
Here is the part almost nobody warns you about, and it is the part that damages houses. A coil iced into a solid block holds a surprising amount of water — gallons of it — and when it thaws, that water arrives in an hour or two, not spread across a day of normal condensing. The drain pan and condensate line under your coil were sized for a trickle. An overwhelmed or partly clogged drain cannot take a thaw's worth of water at thaw speed, and the overflow goes wherever gravity suggests: into the air handler, through a ceiling below, down a wall cavity.
So before you start the thaw, do three things. Find the drain pan under the coil and check whether it is cracked or already holding water. Find the condensate drain line and confirm it actually drains — pour a cup of water into the access point and watch it leave. And put towels down and a shallow tray where drips would land, especially if your air handler sits in an attic or a closet above finished rooms. If the pan overflows anyway, or you find water where it should never be, the drain system itself needs the full treatment in AC Leaking Water Inside: Find the Cause, Clear the Drain, Protect the Ceiling — a thaw simply exposes the same clogged drain that causes ordinary summer leaks, all at once.
One more confusion to head off: a puddle around the air handler the day after a freeze is usually meltwater, not a new leak. Dry everything, confirm the drain runs clear, and only worry if water keeps appearing while the coil stays ice-free.
Location decides how much this matters. An air handler in a basement can overflow onto concrete and cost you a mop. The same unit in an attic or a second-floor closet overflows into the ceiling below, and the first sign is a brown stain spreading over a bedroom. Attic installations are supposed to have a secondary drain pan under the whole unit, often with a float switch that shuts the system down when the pan fills — if yours has one, check that the pan is intact and the switch is actually wired in, because a thaw is exactly the event that tests both. If your system shut itself off mid-thaw and will not restart, a tripped float switch on a full secondary pan is a likely and oddly reassuring explanation: the safety device did its job, and the job now is to drain the pan and find why the primary drain could not cope.
The DIY solution, in full
Everything in this section is yours to do, in this order.
- Thaw completely — cooling off, fan On, towels down, drain checked first (above). Light frost: 2–4 hours. Bridging ice: 4–8 hours. A solid block: 8–12 hours or overnight. Patience here is not optional; a restart on a half-thawed coil rebuilds ice on a frozen core and proves nothing.
- Replace the filter with the correct size, airflow arrow pointing toward the blower. Write the date on the frame.
- Open the whole air path — every supply vent open, every return uncovered. If a return grille is filthy, vacuum it.
- Check the blower basics. With the power off at the switch and breaker, look at the blower wheel: heavy dust build-up can be vacuumed and brushed clean. Spin it by hand — it should turn freely and quietly. A wheel that grinds, wobbles or barely turns is telling you the motor or its bearings are the airflow problem, and that is the boundary of this DIY stage.
- Restart and run the freeze diary exactly as described above. This step is not an afterthought; it is the verdict.
- Mind the nights. If a freeze coincides with outdoor temperatures under about 60°F, raise the thermostat or switch the system off on cold nights and see whether the problem simply never recurs in hot weather.
If the diary convicts airflow and your re-walk finds nothing left to open or clean, or if the wheel will not spin freely, the remaining airflow cause — a blower motor or its capacitor — is a judgment call: the parts are not exotic, but the capacitor can hold a charge with the power off, and a motor swap involves wiring that has to go back exactly right. Plenty of capable owners do it; nobody should feel obliged to.
The pro solution: what a good technician actually does
When the refreeze test points to refrigerant, the job changes legal status, not just difficulty. Under the EPA's Section 608 rules, refrigerant for stationary air conditioners can be bought and handled only by certified technicians, and knowingly venting it is prohibited. There is no legal DIY recharge, and any guide that shrugs at that is shrugging at a federal rule. But the deeper reason to hire this out is mechanical: refrigerant is not consumed. A low system has a leak, and adding refrigerant without finding it buys you weeks or months before the same freeze, plus a second bill.
A proper visit runs like this. The technician confirms the thaw and checks airflow first — expect the filter and blower questions again, and do not be offended; they are ruling out the cheap family before touching the sealed system. Then come gauge readings and temperature measurements that show how low the charge is and how the coil is behaving. If the charge is low, the leak search follows: an electronic detector sniffing the joints and coil, UV dye, or nitrogen pressure testing for a stubborn one, at $200–$500 depending on method and time. Only with the leak found does the repair-and-recharge quote mean anything: braze or replace the leaking joint, section or — at the expensive end — the coil itself, evacuate the system, and weigh in the correct charge. Allow half a day for a straightforward leak repair and recharge; a coil replacement is a full day and a four-figure conversation. Blower motor or capacitor work, if that is the verdict instead, is usually a 1–2 hour job.
The quote you accept should itemise: the leak's location, the repair method, the refrigerant type and amount by weight, and whether the price includes the evacuation and recharge or lists them separately. "Top up the gas, $X" with no leak location named is not a repair quote — it is a subscription.
If the verdict lands on the airflow side instead, expect a different and shorter test sequence: the technician measures the capacitor against its rating in microfarads, checks the blower motor's amp draw against its nameplate, and inspects the wheel and the coil face for the dirt load your walk-through could not see — a coil can look clean from the front and be matted with dust deep in the fins, which only shows under a proper inspection light. A capacitor reading well under its rating explains a blower that turns but no longer delivers its rated air, and it is one of the cheapest parts in the whole system. This is also the visit where an honest technician tells you the system is fine and the filter was the whole story — it happens more often than the industry's advertising suggests, and it is the outcome your own diagnosis sequence was designed to reach first.
What the fix costs, and how the table should be read
The honest summary of a frozen coil is that the symptom is free to produce and the bill depends entirely on which family caused it. A filter is $0–30 and an afternoon of thawing. A blower capacitor or motor — the mechanical end of the airflow family — runs $150–$650 fitted. The refrigerant family is where money lives: $200–$500 just to find the leak properly, then $200–$1,500 to repair it and recharge, with the leak's location deciding everything. A leaking joint on an accessible line is a modest job; a leaking evaporator coil is the top of the range and, on an older system, the start of a repair-or-replace conversation rather than a repair.
Read any quote against that shape. A low number that skips the leak search is not a bargain; it is the first instalment. And a diagnostic fee of $75–$200 that gets credited toward the repair is normal practice — confirm the credit before booking, not after.
DIY or pro: the decision
Stay DIY while the cause is in the airflow family and reachable: filter, vents, returns, a dust-choked blower wheel, a cold-night habit. Your total spend should stay under the price of a filter until the freeze diary gives a verdict.
Call a pro when any of these is true: the freeze returns within hours of a complete thaw with clean airflow; ice forms in patches on one part of the coil only; the blower wheel grinds, wobbles or will not spin freely; the system has needed refrigerant before; or you can hear the compressor labouring or clicking off at the outdoor unit. Every one of those says the fault is sealed inside the refrigerant circuit or the motor, where the tools, the law or both say technician.
Urgency, honestly stated
A frozen coil will not flood your house tonight or burn anything down, and it does not need a midnight call-out at midnight prices. It does need the system switched off today, the thaw started today, and the diary started with the next run — because the two ways this gets expensive are both about delay. Run it frozen and you gamble a compressor. Ignore a refreeze pattern for a whole summer and a small leak becomes a bigger one as charge and oil circulate out of it. Treat it as a same-week repair with a same-day first step, and it usually stays the cheap kind of problem.
Keeping it from freezing again
A system that has frozen once has told you exactly where it is vulnerable, and prevention is mostly the habit of not letting that condition rebuild. The filter is the rhythm everything else hangs on: in a house that froze from airflow, check it monthly through the cooling season rather than trusting a calendar interval, because your diary has already shown you how fast yours loads. Keep returns furniture-free as a permanent arrangement, not a one-off tidy, and resist closing vents in spare rooms — the system was balanced for all of them open. Once a year, ideally in spring before the first heat wave, have the coil and blower inspected and the condensate drain cleared as part of a normal tune-up; the drain you clear in April is the ceiling you do not repaint in August. On cold nights at the edges of the season, raise the setpoint or switch off rather than asking the system to cool against 55°F outdoor air. And if your freeze was a refrigerant leak that got repaired, keep the freeze diary habit for the first month after the repair — a refreeze in that window is warranty-relevant information, and you want it written down with dates, not remembered approximately in September.
Sources
- Bryant — Why Does My AC Keep Freezing?
- US Department of Energy — Maintaining Your Air Conditioner
- US EPA — Section 608 Refrigerant Rules
Cost at a glance
| Item | Typical cost | Notes |
|---|---|---|
| New filter (DIY) | $0–$30 | Free if you already have a spare; always the first thing to rule out |
| Diagnostic / service call | $75–$200 | Often credited toward the repair; ask before booking |
| Blower capacitor or motor repair | $150–$650 | Capacitor at the low end, a replacement blower motor at the high end |
| Refrigerant leak search | $200–$500 | Electronic detector or dye; no recharge quote means anything before this |
| Leak repair + recharge | $200–$1,500 | Depends on where the leak is; an evaporator coil leak sits at the top of the range |
Frequently asked questions
How long does it take to thaw a frozen AC?
For a central split system, plan on 2–4 hours for a light frost film and 8–12 hours — sometimes a full day — for a coil iced into a solid block. Switch the cooling off and run the fan on On to move room air over the coil. If you can still see or feel ice, it is not thawed yet, and restarting early just rebuilds the ice on a core that never cleared. Check the drain pan and condensate drain before you start, because all of that ice is about to become water.
Can I chip the ice off to speed things up?
No. The coil is thin aluminium fins wrapped around copper tubing, and it loses every fight with a screwdriver. Bent fins restrict airflow — one of the very causes of freezing — and a punctured tube turns an airflow problem into a refrigerant leak and a four-figure repair. A hair dryer on low, kept moving and at a distance, is the fastest help you are allowed to give it. Time and fan air do the rest.
Why does my AC keep freezing up again after I thaw it?
Because thawing treats the ice, not the cause. The refreeze speed is your best clue: ice back within a few hours of running points to low refrigerant from a leak, while a freeze that takes days to return points to airflow that is still restricted — a filter loading up, returns still blocked, a blower still weak. Note the time in a simple freeze diary and hand it to the technician; it genuinely narrows the diagnosis.
Is a frozen coil always a refrigerant leak?
No. Restricted airflow is at least as common and much cheaper: a clogged filter, furniture over a return, closed vents, or a tired blower all slow the air down until the coil drops below freezing. Refrigerant becomes the prime suspect when the airflow side is verifiably clean and open, the system has a history of needing recharges, or the freeze returns within hours of a complete thaw.
Can a dirty filter really freeze an air conditioner?
Yes, and the mechanism is simple. The coil is designed to run just above freezing with a full stream of warm house air passing over it. Starve that air and the coil temperature falls below 32°F, moisture from the air freezes onto the fins instead of condensing and draining, and the ice itself blocks even more air. It is a feedback loop, which is why a filter that looks merely grey can end with the coil in a solid block of ice.
Is it safe to run the AC while it is frozen?
No. A frozen coil cannot absorb heat properly, so liquid refrigerant can travel back down the line to the compressor — a machine built to squeeze gas, not liquid. That is how a filter problem becomes a compressor replacement. The blower also works against a block of ice and moves almost no air, so you are paying full electricity for no cooling. Off, fan On, thaw, then diagnose.
How much does it cost to fix a frozen AC?
Anywhere from nothing to four figures, which is exactly why the diagnosis matters. A filter is $0–30. A blower capacitor or motor runs $150–$650. If the cause is refrigerant, expect $200–$500 for the leak search and $200–$1,500 for the repair and recharge, with coil leaks at the top. Anyone quoting a recharge price over the phone, before finding the leak, is quoting you the first of two bills.
Checked November 16, 2026. This guide is general information, not a substitute for a licensed professional.
Related guides
AC Blowing Warm Air? 7 Causes, the Checks in Order, and What Repairs Cost
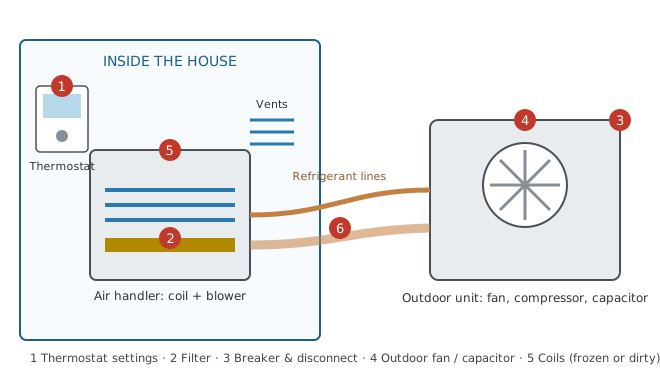
Your AC runs but the air isn't cold. Start with the thermostat and filter, then learn to read the outdoor unit — humming, silent, or iced over — before you pay for a diagnosis.
AC Leaking Water Inside: Find the Cause, Clear the Drain, Protect the Ceiling
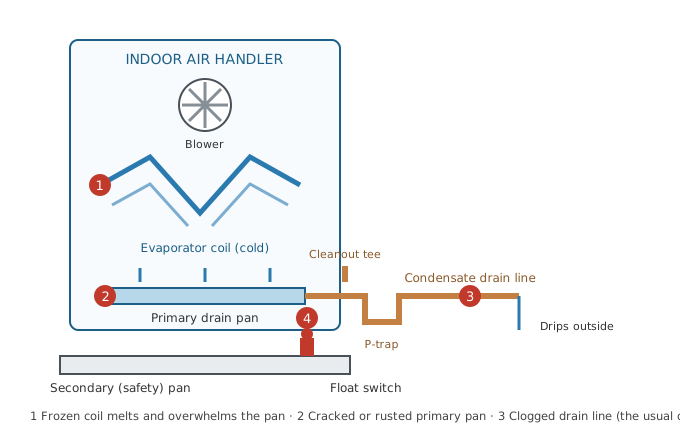
Water pooling at the air handler or a stain spreading across the ceiling is usually a clogged condensate drain — a fix you can often do yourself with a wet/dry vac. Here is the order: stop the damage, trace the water path, clear the line, check the pans.
AC Short Cycling: Why Your AC Keeps Turning On and Off
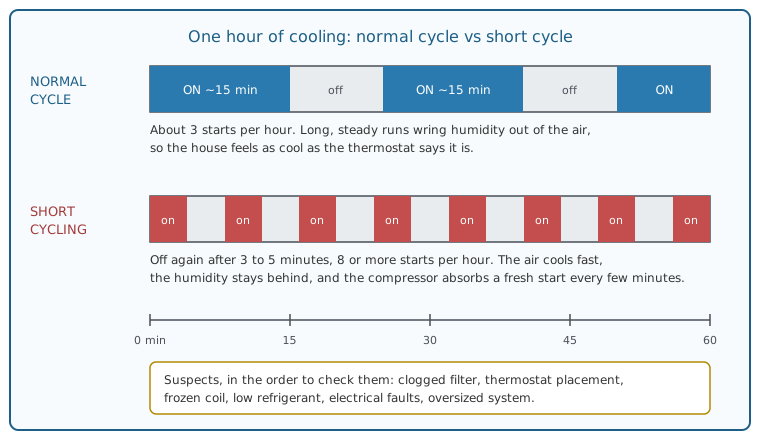
Your AC starts, runs a few minutes, stops, and starts again — all day. Time it with a stopwatch, work through the causes in order, and learn which fixes are yours and which need a technician.