 Keep
AC Leaking Water Inside: Find the Cause, Clear the Drain, Protect the Ceiling
 Daniel Mercer · Editor & Researcher·
Published November 16, 2026·
Updated November 16, 2026
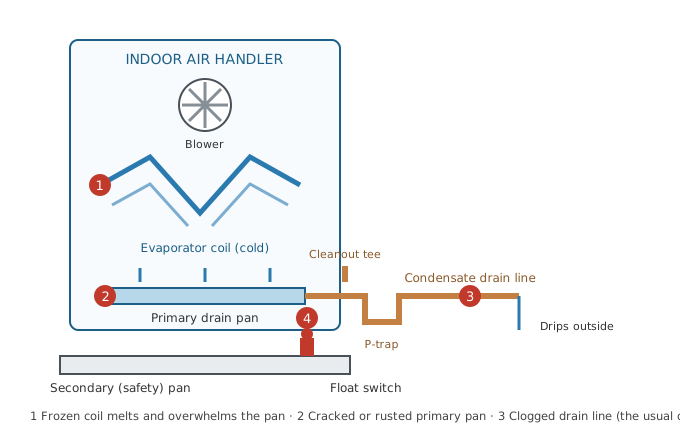
There are two versions of this discovery, and both are miserable. In the first, you walk into the utility closet, the laundry room or the hallway and step in a puddle that has no business being there — cold, clear water spreading out from under the air handler. In the second, which is worse, you look up and see a brown-edged stain blooming across the ceiling, in a house where the air handler lives in the attic above it. Either way, the thought arrives in the same order: where is this water coming from, how long has it been doing this, and what is it ruining right now?
Here is the reassurance first, because it is true: this is almost never a plumbing leak, and it is rarely an expensive failure. Your air conditioner manufactures water as a by-product of cooling, gallons of it on a humid day, and that water has exactly one designed escape route. The leak means the escape route failed — most often because a drain line the width of your thumb has clogged with algae. That is a problem you can frequently fix yourself, in under an hour, with a vacuum. But water does its damage on its own schedule, not yours, so the order of operations matters: stop the damage first, then play detective.
First actions: limit the damage before you diagnose anything
Switch the system off at the thermostat. Not down — off. Every minute the AC runs, the coil wrings more moisture out of your air and adds it to whatever is already overflowing. Owners understandably hesitate to kill the cooling on a hot day, but a running system converts a cup of spilled water into gallons. If you suspect the coil is frozen (weak airflow, ice on the copper lines, a system that has run non-stop), set the fan to On with the mode Off: moving room air over the coil thaws it faster and more gently, and you need to know it is frozen before you go further, because a thawing coil dumps a lot of water at once.
Protect what the water is reaching. Move anything stored under or around the air handler. If the unit is in the attic and the ceiling below is stained, put a bucket under the drip if it is coming through, and resist the urge to poke the stain — waterlogged drywall is heavy and weak, and a sagging, bulging patch of ceiling is one that is holding water and ready to come down in a sheet. Get people and furniture out from under a bulging ceiling and treat it as a small structural problem, not a stain. If water is pooling on a floor, towels and a wet/dry vac now are worth more than any diagnosis in the next hour.
Find the pan and look at the water. Open the closet or climb to the attic unit and look at the drain pan under the coil, and the larger flat safety pan under the whole unit if there is one. What you see sorts the problem immediately:
- Pan full to the brim, water still dripping from the coil — the drain is not draining. Clogged line, most likely.
- Pan empty or low, but water on the floor or in the safety pan — the water is bypassing the pan: a crack, a rust hole, or a coil dumping meltwater faster than the pan can catch it.
- Safety pan holding water, system off, nobody touched the thermostat — the float switch shut the system down to save your ceiling. It worked. The primary drain has failed.
- Everything dry at the unit, stain on the ceiling anyway — check the safety pan's own drain line, and consider that the leak may be intermittent: a coil that freezes at night and melts at noon leaks on a schedule.
Take a photo of what you find before you touch anything. If this turns into an insurance conversation or a warranty claim, that first photo is the most valuable one.
How the water is supposed to flow
If you have just bought the house, nobody showed you this system, so here it is in one pass. Warm, humid air from your rooms is blown across the evaporator coil, a finned coil inside the air handler kept cold by refrigerant. The air leaves cooler — and drier, because its moisture condenses on the cold fins exactly the way it beads on a cold drink can, except the coil collects it by the gallon. On a humid day in a humid climate, a central system can produce 5 to 20 gallons of condensate a day. All of it has to leave the house.
The path is simple and entirely gravity-powered, which is both its virtue and its weakness:
- Water drips off the coil into the primary drain pan, a shallow pan built into the bottom of the coil section.
- The pan slopes to a drain outlet, connected to a PVC condensate line, usually three-quarter inch.
- Near the unit, the line passes through a P-trap — the same U-bend as under a sink — and usually has a vertical cleanout tee with a removable cap. The trap matters: without it, the blower's suction can hold water in the pan or pull air up the line, and the pan drains poorly or not at all while the fan runs.
- The line runs downhill, ideally, to an exit: through an exterior wall to drip outside, into a floor drain, or to a condensate pump — a small box with a motor, fitted when the unit sits below the level of any drain (a basement air handler, typically), which collects the water and pumps it up and out.
Units installed in attics or above finished ceilings get a second layer of defence: a secondary (safety) pan under the whole air handler, with its own drain line run to a deliberately obvious place — classically, a pipe that drips over a window or door so you cannot miss it. Many have a float switch in that pan, a small switch that cuts the system off when the water rises. Water in the safety pan is never normal. It means the primary path has already failed and you are living on the backup.
Every leak in this article is a failure somewhere along that short path: the coil making water faster or in the wrong place, the pan failing to hold it, the line failing to carry it, the pump failing to lift it, or the safety layer failing to warn you.
Reading the pattern: when and where it leaks points at the cause
Before you clear anything, the leak has already told you most of the story, if you read its pattern. A slow, steady drip that worsens through a humid afternoon is the clogged line: the pan fills at the rate the coil makes water, and the most humid hours make the most water. A sudden puddle discovered after a long, hot run — or first thing in the morning — is the frozen coil's signature: the water arrived in one melt, not a drip at a time. A leak that appears within minutes of the system starting, every time, suggests the pan or a joint close to the unit, because the water is escaping before it has travelled anywhere. Water at the base of the unit but a pan that looks dry usually means the coil is dripping outside the pan's edge — a coil so dirty or iced that water runs down its face and off the side, or a pan that has shifted or cracked at a corner. A leak only on the season's first hot week points at something that changed over winter: a line knocked loose, a trap that dried out and lost its seal, a pump that died in the off-season. And water from the high secondary pipe outside is not a cause at all — it is the messenger, reporting that the primary path failed days or weeks ago and the safety pan has been quietly carrying the load. Match your pattern to the causes below and you will usually be looking at the right one first.
The causes, in the order they actually happen
1. A clogged drain line — the usual one
This accounts for the large majority of AC water leaks, and it is nearly a design inevitability. The inside of a condensate line is dark, permanently damp and fed a steady diet of dust and skin cells washed off the coil — perfect habitat for algae and the bacterial slime technicians call zooglea, which looks like pale jelly and grows until it plugs the line or the trap. The clog usually forms at the trap or at a low, sagging section of pipe. The tell: the pan is full, the water in it is murky, and the outside drain outlet — which should drip steadily whenever the AC runs — is dry. A system that cooled fine all spring and starts leaking in the first humid month is telling you the line finally closed.
2. A cracked or rusted primary pan
The primary pan lives wet for its whole life, and on older systems it is galvanised steel that eventually rusts through, often at a corner or around the drain outlet where water sits longest. Newer pans are plastic and crack instead, usually from age, heat, or being stepped on during a past repair. The tell: the drain line flows fine when you pour water in, but water still appears under the unit, and close inspection with a flashlight and a dry paper towel finds a wet seam, rust streak or hairline crack. This is the frustrating one, because the fix is cheap in parts and expensive in labour, as the costs section explains.
3. A frozen coil, melting
When airflow over the coil drops too low or the refrigerant charge falls, the coil can drop below freezing and ice itself into a block. The causes are mundane: a clogged filter is the classic, followed by closed or blocked vents, a failing blower, and low refrigerant from a leak. While frozen, the system may barely leak at all — the water is locked up as ice. The flood arrives when the system cycles off or you switch it off: the ice melts, far faster than the pan and drain were sized for, and water sheets off the coil, misses or overflows the pan, and finds the floor or ceiling. The tells: weak airflow from the vents before the leak, a system that ran unusually long, ice visible on the thick insulated copper line at the unit, and a leak that seems to have happened all at once rather than drip by drip.
4. A disconnected or badly sloped drain line
Drain lines get knocked loose during other work, pulled apart at a glued joint that was never glued, or installed with a section that runs uphill or sags into a belly where sludge collects. In a newly bought house, this is a real possibility: the leak starts the first hot week you run the system hard, because the previous owners' mild use never exposed it. The tell: water dripping from a joint, a line you can wiggle at its fittings, or a section visibly sagging between supports. Look along the whole run, not just at the unit.
5. A failed condensate pump
If your air handler sits in a basement or anywhere below drain level, find the pump: a small plastic reservoir box, roughly shoebox-sized, with the drain line running into it and a thinner tube running up and away. Pumps fail by clogging with the same slime as drain lines, by a stuck float inside the reservoir, or simply by the motor dying after years of service. The tell: the reservoir is full to the top and overflowing, the pump is silent when it should hum and push water out periodically, or it hums but nothing moves. Many pumps have a safety switch wired to shut the AC off when the reservoir overflows — if yours does not, an overflowing pump leaks exactly like a clogged drain.
The solution: clear the drain line, step by step
Work this in order. Most leaks end at step 4.
Step 1 — Confirm the outlet is dry. Find where the drain line exits the house. On most homes it is a PVC pipe emerging low on an exterior wall, often near the outdoor unit, and it should drip steadily while the AC runs on a humid day. A dry outlet with a full pan confirms the clog before you touch a tool. Note the secondary drain too, if you have one — if the high pipe is the one dripping, the primary is blocked and the safety pan is carrying the water.
Step 2 — Vacuum from outside. Take a wet/dry vacuum to the outlet, fit the hose over the pipe end, and seal the gap with a rag or duct tape so the suction works on the line rather than the open air. Run the vacuum for two to three minutes. A successful pull is unmistakable: you will hear the note change, and the vacuum will collect a slug of grey-green jelly and dirty water. This outside-in method is the one most technicians reach for first, because it pulls the clog out the way it went in, instead of pushing it deeper.
Step 3 — Flush with vinegar from the cleanout. Inside, at the air handler, find the vertical cleanout tee on the drain line near the coil — a capped stub of pipe. Remove the cap and pour in about a cup of distilled white vinegar. Vinegar kills the algae and loosens the slime film coating the line. Leave it for thirty minutes. If your line has no cleanout tee, note that for the prevention section — having one fitted is a small, worthwhile job.
Step 4 — Test with water, then with the system. Pour a litre or so of clean water into the pan or the cleanout and go outside: it should arrive at the outlet as a steady stream within moments, not a reluctant drip. Then run the AC for fifteen minutes and check three things — the outlet dripping steadily, the pan level low and stable, and no new water anywhere it should not be. Only now is the system allowed back into service.
Step 5 — If the vacuum failed, work from the inside. A clog that will not pull from outside may be packed at the trap. With the system off, you can clear the trap and the accessible line with a small flexible brush made for condensate lines, working gently from the cleanout. Do not use a drain snake meant for plumbing, do not use compressed air at full pressure (it can blow joints apart inside walls), and never pour in bleach or drain opener: bleach attacks the coil and pan metals, and chemical drain openers in a line that may be cracked will put caustic water wherever the leak is.
Step 6 — Check the pans properly. With the line clear and the pan drained, dry the primary pan with a towel and inspect it with a flashlight: rust flakes, orange streaks, hairline cracks at the corners, water weeping from the underside. Fill it with a jug of water and watch for five minutes — a sound pan holds its level; a cracked one betrays itself with a drip underneath. Check the safety pan the same way, and clear its drain line too: the backup needs a working backup path.
Step 7 — Test the float switch. This takes one minute and proves the device that protects your ceiling actually works. With the system set to cool, lift the float switch gently — or pour water into the safety pan until the float rises. The system should shut off. Lower it, and the system should be allowed to restart. A switch that does not cut power, or one you find taped down or bypassed by a previous owner, goes on the pro list below, today.
Finding the system in a house you just bought
Everything above assumes you can put your hands on the parts, and in a house you have owned for six weeks that is not a given. Air handlers hide in attic corners, hall closets, garages and basement ceilings, and nothing about them is labelled for the owner's benefit. So, once the water is stopped, take the full tour while it is fresh in your mind. The air handler is the indoor box the ductwork connects to; the coil section is where the two copper refrigerant lines enter, and the primary pan is directly beneath it. The drain line leaves the pan as a white PVC pipe — follow it with your hand and you will find the trap and, with luck, the capped cleanout tee. Follow it further and note where it goes: out through a wall, down to a floor drain, or into a pump. Then walk outside and find the outlet, and the secondary outlet if there is one, and remember both spots; they are the two places you will check first for the rest of the time you own this house. If the line disappears into a wall or slab with no cleanout anywhere, write "fit a cleanout tee" on the list for the next technician visit — it is a fifteen-minute job during a call-out and it converts every future clog from a fishing expedition into a procedure. Owners who have done this tour once never describe this leak as mysterious again.
When the line or the pan is done: what the pro does
Call a technician when the clog will not clear, when the pan is cracked or rusted through, when the coil froze and you do not know why, or when the pump is dead. Here is what a good visit looks like, so you can recognise one. The tech clears the line with a vacuum or a CO2/air pressure tool in short controlled bursts, then flushes and tests it with water — and finds out where the clog sat, because a clog that forms at a sagging section will form again until the slope is corrected. A pan replacement is the bigger job: the refrigerant coil usually has to be lifted out of the air handler or the coil section opened up, the old pan removed, the new one set and levelled, and the drain reconnected and tested — which is why a part that costs under a hundred dollars produces a bill of several hundred. If the coil froze, the tech's real job is the cause, not the ice: airflow measured, filter and blower checked, and if those are clean, refrigerant pressures tested for the leak that only a certified technician may repair. A dead condensate pump is simply swapped and its safety switch tested. And a competent tech, finishing any of these jobs on an attic unit, will offer the float switch if you do not have one — it is the cheapest ceiling insurance in the whole trade.
Damage triage: the clock that starts when drywall gets wet
The AC repair is the easy half of this problem. The other half is whatever the water reached, and it runs on a mould clock: on wet drywall, insulation and wood, mould can establish within 24 to 48 hours in warm conditions. So the triage happens today, not at the weekend.
- Ceiling stain, drywall still firm: the leak is stopped and the area is small. Dry it actively — a fan aimed at it, the room's AC or a dehumidifier running. Drywall that got damp and dried within a day usually needs only stain-blocking primer and paint once you are sure it is fully dry (a week of dry weather in the room, no musty smell).
- Ceiling sagging or bulging: it is holding water. Keep people out from under it, and if you are comfortable doing so, a small hole at the lowest point with a bucket beneath lets it drain in a controlled way instead of all at once. Sagging drywall that stays soft after drying gets cut out and replaced.
- Wet insulation in the attic: fibreglass batts that have been soaked lose their insulating value and hold moisture against the ceiling board. Wet sections near the unit should be lifted, the area dried, and sodden batts replaced. This is the step everyone skips and the step that keeps the musty smell alive.
- Water into flooring or a closet floor: pull up anything trapping moisture underneath — boxes, rugs, stored items — and dry the floor itself. Water that ran inside a wall cavity is the hidden case: if a wall below the unit is wet to the touch or smells musty days later, that is a remediation conversation, not a paint conversation.
Document as you go: photos of the stain, the pan, the water line on stored items. If the damage turns out to be significant, insurers deal in documentation, and the first day's photos are the ones that matter.
What it costs
If the vacuum-and-vinegar fix works, this problem cost you an afternoon and a cup of vinegar. Professional prices, from the cost table above, sort themselves by which part of the path failed. A pro drain clearing, $125–$300, is the standard bill — you are paying for the visit, the clearing, a flush and a test. A condensate pump replacement, $200–$500, applies only to pumped systems. A primary pan replacement, $300–$700, is the one owners find shocking until they understand the coil has to come out to do it. A float switch installation, $150–$350, is best combined with another visit. And the sobering line in the table is the last one: ceiling drywall repair, $300–$1,000 and up, which is why a leak over a finished ceiling is a same-day problem while the identical leak in a garage is a weekend problem. The repair is never the expensive part of this story. The water is.
Prevention: the twenty-minute-a-year routine
- Vinegar on a schedule. A cup of distilled white vinegar into the cleanout tee every one to two months of cooling season keeps the line's slime film from ever becoming a plug. Put it on the same calendar note as the filter change.
- Change the filter on time. The clogged filter is the first domino in the frozen-coil version of this leak. A filter that looks grey and felted is already late.
- Know your system's geography before it leaks. Find the air handler, the primary pan, the cleanout tee, the outside outlet and the high secondary drain, in daylight, on a dry day. Five minutes with a flashlight now is the difference between a procedure and a panic later.
- Attic units get the full safety layer. Secondary pan drained to a visible spot, and a float switch that you have personally watched cut the system off. If your attic unit lacks a float switch, having one fitted is the single best money in this article.
- Pan tablets are optional, vinegar is enough. Algaecide tablets dropped in the pan monthly work, but they are one more thing to buy and remember; the vinegar routine achieves the same end. Whichever you choose, choose one — the neglected line always clogs eventually.
- After any other work near the unit, check the line. Drain lines are bumped, kicked and disconnected by people doing other jobs. A glance at the joints after any attic or closet work costs nothing.
How urgent is it, really?
The leak itself: today. Not because the air conditioner is in danger — it mostly is not — but because water inside a ceiling or a wall is on a 24-to-48-hour mould clock, and because a small overflow becomes a ceiling collapse only by being left alone. The diagnosis can proceed calmly once the system is off and the water is stopped; the one finding that upgrades everything is a frozen coil with no obvious airflow cause, because that points at refrigerant, and refrigerant is both a certified-technician job and a sign of a leak that will keep costing you money until it is found. Everything else on this page — a clog, a pan, a pump, a switch — is a defined, bounded repair with a known price. Find where your water stopped flowing, clear its path, prove the safeties work, and this most alarming-looking of AC problems turns back into what it usually is: a thumb-width pipe, a cup of vinegar, and an hour.
Cost at a glance
| Item | Typical cost | Notes |
|---|---|---|
| Pro drain line clearing (service call) | $125–$300 | The most common bill for this problem; includes flushing and testing the line |
| Condensate pump replacement | $200–$500 | Only on systems that pump condensate uphill to a drain; the pump itself is $40–$120 |
| Primary drain pan replacement | $300–$700 | The pan is cheap; the labour is not — the coil often has to be lifted or removed to swap it |
| Float switch / safety switch installation | $150–$350 | Cheap insurance for attic units; some techs add it during any drain repair — ask |
| Ceiling drywall repair and repaint | $300–$1,000+ | Per stained section; a collapsed or mouldy ceiling runs well past this |
Frequently asked questions
Why is my AC leaking water inside the house?
Because the water it makes has nowhere to go. Cooling your air wrings moisture out of it — on a humid day a central AC can produce 5 to 20 gallons of condensate. That water is supposed to drip off the indoor coil into a drain pan and flow outside through a PVC line. When the line clogs with algae and sludge (the usual cause), the pan fills and overflows inside the house. A cracked pan, a frozen coil melting off, or a failed condensate pump produce the same puddle by different routes.
Can I keep running the AC while it is leaking?
No. Every hour it runs, it makes more water, and the leak point does not heal itself. Running with a frozen coil can also damage the compressor. Switch the system off at the thermostat, deal with the water, and run it again only once you have watched the drain carry water away properly. A fan-only setting (Fan: On, mode Off) is fine for helping dry things out and thawing a frozen coil.
How do I unclog my AC drain line myself?
Find where the PVC drain line exits the house — usually low on an exterior wall near the outdoor unit, dripping when the AC runs. Fit a wet/dry vacuum hose over the outlet, seal the joint with a rag or tape, and run the vacuum for two to three minutes; you will usually hear and feel the clog of algae and sludge pull through. Then go inside, pour a cup of distilled white vinegar into the line's cleanout tee near the air handler, and let it sit half an hour before running the system and confirming the outlet drips steadily.
What is the white PVC pipe that drips water outside my house?
That is the condensate drain outlet, and dripping while the AC runs is its whole job — a steady drip or thin trickle on a humid day is healthy. Some homes have a second, higher pipe, often above a window or door: that is the secondary drain, and it is plumbed to a conspicuous spot on purpose. Water from the high pipe means the primary drain is blocked and the safety pan is doing the work — it is a warning light, not a nuisance.
Why did my AC shut off by itself with water sitting in the pan?
A float switch did its job. It is a small switch sitting in the drain pan or the secondary pan that kills the system when the water level rises, so the pan cannot overflow onto your ceiling. The AC will not restart until the water is drained and the cause — almost always a clogged drain line — is cleared. Never bypass or tape down a float switch; it is the only thing standing between a $0 clog and a $1,000 ceiling.
How much does it cost to fix an AC that is leaking water?
If you clear the clog yourself with a vacuum you already own, the cost is a cup of vinegar. A professional drain clearing typically runs $125–$300. Replacing a failed condensate pump is $200–$500, and swapping a rusted primary drain pan is $300–$700 because the coil often has to come out. The expensive version of this problem is never the AC repair — it is the ceiling, drywall and flooring damage when a leak runs unnoticed, which starts around $300 and climbs fast.
Will vinegar really keep the drain line clear?
Yes, as maintenance — it is what most manufacturers and technicians recommend. Half a cup to a cup of distilled white vinegar poured into the cleanout tee every month or two during cooling season suppresses the algae and bacterial slime that form the clog. Do not use bleach: it can damage the coil's metal fins and the pan if it splashes, and several manufacturers specifically advise against it. Vinegar prevents clogs; it will not dissolve a solid one — that is the vacuum's job.
Checked November 16, 2026. This guide is general information, not a substitute for a licensed professional.
Related guides
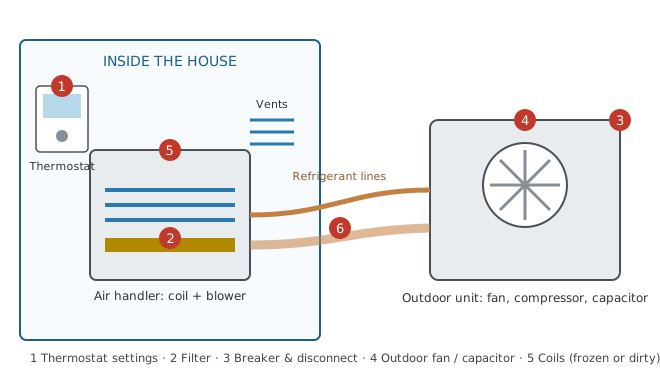
AC Blowing Warm Air? 7 Causes, the Checks in Order, and What Repairs Cost
Your AC runs but the air isn't cold. Start with the thermostat and filter, then learn to read the outdoor unit — humming, silent, or iced over — before you pay for a diagnosis.
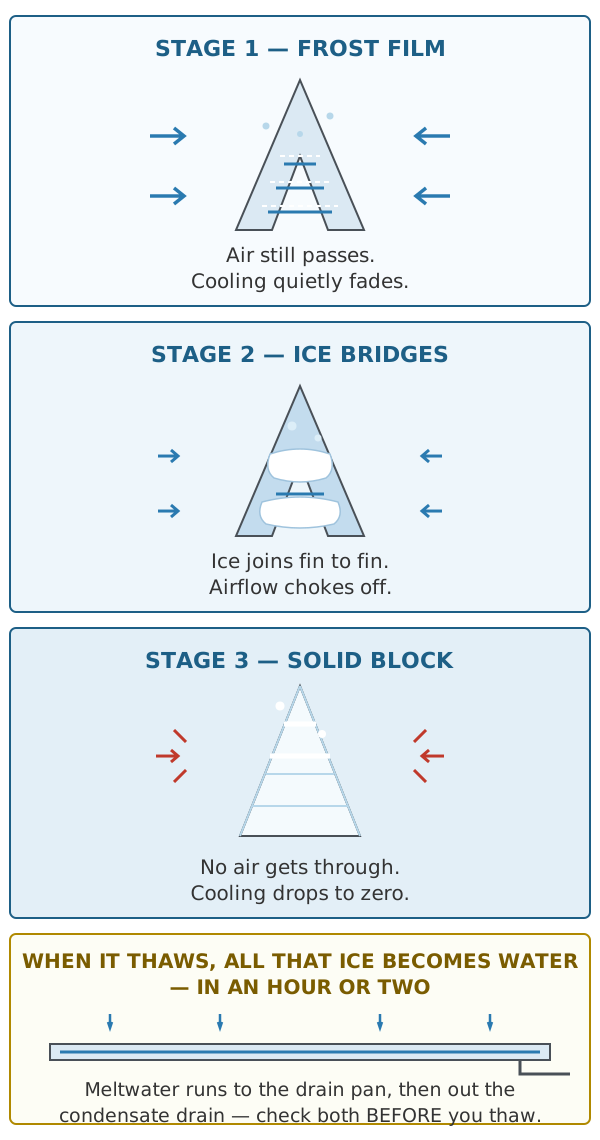
AC Frozen Up? Thaw It Fully, Then Prove Which of the Two Real Causes Did It
Ice on your AC coil means the system is starving for air or refrigerant. Thaw it fully first, then use the refreeze test in this guide to prove which cause you have before paying for a repair.
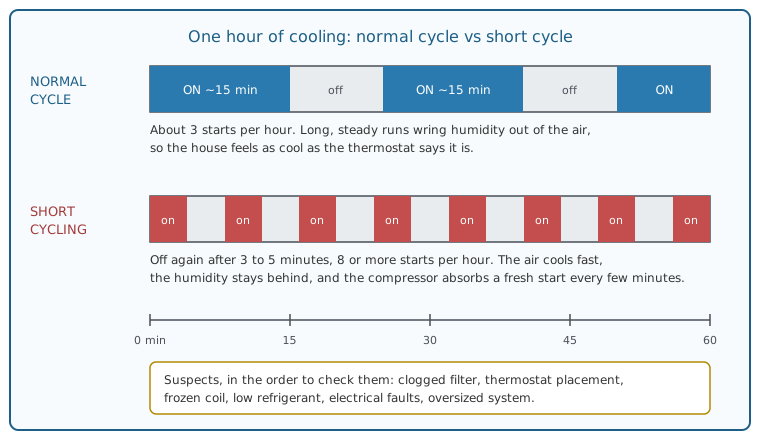
AC Short Cycling: Why Your AC Keeps Turning On and Off
Your AC starts, runs a few minutes, stops, and starts again — all day. Time it with a stopwatch, work through the causes in order, and learn which fixes are yours and which need a technician.