 Keep
Water Heater Not Getting Hot Enough? Measure First — the Temperature Tests That Find the Cause
 Daniel Mercer · Editor & Researcher·
Published November 16, 2026·
Updated November 16, 2026
The complaint is always phrased the same way, and it is worth taking seriously word by word. The water is warm. It is just never hot. Not in the shower with the handle swung all the way over. Not at the kitchen tap first thing in the morning, before anyone has used a drop. Not ever. The tank is not emptying early, the way a failing heater usually announces itself. It is delivering a full tank of water that simply is not hot enough, and it has been doing it so consistently that most owners have quietly adapted: longer showers at full blast, the dishwasher run twice, a suspicion that this is just what the house is like.
It is not what the house is like. A storage water heater has one job with a number attached to it, and the number is printed on a dial you can read. When the delivered temperature and the dial disagree, one of a short list of parts is responsible, and almost every guide on the internet will happily sell you the whole list, one part at a time, in the order that suits a parts supplier. This guide runs the other way. You are going to take one measurement, with a thermometer you already own, and let that single number split the list in half before a dollar moves.
That distinction matters because lukewarm water is a different failure from running out of hot water, and the two get confused constantly, including by plumbers quoting over the phone. Running out is a volume failure: the water starts properly hot and dies early. This is a temperature failure: the water never reaches temperature in the first place, even on the very first draw from a tank that has sat undisturbed all night. The causes overlap at the edges, and where they do, this guide will point you at our companion guide on hot water that runs out fast rather than repeat it. But the centre of this problem is its own: something in your heater is mis-measuring, under-heating, or diluting, and a thermometer can tell you which.
Step one: the thermometer protocol
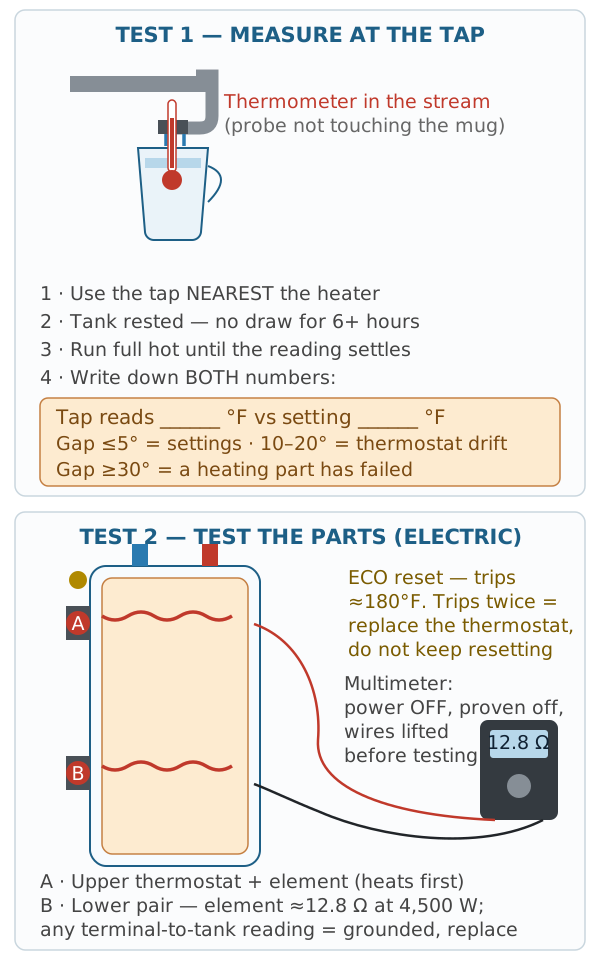
Every diagnosis in this guide hangs off one test, and the test is borrowed from the people who set the safety standards. The U.S. Consumer Product Safety Commission's own method for checking a home's hot water is disarmingly simple: hold a thermometer under the faucet and read the water temperature. No gauges on the tank, no guessing from how the shower feels on your shoulder. Skin is a terrible thermometer, by the way. It adapts, it varies by person, and it cannot tell 108°F from 118°F, which is exactly the gap this whole problem lives in. A five-dollar kitchen thermometer can.
Let the tank rest. The test only means something if the tank starts from a known state: full, and heated to whatever it believes the temperature should be. That means no showers, no laundry, no dishwasher for at least six hours beforehand. Overnight is perfect. First thing in the morning, before the household starts drawing, the tank has had all night to do its best work. Whatever temperature it has achieved by then is the truth about the heater, uncontaminated by demand.
Measure at the nearest tap. Use the faucet physically closest to the water heater — often a utility sink, a downstairs bathroom, or the kitchen if the heater is nearby. Distance costs degrees: a long pipe run sheds heat into the walls, and a far tap can read several degrees below what the tank actually made. Testing at the nearest tap removes the plumbing from the evidence. What is left is the heater itself.
Measure correctly. Run the hot tap fully open and let it run until the temperature stabilises, usually thirty to sixty seconds as the cooled water standing in the pipe clears out. Then hold the thermometer probe in the middle of the stream, or collect the water in a mug and read it immediately with the probe in the water but not touching the mug's sides. Write the number down. Then go to the heater and write down the second number: the thermostat setting, exactly as the dial or the gas control shows it. Two numbers on a scrap of paper. That is the entire instrument kit for the first and most important decision in this guide.
Read the gap. Everything now depends on the distance between your two numbers.
| Tap temperature vs setting | What it means | Where this guide sends you |
|---|---|---|
| Within about 5°F of the setting | The heater is doing exactly what it is told. The argument is about the setting itself | The 120 vs 140 decision, below |
| 10 to 20°F below the setting, consistently | The thermostat is mis-measuring: calibration drift, or a sensor losing contact with the tank | Cause 2: the lying thermostat |
| 30°F or more below the setting | Heat is not being made or not reaching the water: failed element, failing gas control, heavy sediment | Causes 3 to 6 |
| Correct at the nearest tap, lukewarm at one bathroom | The tank is fine. Cold water is crossing into the hot line at that fixture | Cause 7: the local dilution |
| Correct in the morning, fades oddly under use | You may have a volume problem wearing a temperature costume | Our hot-water-runs-out-fast guide, after the two paragraphs below |
Notice what this table has already done. If your gap is small, you will not be buying elements. If your gap is huge, you will not be wasting a Saturday adjusting dials. The owners who spend the most on this problem are the ones who start replacing parts in the order a search result listed them. You now know which third of the cause list is yours. Before we open it up, though, there is a prior question the small-gap readers have to settle, and it is the one with genuine stakes in both directions: what should the setting be in the first place?
The setting itself: 120, 140, and the valve that ends the argument
If your thermometer says the heater is faithfully delivering what it is set to, your problem is a decision, not a defect — and it is a more serious decision than the dial makes it look, because the two risks pull in opposite directions and both are real.
The scald side. The Department of Energy recommends 120°F as the standard household setting, and the Consumer Product Safety Commission's Publication 5098, its safety alert on tap water scalds, is the reason why. Skin burns on a curve that steepens brutally with temperature:
| Water temperature | Time to a serious burn (adult skin) |
|---|---|
| 120°F | About 5 minutes or more |
| 130°F | About 30 seconds |
| 140°F | A few seconds |
| 150°F | About 2 seconds |
Read the bottom of that table again. At 150°F, the water injures faster than a person can react, and children and older adults burn faster than the adult figures suggest because their skin is thinner. This is why 'just turn it up' is not a casual answer to lukewarm water. Every degree you add above 120 is bought with reaction time, and the currency is spent by the most vulnerable person in the house.
The bacteria side. The opposing risk is slower and quieter. Legionella, the bacterium behind Legionnaires' disease, grows in warm water and grows best in roughly the 77 to 113°F band — which is to say, it thrives in a water heater set too low, and it is killed at temperatures around 140°F. Health guidance aimed at Legionella therefore points the other way from the scald guidance: store hot water at 140°F or above. A tank that has sat at 105 or 110°F for years because a thermostat drifted is not just a comfort failure; it has been holding water in the growth band indefinitely. For most healthy households the practical risk is low, but for anyone immunocompromised it is a genuine consideration, and it is the reason this guide treats a badly drifted thermostat as more than an annoyance.
The resolution. Plumbers who deal with both risks install the same device: a thermostatic mixing valve at the tank outlet. The tank stores water at 140°F, hot enough that Legionella cannot thrive in it. Every drop leaving the tank passes through the valve, which blends in cold water and delivers a steady 120°F to the house. Scald risk at the taps stays at the safe setting; the storage risk disappears; and as a side benefit, the hotter storage stretches your usable hot water, because every shower mix uses less from the tank. If your thermometer test says the heater is healthy and your household is arguing about the dial, this valve, fitted by a plumber for roughly $350 to $650, is the grown-up answer. It is also the answer if you simply want 140°F storage for a large household's demand without handing anyone a two-second burn.
One more setting note before we move to the failures. Many gas water heaters do not show numbers on their control at all. They show words and letters: Warm, Hot, then A, B, C, then Very Hot. On many common controls those letters correspond, roughly, to Hot at about 120°F, A at about 130°F, B at about 140°F, and C at about 150°F, with Very Hot near 160°F. The mapping varies by brand, so check the manual or the manufacturer's chart for your model — but know that a control left sitting between Warm and Hot may be storing water at 100 to 110°F while the owner swears it is 'turned up'. On an electric tank, the thermostats hide behind access panels, there are two of them, and they left the factory at 120°F; a previous owner who raised only one has built a heater that disagrees with itself. Which brings us to the causes, in the order you should check them.
How your heater decides the water is hot enough
Thirty seconds of mechanism now, because every cause below is a corruption of it.
An electric tank has two heating elements and two thermostats, one pair near the top and one near the bottom, and they work in sequence, not together. When the tank is cold, the upper thermostat takes power first and heats the top portion. Only when the top reaches its setting does the upper thermostat hand power down to the lower pair, which heats the rest. This is why the failure signatures differ: if the upper element or thermostat dies, the lower pair never receives power at all and you get no properly hot water. If the lower element dies, the top heats beautifully and the tank behaves like a much smaller heater — which is a volume failure, and it has its own guide. For a pure temperature failure on an electric tank, the suspects are a thermostat whose sensing has drifted, an element that has shorted to its sheath and heats weakly and wrongly, or an element of the wrong wattage fitted in a previous repair, quietly under-powering every recovery.
A gas tank has one decision-maker: the gas control valve on the front of the tank. It holds the temperature dial, a sensor probe that reaches into the tank's water, the pilot assembly, and the valve that feeds the main burner underneath. When the sensor says the water is below the setting, the control opens and the burner fires; when the sensor is satisfied, it closes. Nearly every gas-side temperature failure is this one part lying or weakening: a sensor that reads the water as hotter than it is, so the burner shuts off early, or a valve that no longer opens fully, so the burner under-fires. The thermocouple, by contrast, only guards the pilot; a pilot that stays lit happily while the water stays lukewarm has already cleared the thermocouple of suspicion.
In both designs, the pattern to hold in your head is the same. Something measures, something heats, and the water either reaches the number or it does not. The causes below are just the ways the measuring and the heating come apart.
Cause 1: the setting is not where you think it is
Check this first because it is free, commoner than any part failure, and faintly embarrassing, which is why it gets skipped. Settings change without the owner's knowledge. A gas control gets knocked by a stored paint can or a curious child. An electric tank's thermostats get adjusted during some long-forgotten repair and set back wrong, or set back differently from each other. A vacation or 'warm' setting chosen for a trip never gets restored. A house changes hands and the new owner inherits a dial position nobody chose for them.
The check takes two minutes. On a gas heater, read the control: if it shows letters, translate them with the manufacturer's chart before concluding anything, and if the tank has been sitting at 'Hot' minus a notch, you may have found your whole problem. On an electric heater, kill the power at the breaker, remove both access panels and the insulation, and read both thermostat dials. They should match each other and match your intention, conventionally 120°F. If one says 120 and the other says 100, the tank has been heating to a compromise you never agreed to.
While the panels are open on an electric tank, look for the red reset button on the upper thermostat. That is the ECO, the energy cut-off, a one-shot safety switch that trips at around 180°F and kills power to the whole heater. If it has tripped, press it once, restore power, and watch what happens over the next day. A single trip after, say, a power surge can be an event. A reset that trips again is a message, and it gets its own cause below, because resetting it repeatedly is how a small fault is invited to become a dangerous one.
Correct the setting, give the tank a few hours to reheat fully, and repeat the thermometer protocol the next morning. If the gap has closed, you are done, and the repair cost you a scrap of paper. If the dial now says one number and the tap still insists on another, the thermostat is not confused about its orders. It is failing to carry them out.
Cause 2: the thermostat that lies — calibration drift
This is the signature finding of the thermometer protocol: the tap sits 10 to 20°F below the setting, day after day, with the heater cycling on and off in a perfectly orderly way. Nothing is broken in the sense of stopped. The heater simply believes the water is hotter than it is, and stops heating early, every time, with total confidence.
Water heater thermostats are bimetal devices. A strip of two metals bends with temperature and makes or breaks the circuit, and the sensing surface sits pressed against the outside of the tank wall, reading the water temperature through the steel. Three things corrupt that reading over a heater's life. The bimetal itself fatigues and its calibration wanders, almost always in the direction of reading hot. The sensor's contact with the tank wall degrades, particularly if a previous repair left it loosely seated, and it begins reading a blend of tank temperature and the room air inside the jacket, which in a warm utility space can flatter it further. And scale and sediment inside the tank, at the exact height of the lower thermostat, can insulate the wall so the sensor feels a different temperature from the water a few inches away.
The reason this cause deserves its own section rather than a line in a list is that it is chronically misdiagnosed in both directions. Owners replace elements that test perfectly. Plumbers quote new heaters for tanks with a $20 fault. And a second group of owners does the opposite: they compensate by turning the dial up 15 degrees, which restores the shower and conceals the drift, until the drift grows past the dial's range or the same thermostat's high-limit behaviour degrades with it. A thermostat that cannot be trusted at 120 cannot be trusted at 140 either.
The test is the one you have already done: a stable, repeatable gap between setting and delivery, with normal cycling. On an electric tank you can confirm with the multimeter checks in the next section, because a drifted thermostat still shows correct continuity behaviour; it is the temperature at which it switches that has moved, and no ohmmeter reads that. Diagnosis here is the thermometer's job. The fix is replacement of the thermostat, and it is covered in the solutions section: a $15 to $30 part, an hour of careful work, and a heater that starts telling the truth again.
Cause 3: electric elements and thermostats, tested properly
If your gap is large — the tap running 30°F or more below the setting on an electric tank — it is time to open the access panels and use a multimeter. This is the section the listicles skip, because values are harder to write than adjectives. Here are the values.
Safety discipline, without exception. Turn the breaker off. Then, before your fingers go anywhere near a terminal, set the meter to AC volts and measure across the element terminals and from each terminal to the tank. The meter must say zero, or so close to zero that it is clearly noise. Breakers get mislabeled. Panels get rewired by optimists. The meter is the only opinion that counts, and this thirty-second habit is what separates a testing procedure from an accident. Treat every wire as live until your own meter, in your own hands, says otherwise.
Test the elements. With the power proven off, pull the two wires off the element's terminals. Set the meter to ohms and measure across the two terminals. An element is a coil of resistance wire, and its resistance is fixed by its rating: resistance equals voltage squared divided by watts. For the standard 240-volt elements, that gives you this table.
| Element rating (240 V) | Expected resistance | Reading that condemns it |
|---|---|---|
| 1,500 W | About 38 ohms | Infinite (open) or near zero (shorted) |
| 2,500 W | About 23 ohms | Infinite or near zero |
| 3,500 W | About 16.5 ohms | Infinite or near zero |
| 3,800 W | About 15 ohms | Infinite or near zero |
| 4,500 W | About 12.8 ohms | Infinite or near zero |
| 5,500 W | About 10.5 ohms | Infinite or near zero |
Smaller 120-volt elements exist on small point-of-use tanks: a 1,500-watt, 120-volt element reads about 9.6 ohms and a 2,000-watt about 7.2. Whatever the rating, allow roughly ten percent either side of the table value for meter accuracy and manufacturing tolerance. Three readings matter. A reading in range means the coil is intact. Infinite resistance — the meter showing overload, exactly as it does with the probes held apart in the air — means the coil has burned through and that element makes no heat at all. And a reading of a few ohms, far below the table, means the coil has partially shorted, which produces weak, wrong heat and often a breaker that trips at odd moments.
Then run the second element test, the one most owners miss. Leave one probe on a terminal and touch the other to the bare metal of the tank or the element's own mounting flange. The meter should show infinite resistance: the coil is sealed inside its metal sheath and must have no electrical path to the tank. Any continuity there means the sheath has cracked and the coil is leaking current into the water and the tank body. A grounded element can keep heating when its thermostat has switched off, fed by the other leg of the circuit, which produces a bizarre signature all of its own: water that overheats at rest, an ECO that trips, then lukewarm chaos after the reset. Grounded elements are replaced, never monitored.
Test the thermostats. With the wires lifted and the tank cold, measure continuity across each thermostat's terminals. A thermostat that is calling for heat — which a cold tank should be asking for — shows continuity. Turn its dial slowly and you will hear and feel a click near the point where the setting passes the water's actual temperature; continuity should break and remake either side of that click. A thermostat with no continuity on a cold tank has failed open and will never call for heat. One with continuity that never breaks as the dial sweeps is failed closed, which is the overheating fault that trips the ECO. What the meter cannot show you is calibration: a drifted thermostat clicks at the wrong temperature while passing every continuity test perfectly, which is why the thermometer protocol, not the meter, is the judge of Cause 2.
The ECO that keeps tripping. The red reset button deserves a final word, because it is the most misread signal on the whole appliance. The ECO is a manual-reset high-limit switch that trips at around 180°F. It does not trip because the water was a little warm. It trips because the tank overheated badly, and the usual reason a tank overheats is a thermostat whose contacts have welded closed, calling for heat without end, or a grounded element heating outside the thermostat's control entirely. Pressing the reset and walking away treats the alarm as the fault. If your ECO trips a second time, the diagnosis is already made: test the elements for a ground fault and plan on replacing the thermostat. Both are in the solutions section, and neither is optional maintenance you can defer while resetting a button every few days.
Cause 4: the gas control valve — under-firing and reading wrong
On a gas heater with a big temperature gap, the evidence arranges itself differently. The pilot is lit and stays lit. The burner fires when the tank is drawn down. But the flame looks lazy, or the burner shuts off after a few minutes with the tank still far from its setting, or the burner runs and runs and the water climbs with painful slowness. All three signatures live in the same part: the gas control valve, the combined dial, sensor and valve on the front of the tank.
The control's temperature sensor is a probe that sits in the tank water at the back of the unit. Like the electric thermostat, it can drift, and when it reads the water as hotter than it truly is, the control closes the burner down early and delivers a tank of water heated to a number the dial never asked for. Unlike the electric case, you cannot separate sensor from valve: the control is one sealed assembly, and when any part of its judgement fails, the assembly is replaced whole. The valve side fails too. A control that no longer opens fully starves the burner, and a starved burner under a 40-gallon tank produces exactly your complaint — water that gets warm, eventually, and never gets hot.
Two checks are yours to make before anyone is called. First, watch a full heating cycle after a heavy draw, like a shower. The burner should light with a strong, steady, mostly blue flame and run continuously until the tank approaches its setting, which after a big draw takes a while. A burner that cuts out after two or three minutes, rests, relights, and repeats is short-cycling on its own sensor's bad information. A flame that stays small and yellow-tipped throughout is being under-fed or is dirty, and burner cleaning is part of what a service visit covers. Second, translate the dial honestly using the letter mapping from the settings section; more than a few 'failed controls' are controls set to a letter the owner misread.
Everything beyond observation is a plumber's. The control is threaded into the tank and connected to the gas supply; replacing it means draining the tank, breaking and remaking a gas connection, and leak-testing the result. What the plumber does, how long it takes, and what the quote must say are laid out in the solutions section. Budget on the part at $150 to $300 and the whole job at $300 to $550, and hold that figure against the tank's age before you approve it, for reasons the replacement section makes plain.
Cause 5: sediment — the blanket between the fire and the water
Sediment is the slow cause, the one that arrives by degrees over years, which is why owners adapt to it instead of diagnosing it. Every tank accumulates mineral sediment at its floor, fastest in hard-water country. On a gas heater, that layer sits directly between the burner and the water. The burner heats the sediment; the sediment, eventually and inefficiently, heats the water above it. Heat transfer falls, burner runs lengthen, fuel bills creep, and the delivered temperature sags — a heater working harder to achieve less, which is the thermodynamic portrait of your complaint. The popping and rumbling that often accompany it is steam forming under that layer, and it has its own guide on this site; here, the point is the temperature cost. On an electric heater, sediment buries the lower element, which then overheats inside its mineral overcoat and burns out early — sediment is the leading reason lower elements die young — and it insulates the lower thermostat's patch of tank wall, corrupting its readings into the bargain.
The test is crude and effective. Drain a few gallons from the tank's drain valve into a white bucket, power and fuel managed as the flush guide describes. Grit, flakes and cloudy water confirm the layer. The fix is a proper flush, and if the tank has gone a decade unflushed, the honest warning is that the sediment may have hardened past what flushing can move, which is one of the ways an old tank talks you into replacing it. A tank that recovers its temperature after a thorough flush has told you the cause was the blanket, not the burner or the control. Cross-check with our water heater flushing guide for the full procedure, and note the prevention maths: an annual flush is an hour; a gas control replaced because sediment cooked the tank's floor is $300 to $550 and up.
Cause 6 and 7: the two that are not the heater at all
Crossover dilution. If your thermometer reading at the nearest tap was correct but one bathroom runs lukewarm, cold water is crossing into the hot line at a single-handle fixture — most often a shower valve whose cartridge seals have failed, letting pressurised cold water push into the hot side and blend down everything downstream of that fixture. It is one paragraph here because the deep test procedure, isolating fixture by fixture, lives in our hot water runs out fast guide, where crossover appears as the great impersonator of tank failure. What belongs in this guide is the boundary line: correct temperature at the tap nearest the heater acquits the heater, completely, and no part fitted to the tank will fix a shower cartridge.
The dip tube, briefly. A dip tube that has cracked partway down can spill incoming cold water into the upper tank, where it tempers the hottest water before it leaves — usually a volume symptom, occasionally a mild temperature one, and betrayed by white or pale plastic flecks caught in faucet aerators. It earns a paragraph, not a section, for the same reason: the full diagnosis and the replacement are covered in the runs-out-fast guide, and fitting this guide's thermometer protocol first is what tells you whether you even need to go there. If your rested, nearest-tap reading is low, your fault is in the measuring or the heating. If it is correct and the showers still disappoint, cross over to the companion guide with your two numbers in hand.
The fixes, cause by cause
Diagnosis was the hard part. Most of the repairs below are an hour's work, and two of them are among the most satisfying in all of home maintenance, because the part costs less than the thermometer of doubt that preceded it.
Replacing an electric thermostat (DIY, about an hour). Breaker off, and proven off at the terminals with your meter. Photograph the wiring before touching it; thermostat terminals are a small maze and the photograph is your map. Move one wire at a time from the old thermostat to the matching terminal on the new one, so the maze is never fully dismantled. The critical detail is the sensor: the thermostat's back must sit flat and tight against the tank wall, because a sensor floating in jacket air is a new liar installed to replace the old one. Set both thermostats to the same temperature, 120°F unless you have fitted a mixing valve. Insulation back, covers back, power on, and the next morning's thermometer reading is your verdict. If the ECO was tripping, replace the thermostat on principle even if its continuity tests passed: welded contacts are intermittent liars too.
Replacing a heating element (DIY, one to two hours). Power off and proven off. Shut the cold supply, open a hot tap to break the vacuum, and drain the tank below the level of the element you are changing — the upper element needs only a few gallons out, the lower needs the tank drained well down. Unscrew the old element with an element wrench, expect a brief spill, and fit the new element with its new gasket, snug and even. Match the replacement's wattage and voltage to the old element's stamp exactly; a bargain element of the wrong wattage installs a new fault with your own hands. Then the rule that saves elements and weekends: refill the tank completely, with a hot tap open until water runs from it in a steady stream and the air is purged, before the breaker goes back on. An element energised in air — dry-fired — burns out in under a minute, and it does so silently, so the new part is dead before its first shower. Power last, always.
The gas control valve (pro, two to three hours). Here is what you are paying for, so you can judge the visit. The plumber drains the tank, shuts off and disconnects the gas line, unthreads the old control from the tank, fits the new control with fresh sealant, reconnects and leak-tests every disturbed gas joint, refills the tank, relights the pilot, and then — the step that separates a repair from a part swap — verifies the delivered temperature at a tap against the new control's setting. The written quote should name the control by brand and model, state whether the thermocouple is being replaced with it (cheap insurance while the assembly is apart), include the leak test and the temperature verification, and carry a parts-and-labour warranty of at least a year. A quote that is one line and one number, for the part at the heart of your gas supply, is a quote to decline.
Fitting a mixing valve (pro, about an hour). The plumber cuts the valve into the hot outlet at the top of the tank, sets the tank control to 140°F, and dials the valve's output to 120°F, verified with a thermometer at the nearest tap — your thermometer protocol, run by the person who fitted it, before they leave. The quote should specify a thermostatic mixing valve rated for water-heater duty, its set temperature, and the verification step. After this visit, your tank stores hot enough to suppress Legionella and your taps deliver at the scald-safe setting, and the dial argument in your house is permanently over.
Repairing a crossover (pro, or a confident DIY cartridge swap). The plumber's first move is confirmation, isolating fixtures until the dilution stops, because replacing the wrong cartridge is the standard wasted callout in this corner of plumbing. The repair itself is usually a shower or faucet cartridge replacement, seals and all, at $200 to $450 depending on the fixture. The quote should say which fixture was isolated as the culprit and how it was proven. If nobody can prove which fixture is crossing over, nobody should be selling you a cartridge yet.
What it costs, and how the quotes compare
The front of this guide carries the summary table; here is how to use it. The pattern across every row is that the part is cheap and the visit is the cost, which is why bundling matters: a plumber already standing at your tank should test both elements and both thermostats, flush the sediment while the tank is drained for an element, and replace a thermocouple while a gas control is off. Each of those is minutes of extra work inside a visit you have already bought, and hundreds if purchased as separate callouts later.
Judge any single repair against two numbers. The first is the tank's age: the standard tank's realistic life is ten to twelve years, and a $300 to $550 gas control fitted to an eleven-year-old tank is money invested in a shell that may split next winter. The second is the replacement benchmark: a new 40- to 50-gallon tank, installed, typically runs $1,200 to $2,800 depending on fuel and market. A repair above roughly a third of that figure, on a tank past its tenth year, needs a specific argument in its favour — a sound shell, a recent anode, a household budget that demands it — and 'the plumber is already here' is not one. The Department of Energy's sizing guidance, linked in the sources, is the right reading if you land on replacement: a new tank chosen by first-hour rating rather than by matching the old one's gallons is the one upgrade this whole miserable experience can buy you.
DIY or call a pro: the honest split
Do it yourself, with confidence, if your heater is electric and your tests have convicted a thermostat or an element. The parts are cheap, the procedure is methodical, and the only unforgiving step is electrical discipline, which is a habit, not a talent: breaker off, proven off with the meter, power restored only to a full tank. Add the thermometer protocol, the dial corrections, the sediment check and the morning-after verification, and the entire diagnostic half of this guide is owner territory.
Call a plumber for anything that touches gas, without a category of exception: the control valve, the burner, the flue. Call one for the mixing valve unless you are genuinely fluent in cutting and joining your home's pipe material, because a leaking joint above a water heater undoes the point of the exercise. Call one for a crossover you cannot isolate to a single fixture. And call one, whatever the fuel, when the tank shows rust at its base, water in the pan, or a serial number that makes it a teenager: at that point the professional's real product is not the repair, it is the judgement about whether any repair should happen at all.
Urgency, stated plainly
Lukewarm water can wait for a planned fix, and this guide's whole method — rest the tank overnight, measure in the morning — assumes a household that is inconvenienced, not endangered. Hold three exceptions in view. A tank that has lived for a long time well below 120°F, in a home with an immunocompromised person, should have its setting resolved this week, ideally with the mixing valve that resolves it safely. A tank you have turned up in frustration should be measured today, because the scald table does not care about your intentions. And the moment this problem keeps company with a gas smell, a breaker that trips on reset, or water appearing at the tank's base, it stops being this problem: those are the emergency pages of this site, and they outrank everything written here.
The short version
Rest the tank. Measure at the nearest tap. Write down two numbers. A small gap is a settings decision, and the safe form of that decision is 120°F at the taps with a mixing valve if you want 140°F in the tank. A medium gap is a thermostat that has started lying, and it costs less than a night out to replace. A large gap is a failed heating part — an element you can test to the ohm, or a gas control you should hand to a plumber with a checklist of what the quote must contain. A gap that exists only in one bathroom is not the heater at all. The owners who overpay for this problem are the ones who start with the parts catalogue. You started with a thermometer, which is why you will not be one of them.
Cost at a glance
| Item | Typical cost | Notes |
|---|---|---|
| Thermostat replacement (pro) | $150–$250 | The part is $15–$30; you are paying for the visit. Both thermostats should be tested, not just the one that failed |
| Heating element replacement (pro) | $200–$350 | Part $10–$60. A realistic DIY at $20–$60 in parts if you own a multimeter and follow the power-off rules in this guide |
| Gas control valve replacement (pro only) | $300–$550 | Part $150–$300 and 2–3 hours of work. On a tank past ten years old, price a new heater before you approve this |
| Thermostatic mixing valve fitted at the tank | $350–$650 | The valve that ends the argument: store at 140°F for Legionella control, deliver 120°F to the taps |
| Crossover repair at a fixture (pro) | $200–$450 | Usually a failed single-handle shower or faucet cartridge letting cold water bleed into the hot line |
Frequently asked questions
Why is my hot water only lukewarm, even with the tap on full hot?
Because somewhere between the burner or element and your tap, temperature is being lost or never made. The short list: the thermostat is set lower than you think, the thermostat is set right but its sensor has drifted so it heats to less than the dial says, a heating element or the gas control is underperforming, sediment is insulating the bottom of the tank from its own heat source, or cold water is crossing into the hot line at a single-handle fixture and diluting every draw. A two-minute thermometer test at the tap nearest the heater, after the tank has rested, tells you which family you are in before you spend anything: near the setpoint means a settings argument, far below it means a failed part.
How hot should the water at the tap actually measure?
Within about 5°F of whatever the tank is set to, at the tap nearest the heater, after the tank has rested and heated fully. Most homes are set to 120°F, so expect roughly 115 to 120°F at that first tap. Taps further away read a few degrees lower because the pipe run sheds heat, which is normal. What is not normal is a big gap at the nearest tap: 10 to 20°F below the setting points at thermostat calibration, and 30°F or more below points at a part that makes or delivers heat having failed. Measure in the morning before anyone showers, with a kitchen or meat thermometer held in the stream, not touching the mug.
Can a thermostat be set right but still heat wrong?
Yes, and it is one of the most common findings in this whole diagnosis. Water heater thermostats are simple bimetal devices, and as they age their calibration drifts: the dial says 120°F, the sensor behaves as if it were set to 105°F, and the tank obediently heats to the wrong number for years. The thermometer protocol exposes it in one reading — the tap temperature sits stubbornly 10 to 20°F below the setting, the heater cycles normally, and nothing else is wrong. The fix is a replacement thermostat, a $15 to $30 part, not a new water heater. Turning the dial up to compensate works until the drift grows, and it hides the fault instead of fixing it.
How do I test a heating element and thermostat with a multimeter?
Power off at the breaker first, then prove it is off by measuring voltage at the element terminals — treat the tank as live until the meter says otherwise. With the power off, lift the wires off the element and measure resistance across its two terminals. A healthy 4,500-watt, 240-volt element reads about 12.8 ohms; 5,500 watts reads about 10.5, 3,500 watts about 16.5. Infinite resistance means the coil has burned open. Any reading from a terminal to the bare tank means the element is shorted to its sheath and must be replaced. For a thermostat, measure continuity across its terminals with the tank cold: a thermostat calling for heat shows continuity; one that shows none on a cold tank has failed. Every value you need is in the table in this guide.
Why is the water hot at one faucet but lukewarm at another?
That split is the most useful clue in the whole problem, because it clears the water heater. If the tap nearest the heater measures at the setpoint, the tank is making hot water correctly, and the lukewarm tap is being diluted locally. The usual culprit is a failed cartridge in a single-handle shower or faucet: cold water crosses inside the valve body into the hot side and blends down everything that fixture delivers. A tempering or mixing valve at that fixture can do the same when it fails. Test two or three taps before you conclude anything: hot everywhere except one room is a plumbing fault in that room, not a heater fault.
Is 120°F hot enough, or should I turn the heater up?
It depends on which risk you are managing, and the honest answer is that the two official recommendations point in opposite directions. The Department of Energy and the Consumer Product Safety Commission say 120°F, because hotter water scalds: at 150°F a serious burn takes about two seconds, at 120°F it takes minutes. Health guidance aimed at Legionella bacteria points the other way, because Legionella grows best in warm water below about 120°F and is killed at 140°F. The resolution plumbers actually install is a thermostatic mixing valve at the tank outlet: store the water at 140°F, where bacteria cannot thrive, and let the valve blend it down to a safe 120°F on the way to the taps. That is the correct answer for most houses, and it is covered in this guide.
When is lukewarm water a sign I should replace the heater instead of repairing it?
When the failed part costs real money and the tank is old. A thermostat or an element is cheap at any age. A gas control valve at $300 to $550 on a tank that is ten or more years old is a different calculation: the tank itself is statistically near the end of its life, and the next failure is already on its way. Add the heater's age, any rust at the base, rumbling that flushing no longer cures, and a repair quote above roughly a third of the installed cost of a new heater — around $1,200 to $2,800 for a standard tank — and replacement usually wins. If the tank is under eight years old and the shell is sound, repair it without a second thought.
Checked November 16, 2026. This guide is general information, not a substitute for a licensed professional.
Related guides
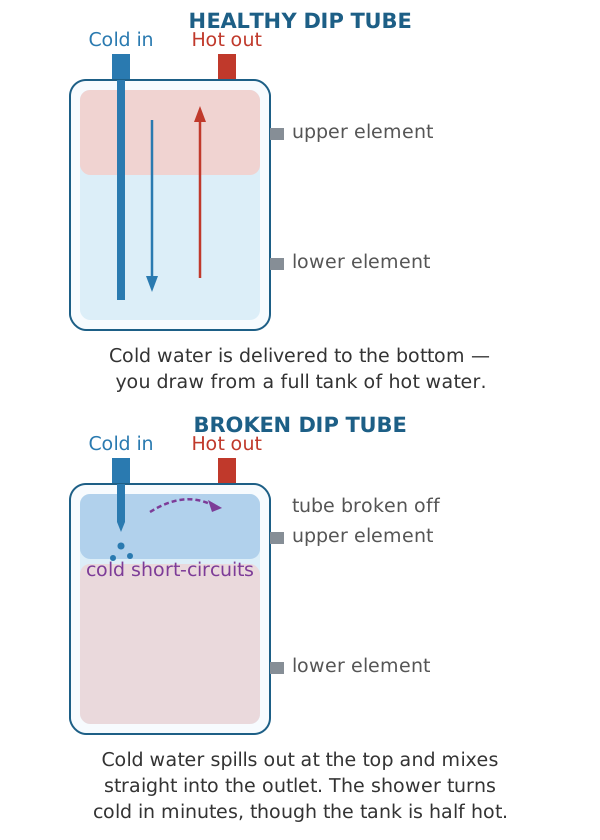
Why Your Hot Water Runs Out So Fast — and the Bucket Test That Tells You Why
Showers going cold in minutes? The bucket test measures how much hot water your tank actually delivers, then splits the causes: broken dip tube, dead lower element, sediment, thermostat, cross-connection, or a tank that is simply too small now.
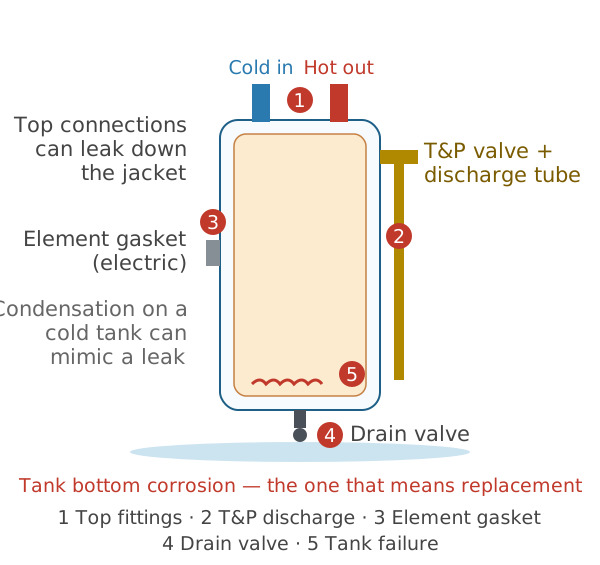
Water Heater Leaking From the Bottom? Find the Real Source Before You Replace It
Water at the base of a water heater has five possible sources — and only one of them means a new tank. The dry-and-trace test, the T&P warning, shut-off steps, and 2026 costs.
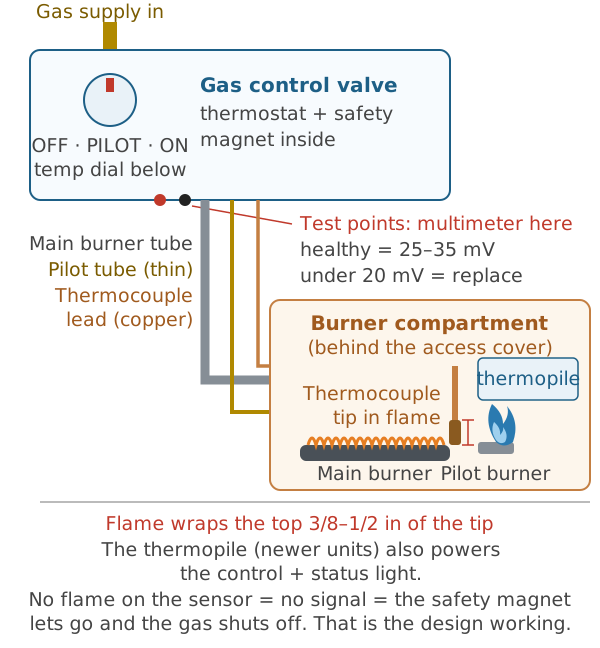
Pilot Light Won't Stay Lit? The Thermocouple Test Before You Replace Anything
The pilot lights, then dies when you release the knob — or hours later. Work through the timing triage, the correct relight, the millivolt test, and the thermocouple swap, in that order.