 Keep
How to Shock Chlorinate a Well: Dose, Steps, and the Retest That Proves It Worked
 Daniel Mercer · Editor & Researcher·
Published November 16, 2026·
Updated November 16, 2026
A lab report with the word "positive" next to coliform bacteria is the moment most well owners first hear the phrase shock chlorination. It sounds dramatic. It is actually the most routine repair in well ownership: a measured dose of ordinary bleach, one afternoon of methodical work, a day of patience, and a follow-up test. Done properly, it clears a one-time contamination event completely. Done casually, with a guessed dose and no retest, it clears nothing but your schedule.
This guide is the full version: how to work out the dose from your own well's paperwork, how to protect the softener and filters the chlorine would damage, the extension-service procedure step by step, how to flush hundreds of gallons of chlorinated water without knocking out the bacteria your septic tank depends on, and the retest schedule that separates "probably fine" from proven. If your positive result is fresh and you have not read it yet, start with How to Test Your Well Water: What to Test, How Often, and What It Costs; this post picks up exactly where that one ends.
When shocking is the right move, and when it is pointless
Shock chlorination does one job well: it kills bacteria that are in the well and the plumbing right now, including the slime layer (biofilm) on the casing walls where bacteria shelter. Penn State Extension lists the situations it is built for, and they share a pattern: a single event let bacteria in, and the door has since closed.
- A positive coliform test with no obvious ongoing cause. In Penn State's survey of 450 Pennsylvania wells, about 35% carried coliform bacteria, so a positive result is common, and many trace to a one-off incident.
- After well work. A new pump installed, the cap removed for repairs, a new well commissioned: every time the system is opened, the standard practice is to disinfect it before it goes back into service.
- After flooding or extreme rain. Water over the wellhead, or runoff pooling around it, can carry surface bacteria straight down the casing.
- After a cap or casing repair. You fixed the entry point; now clear whatever used it while it was open.
The pointless cases share the opposite pattern: the door is still open. If the casing is cracked, the wellhead sits buried or in a pit that floods, the grout seal has failed, or a septic system is leaking uphill of the well, bacteria have a continuous supply route. Shocking that well is mopping the floor with the tap running. You will get a clean test if you take it quickly, a dirty one a month later, and a drawer full of bleach receipts. The honest order of work is: find and fix the pathway, then shock, then retest. Section nine below covers what the research says about wells that keep failing, because it changes the decision from "shock again" to "treat continuously."
One more expectation to set before you start: shock chlorination is a disinfection, not a cleaning and not a treatment system. It does nothing for nitrate, iron, hardness, or chemicals. A sediment- or slime-fouled well may need physical cleaning by a contractor first, or the chlorine never reaches the bacteria hiding in it.
Safety and prep: the hour before the bleach
Nothing in this job is exotic, but it concentrates several small hazards in one afternoon: a strong oxidiser, an open well, a pump you will switch off and on, and a household that needs to know the water is off-limits for drinking until a lab says otherwise. Mississippi State Extension's preparation list is the right shape; here it is expanded into the order that works in a real house.
Tell the household and stock drinking water. From the moment the bleach goes in until the retest comes back clean, the tap water is not for drinking, cooking, ice, or baby formula. Fill every jug you own, or buy a case of bottled water, before you start. Laundry waits too: strong chlorine bleaches fabric.
Pick the right bleach. Regular, unscented, liquid household bleach, less than six months old (chlorine strength fades in storage, and an old jug under the sink may be well below its label strength). No scented, no splash-less, no colour-safe: the additives and thickeners in those products do not belong in a drinking well, and colour-safe bleach is a peroxide product that will not disinfect at all. Note the concentration on the label, 5.25% or 8.25% sodium hypochlorite, because the dose table below has a column for each.
Protect yourself. Gloves and eye protection while handling the bleach, and old clothes. Work outdoors or with ventilation when you mix. And the rule that outranks every other in chlorine work: never mix bleach with anything except water. Not vinegar, not ammonia, not another cleaner; those combinations make gases that injure lungs fast.
Know your pump type and your well's condition. The standard extension procedure, including Mississippi State's, is written for wells with submersible pumps in sound condition. If your well uses a jet pump, or the well itself is damaged (a cracked casing, a sudden pressure drop when the pump runs), stop here and call a certified well contractor: disinfecting a damaged well wastes the effort and can hide the real problem. Walk the wellhead first, clear debris away from it, and look at the cap. If the cap is cracked, loose, or a plain flat cover rather than a sealed sanitary cap, replace it as part of this job, because it is the most common door bacteria use.
Flush a cloudy well first. If the water has been muddy or cloudy, connect a hose to the outside tap nearest the well and run it until the water runs clear before any bleach goes in. Sediment consumes chlorine; dosing a dirty well spends your bleach on mud instead of bacteria.
Gather the kit. Wrench for the well plug or cap bolts, a garden hose long enough to reach from an outdoor tap back to the well (this is the recirculation loop, and it is not optional), a clean 5-gallon bucket, about 5 gallons of clean water for mixing, a funnel, gloves and goggles, and your measured bleach. With that on the ground beside the well, the procedure itself is straightforward.
The dose worksheet: your well's numbers, not a guess
Every failed shock job I have ever seen described traces back to this step: the dose was a guess, usually a timid one ("a cup of bleach in a well felt like a lot"), and a timid dose wipes out the bacteria in the water while leaving the biofilm on the casing walls alive to reseed the well. The dose is not a vibe. It comes from two numbers, and both are written down for your specific well.
Find the well log. When your well was drilled, the driller filed a completion report, also called a well log or driller's log, with the state (most states keep these, through the health department, environmental agency, or a state well-record database; your closing paperwork or the driller named on the well tag may have a copy too). It records the figures you need: total depth, casing diameter, the static water level (how far below the surface the water stands), and usually the pump setting and screen depth. If the house came with no paperwork at all, the state database search by address or parcel is the first move, and the driller's tag riveted to the casing is the second.
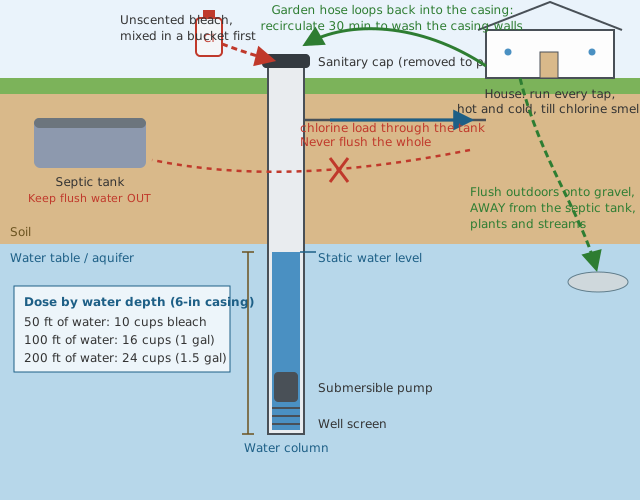
Work out the depth of water. The bleach treats the water standing in the well, so the number you need is the water column: total depth minus static water level. A well drilled 220 feet deep with water standing 60 feet down holds 160 feet of water. If you cannot find the static level, Mississippi State's instruction is to dose from the total depth instead; you will use more bleach than strictly needed, which is the safe direction to err in.
Convert to volume if you want a cross-check. Casing diameter decides how much water each foot holds: a 4-inch casing holds about 0.65 gallons per foot, a 6-inch about 1.5 gallons per foot, an 8-inch about 2.6 gallons per foot. So that 160-foot water column in a 6-inch casing is roughly 235 gallons. A widely used rule of thumb, about 3 pints of bleach per 100 gallons, would suggest around 7 pints; the extension table below lands in the same neighbourhood for typical depths, and where they differ, follow the table.
Read your dose off the table. These figures are Mississippi State Extension's published table for unscented household bleach, by depth of water in the well. The regular column assumes standard bleach (about 5.25% sodium hypochlorite). Concentrated bleach at 8.25% is roughly half again as strong, so the concentrated column uses about two-thirds as much; that conversion is arithmetic, and rounding up to the nearest half cup is fine.
| Depth of water | 4-in casing, regular bleach | 4-in casing, 8.25% bleach | 6-in casing, regular bleach | 6-in casing, 8.25% bleach |
|---|---|---|---|---|
| 50 ft | 8 cups | about 5 cups | 10 cups | about 6.5 cups |
| 100 ft | 10 cups | about 6.5 cups | 16 cups (1 gal) | about 10.5 cups |
| 150 ft | 12 cups | about 8 cups | 20 cups | about 13 cups |
| 200 ft | 14 cups | about 9 cups | 24 cups (1.5 gal) | about 16 cups (1 gal) |
For an 8-inch casing the regular-bleach figures are 14 cups at 50 feet of water, 22 cups at 100 feet, and 2.5 gallons at 200 feet. Very wide bored wells (24 or 36 inches) take gallons, not cups, and are a good reason to have a contractor do the maths and the job. Two warnings ride with the table. First, more is not better without limit: Mississippi State flags excessive chlorination as harmful in its own right, hard on pump seals, plumbing, and the well itself, so measure rather than glug. Second, bleach age matters as much as bleach volume; a jug that has sat for a year may have lost enough strength that your correct-looking dose under-delivers. Buy fresh for this job.
Write the three numbers (water depth, casing diameter, dose) on paper and take them to the well with you. Mid-procedure is the wrong time to be reconstructing arithmetic.
Protect the house first: softeners, filters, and the water heater
The chlorine concentration that kills bacteria in a well is far stronger than anything your treatment equipment was built to drink, and Penn State Extension's warning is blunt: some water treatment equipment can be damaged or exhausted by high chlorine concentrations, and you should determine, from the manual or the manufacturer, whether yours should be bypassed. Mississippi State builds the bypass into step two of the procedure. Here is what that means device by device.
Water softener: bypass it. Strong chlorine degrades the resin bed that does the softening, and a resin bed loaded with chlorinated water then has to be disinfected itself before it goes back to work. Turn the bypass valve (or set the unit to bypass / out of service) before the bleach goes in, and leave it bypassed until the system is fully flushed. Afterwards, disinfect the softener following the manufacturer's instructions before returning it to service.
Sediment and carbon filters: bypass or remove. A sediment cartridge will load up and choke flow during the job. A carbon filter is worse: carbon's whole job is removing chlorine, so the shock dose will exhaust a cartridge's capacity in one pass, and until it does, it is quietly stripping the chlorine out of the water on its way to the taps you are trying to disinfect. Bypass the filter housing if it has a bypass; if not, remove the cartridge for the duration and disinfect the housing before the new cartridge goes in.
Reverse osmosis: bypass and isolate. The thin membrane at the heart of an RO unit is damaged by chlorine; manufacturers design the carbon prefilter to strip chlorine out before it reaches the membrane, and a shock dose overwhelms that protection. Close the RO feed or put the system in bypass, and empty the storage tank rather than letting it fill with chlorinated water. Leave it isolated until the flush is complete and the water runs chlorine-free.
The water heater: include it, deliberately. The hot-water side of the plumbing needs disinfecting too, and the heater's tank is part of that plumbing. You do not drain it first. During the fixture step below, you run the hot taps until chlorine arrives, which draws chlorinated water through the heater and fills it; it then sits with the rest of the system during the hold, and gets flushed through afterwards like everything else. One caution: never drain a water heater and leave it empty with the power or gas on, and never open its drain valve as part of this job unless you know the refill procedure. The heater participates by flow, not by draining.
Everything else. Ice makers and refrigerator filters: shut the ice maker off and plan to discard the first batches of ice after the job; a fridge filter that has soaked in chlorinated water gets replaced at the end. Humidifiers and anything else with a small reservoir get emptied and refilled with clean water afterwards.
The procedure, step by step
This follows the sequence the extension services publish, with the two stages the short versions skip (recirculation and the septic-aware flush) kept in full. Active work is roughly an hour at the well and an hour in the house; the hold does the rest.
Step 1: Power off, equipment bypassed. Switch off the circuit breaker to the well pump. Put the softener and filters into bypass, as covered above. Do not skip the breaker: you are about to open the well, and the pump should not be able to start while you work.
Step 2: Open the well. Access depends on your wellhead: a threaded plug you unscrew, a well cap held by bolts, or a sanitary cap. Lift the cap clear and set it somewhere clean, gasket side up. If what you find matches none of those (a buried pit, a casing cut off below grade, a cap that will not budge), stop and call a contractor; a buried or pit wellhead is itself a contamination pathway and part of the problem, not a detail to work around.
Step 3: Mix and pour. Fill the 5-gallon bucket about three-quarters full with clean water, then add your measured bleach dose to the water (bleach into water, not the other way round, and never in a sealed container). Using the funnel, pour the solution slowly into the casing or through the plug opening, taking care not to splash; what lands on the casing walls on the way down is doing useful work, what lands on your clothes is not. For a large dose, mix and pour in bucket batches until the full measured amount is in.
Step 4: Recirculate for 30 minutes. Turn the pump breaker back on. Connect the garden hose to the outdoor tap nearest the well, feed the hose end into the casing (or through the funnel in the plug opening), and run it for 30 minutes. This loop is the step that separates a disinfected well from a well with bleach-flavoured water at the bottom of it: it drags the chlorinated water up through the pump and house line and pours it back down over the casing walls, washing the full height of the water column and the casing surface where biofilm lives, and it mixes the dose evenly instead of leaving it layered. Aim the returning stream around the inside of the casing as you go if you can. By the end, the water coming out of the hose should smell strongly of chlorine.
Step 5: Draw chlorine to every fixture. Now walk the house in a sensible order, outside taps first, then inside: open each tap, cold first and then hot, one at a time, run it until you smell chlorine, then close it and move on. Include every bathroom, the kitchen, laundry tub, shower and tub spouts, and flush each toilet once. The smell test is the point: chlorine at the tap proves the solution has reached the end of that run of pipe, including the hot side through the water heater. A tap that never smells of chlorine after a fair run is telling you something (a bypass still open, a filter still in line stripping it) and is worth investigating before the hold, not after.
Step 6: Hold for 12 to 24 hours. With every fixture charged, stop. The chlorinated water needs contact time with the well, the pump, the pressure tank and every pipe: Mississippi State sets a floor of 8 hours or overnight, and the 12-to-24-hour window is what most extension procedures aim for, so plan on pouring in the morning and flushing the following morning. During the hold, use the water as little as possible (every gallon drawn pulls the solution out of position and shortens contact), drink the bottled water you stocked, and keep the household informed so nobody fills a kettle out of habit.
Step 7: Flush, outdoors first. Contact time over, the chlorine has to leave, and where it leaves matters enough to get its own section below. The short version: hose on an outdoor tap, water run outside onto the ground until the chlorine smell is gone, then each indoor fixture run briefly until it too runs clear of the smell.
Step 8: Restore and disinfect the equipment. With the system flushed, take the softener and filters out of bypass only after disinfecting them per the manufacturer's instructions, fit a fresh filter cartridge if the old one rode through any chlorinated water, put the RO back in service, and turn the ice maker on, discarding its first batches. Then book the retest; the job is not finished until the lab says so.
Flushing without killing your septic
If your house is on a septic system, and a large share of well homes are, the flush is the one stage where the two systems collide. Your septic tank is not a tank in the way a fuel tank is a tank; it is a living treatment reactor, and the bacteria in it are what break down everything your household sends it. Chlorine's entire purpose is killing bacteria. A shock job for a mid-depth well easily involves flushing 300 to 500 gallons of strongly chlorinated water once the well, the pressure tank, the water heater and the pipes are all counted, and sending that whole load down your drains in an hour is the domestic equivalent of dosing the tank itself.
Mississippi State's procedure states the rule plainly: when you flush, keep the running water away from your septic system, your landscaping, and bodies of water. In practice:
- Do the big flush outdoors. Connect the hose to an outdoor tap (which on most well homes draws from the pressure tank without passing a drain) and run the well down through the hose, onto a gravel drive, a bare patch of ground, or an unused corner of the yard. Spread the discharge if you run for a long time rather than eroding one spot.
- Keep it off the drainfield too. The drainfield is the second half of your septic system, and flooding it with a few hundred extra gallons while it also receives the house's normal flow helps nothing. Choose ground that is not uphill of the tank or field, and not where the water will pond and run back toward the wellhead.
- Keep it away from plants you care about and from water. Strong chlorine burns garden plants and lawn, and it is lethal to fish and aquatic life at very low concentrations, so no flushing into a ditch, stream, pond or storm drain that leads to one.
- Then clear the indoor pipes in short runs. Once the well itself runs chlorine-free at the hose, work through the indoor fixtures one at a time until the smell clears at each. That indoor portion does reach the septic tank, but it is a fraction of the total volume and at a falling concentration; it is the manageable remainder, not the main load.
The reverse mistake is worth naming too: do not "protect" the septic by shortcutting the flush and leaving the house smelling of chlorine for a week of normal use. That spreads the same chlorine into the tank in daily doses and delays the retest. One deliberate outdoor flush, then a proper indoor clear-out, is both the septic-friendly and the water-friendly route.
The retest that proves it worked
A shock job without a retest is a rumour. The water will taste and smell normal within a day of flushing, and that tells you nothing: coliform bacteria are odourless and invisible at any concentration that matters. The proof is a lab result, taken on the schedule Penn State Extension sets out.
Wait until the chlorine is fully gone, then test at 10 to 14 days. Residual chlorine in the sample bottle would kill bacteria in transit and hand you a false clean. By 10 to 14 days after the job, the system has been back in normal use, the water in the bottle is the water your family actually drinks, and bacteria with a surviving pathway have had time to re-establish and be caught. Sample the way the testing guide describes: sterile bottle from the lab, a cold tap with the aerator removed, no touching the bottle mouth. Until that result comes back clean, keep drinking bottled water; Mississippi State's instruction is explicit that the water should not be used for drinking or cooking until a certified laboratory has tested it.
Then test again in two to three months. This second result is the one most owners skip and the one that carries the real verdict. Penn State's schedule is deliberate: a clean 10-to-14-day test shows the disinfection worked; a clean test two to three months later shows the contamination is not quietly re-entering. File both results with your well log: together they convert one bad report into a closed chapter, and they start the documented history that makes a well house easier to sell.
If the bacteria come back: the honest failure branch
Now the finding that should be printed on every jug of bleach sold for this purpose. Penn State studied wells contaminated with coliform bacteria and found that shock chlorination, done properly and combined with fitting a sanitary well cap, successfully removed the bacteria for one year in only about 15% of the wells. The procedure worked best where the contamination was light (fewer than 10 colonies per 100 mL) and no E. coli was present. Read that the right way: shocking is not a weak technique, it is a diagnostic one. A well that stays clean was a one-time event. A well that fails again is telling you the bacteria have a road in, and no amount of chlorine poured down the well will close a road.
So if your retest, at either stage, comes back positive:
- Inspect the pathway before re-shocking. Cap first: is it a sealed sanitary cap, intact, vents screened? Casing next: any crack, corrosion hole, or a casing that ends below grade or in a pit? Then the grout seal around the casing, the ground slope (soil should shed water away from the wellhead, never pool against it), and finally the neighbourhood: how close is the septic tank and drainfield, is either showing failure signs, and does surface water have a route downhill to the well?
- Fix what you find, then shock once more. A new sanitary cap and a regraded wellhead have ended many repeat-positive stories. Shock after the repair, and retest on the same schedule.
- If a sound, sealed well still fails, change strategy. Penn State's conclusion for that case is direct: a continuous disinfection system becomes necessary. The two standard forms are ultraviolet light, which disinfects water as it enters the house and needs clear water and a bulb change on schedule, and continuous chlorination, which doses a small amount of chlorine constantly and is usually paired with a contact tank and a carbon filter to remove it before the taps. A well contractor or water treatment firm sizes either one; budget for a real system rather than a third and fourth jug of bleach, and ask them to confirm the well itself is structurally sound first, because continuous disinfection on a well with a broken casing is treating a symptom at equipment prices.
What it costs, and the DIY-or-pro call
The money is lopsided in a way that favours trying this yourself once, correctly. The DIY job is bleach, a bucket and PPE: $10 to $40 all-in for most wells, since the dose for a typical 6-inch casing runs from ten cups to a gallon and a half. The professional version, a well contractor dosing for your depth and inspecting the cap and equipment in the same visit, runs roughly $150 to $400. The retests are the cost owners forget to budget: budget for two bacteria tests in the first three months, free to $80 each depending on whether your county health department subsidises them.
Do it yourself if your well is a standard submersible set-up in sound condition, the cap comes off with ordinary tools, and this is a first positive or a post-repair disinfection. Call a professional instead if the well is damaged or uses a jet pump (the published procedure does not cover it), if the wellhead is buried or in a pit, if the dose maths involves a wide bored well, or if this is a repeat positive: at that point you are no longer buying chlorine, you are buying a diagnosis, and that is the part worth paying for.
Urgency, in one paragraph. A coliform-only positive with a sound-looking wellhead: book the job inside the next week, drink bottled water in the meantime if it settles your mind, and do not let it slide a season. An E. coli positive, a flooded wellhead, or a positive test in a house with an infant or an immunocompromised family member: bottled water from today, the job done as soon as you can assemble the kit, and a contractor on the phone if anything about the well looks damaged. The bacteria are the message; the shock, the retest and, if it comes to it, the pathway repair are the reply.
Cost at a glance
| Item | Typical cost | Notes |
|---|---|---|
| DIY shock chlorination (bleach and supplies) | $10–$40 | One to two gallons of fresh unscented bleach, a bucket, a funnel, gloves and goggles; the garden hose you already own does the recirculating |
| Bacteria retest at a certified lab | Free–$80 | County health departments often test free or nearly so; private certified labs typically charge $40–$80 for the bacteria panel |
| Professional disinfection service | $150–$400 | A well contractor doses for your depth and volume and inspects the cap and equipment in the same visit; published national data runs lower for shallow wells, flood recovery runs higher |
| Well contractor labour (if the well needs work first) | $45–$150 per hour | What you pay if the cap, casing or pump needs attention before disinfection makes sense |
Frequently asked questions
How much bleach does it take to shock chlorinate a well?
It depends on the volume of water standing in the well, which you get from two numbers on your well log: the depth of water and the casing diameter. Mississippi State Extension's table calls for 10 cups of regular household bleach for 50 feet of water in a 6-inch casing, 16 cups (1 gallon) at 100 feet, and 24 cups (1.5 gallons) at 200 feet. A 4-inch casing needs less: 8, 10 and 14 cups at the same depths. If your bleach is the concentrated 8.25% kind, use about two-thirds as much.
How long do I wait after shock chlorinating before using the water?
The chlorine needs contact time first: at least 8 hours in the well and pipes, and 12 to 24 hours is the window most extension guides aim for. Then flush until no chlorine smell remains. After that the water can go back to normal household use, but do not drink it until a lab retest, taken 10 to 14 days after the job, comes back free of coliform bacteria. That retest, not the smell of the water, is the all-clear.
When should you shock chlorinate a well, and when is it pointless?
Shock after a positive coliform test, after the well is opened for pump work or repairs, after flooding or an unusually heavy storm sends runoff over the wellhead, and as part of commissioning a new well. It is pointless as a standalone fix when contamination has a continuous route in: a cracked casing, a buried wellhead, failed grout, or a failing septic system uphill. Chlorine kills the bacteria present today; it cannot close the door they walked through, so fix the pathway first or the next test will fail too.
What if bacteria come back after shock chlorination?
Treat a repeat positive as information, not bad luck. A Penn State study found that shock chlorination plus a sanitary cap kept only about 15% of contaminated wells bacteria-free for a full year, which tells you most returns trace back to an open pathway: cap, casing, grout, or a nearby waste source. Inspect and repair those first. If bacteria still return after the well is sealed and sound, Penn State's guidance is that a continuous disinfection system, ultraviolet light or continuous chlorination, becomes necessary instead of endless re-shocking.
Can I shock chlorinate with a water softener or filters in line?
Not safely for the equipment. Put softeners and filters in bypass before you start, exactly as the extension procedures direct: strong chlorine exhausts filter carbon, attacks reverse osmosis membranes, and loads softener resin with chlorine it was never meant to hold. Leave everything bypassed through the flush, then disinfect the treatment equipment itself following the manufacturer's instructions before putting it back in service.
Is it safe to flush the chlorinated water into my septic system?
The everyday trickle is not the problem; the flush is. Shocking puts hundreds of gallons of strongly chlorinated water through the house, and your septic tank treats waste using living bacteria that chlorine is designed to kill. Mississippi State Extension's procedure says to keep the flush water away from the septic system: run the big flush from an outdoor tap through a hose onto gravel or bare ground, away from the tank, the drainfield, garden plants and any stream or pond. The small amount that reaches the tank from indoor taps during the flush is a minor load by comparison.
Can I use scented, colour-safe or splash-less bleach?
No. Use regular, unscented household liquid bleach, and check the date: Mississippi State Extension specifies bleach less than six months old, because chlorine strength fades on the shelf. Scented and splash-less products carry additives and thickeners you do not want in a drinking well, and colour-safe bleach is a different, weaker chemistry that will not disinfect. And the standing rule for any chlorine work: never mix bleach with acids, ammonia or any other cleaner.
Checked November 16, 2026. This guide is general information, not a substitute for a licensed professional.
Related guides
Air in Your Water Lines: Why Faucets Sputter on a Well
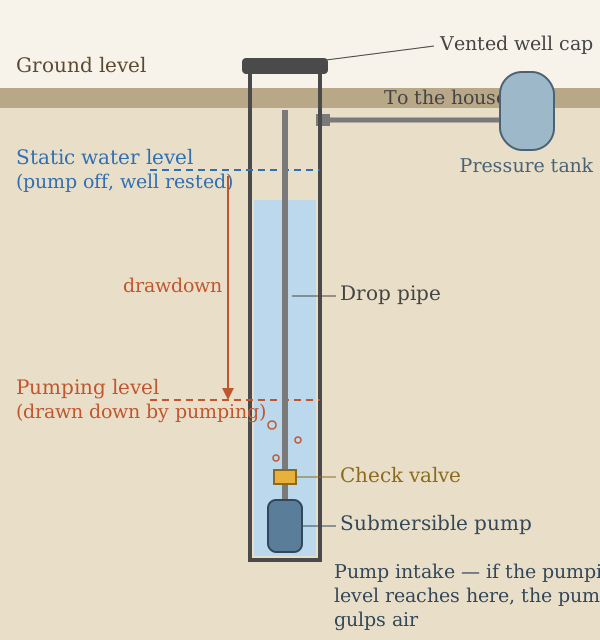
A sputtering faucet on well water is a symptom with a short list of causes — drawdown, a leaking check valve or drop pipe, a tired pressure tank, or dissolved gas. How the timing of the sputter tells you which one, the tests to run, and what each fix costs.
How Far Should a Well Be From a Septic Tank? Setbacks, Explained
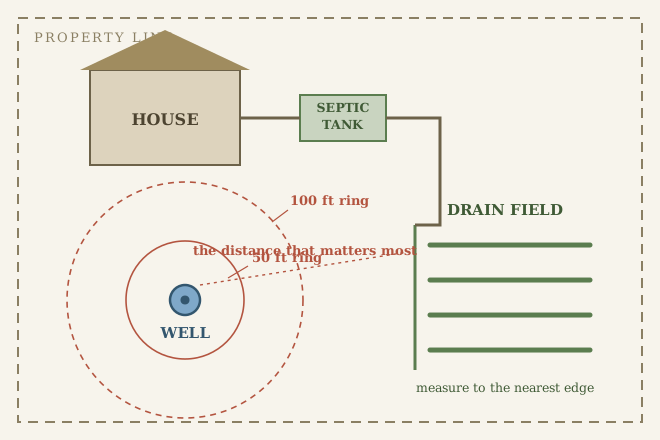
Most states want 50 feet between a well and a septic tank and 100 feet to the drain field — but the field is the distance that actually protects your water. How to measure yours, and what to do if it comes up short.
How to Test Your Well Water: What to Test, How Often, and What It Costs
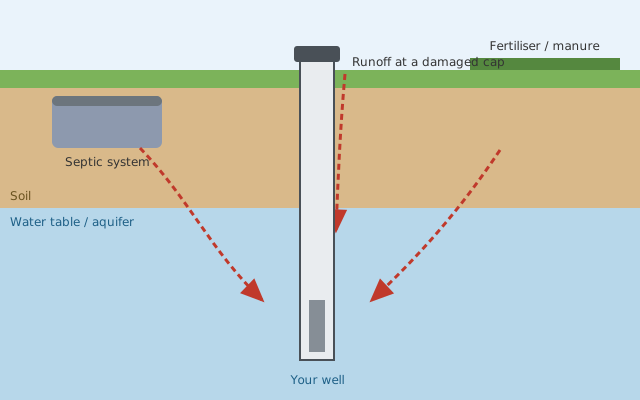
Private wells aren't monitored by anyone but you. The EPA's annual four tests, the one-time baseline panel, how to take a proper sample, what results mean, and what testing costs.