 Keep
Basement Flooded? The First-48-Hours Playbook: Safety, Pumping, Drying, and Insurance
 Daniel Mercer · Editor & Researcher·
Published November 16, 2026·
Updated November 16, 2026
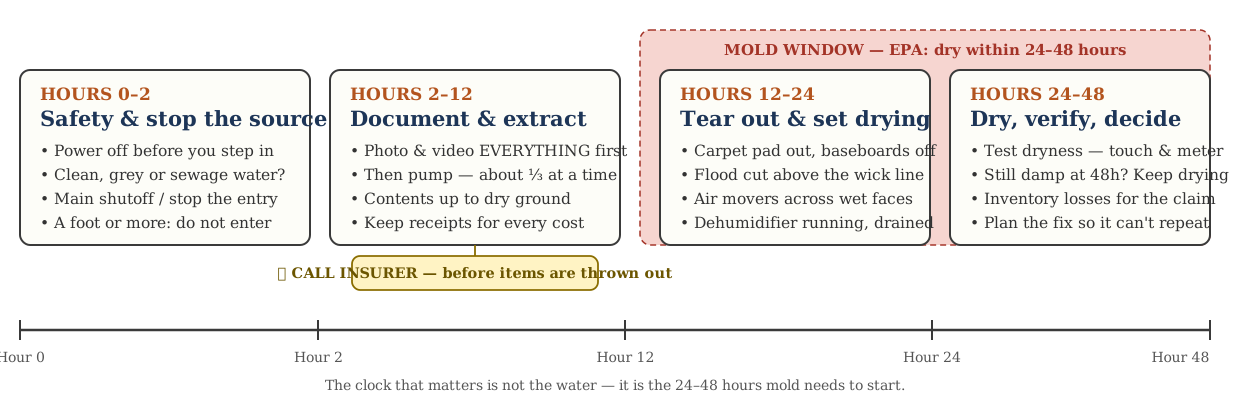
You find it the way everyone finds it: the smell reaches you first, at the top of the basement stairs — damp, earthy, wrong — and then you see the shine on the floor where no shine should be. Boxes sagging in brown water. The freezer standing in an inch of it. The furnace, the water heater, the good rug. Everything down there feels urgent at the same time, and that feeling is the first problem, because a flooded basement is not actually forty emergencies. It is three urgent things, one deadline, and a sequence. Do the sequence in the wrong order and a bad weekend becomes a five-figure gut job. Do it in the right order and most floods end as exactly that: a bad weekend.
The stakes justify the care. FEMA's FloodSmart program puts it bluntly: just one inch of water in a typical home can cause up to $25,000 in damage. That number is not about the water — an inch of water is a mop problem. It is about what the inch touches: flooring, drywall, insulation, appliances, everything stored at floor level, and the mold clock that starts the moment they get wet.
One more thing before the playbook, aimed at the reader this site is written for: if you are new to this house, you may not know where your main water shutoff is, or which breaker feeds the basement, or whether you even have a sump pump. Every rival guide quietly assumes you do. This one starts a step earlier, and tells you how to find each thing at the moment you need it.
Hours 0–2: make it safe, then stop the source
Electricity before everything. Water and household current are the one combination in this whole event that can kill you, so the first rule is absolute: if standing water is touching, or anywhere near, electrical outlets, baseboard heaters, the electrical panel, the furnace, the water heater or plugged-in appliances, the power to the basement goes off before you step in. If you can reach the panel across dry floor, flip the basement circuits — or the main breaker, if there is any doubt about which circuits are wet. If reaching the panel means wading through the water, or the panel itself is in the water, do not enter. Call an electrician, your utility, or the fire department's non-emergency line and let them make the space safe. This is not caution theatre: a submerged outlet or a faulted appliance can energise the water around it.
Depth sets the second rule. An inch or two of water, power off, rubber boots on: workable. Around a foot or more, stay out until you know what is under it. Deep water hides the open sump pit, the floor drain, submerged debris and anything sharp, and a foot of water against a wall is also a structural fact, not just a cleaning fact. If you smell gas at any point — a flooded water heater or furnace can drown a pilot and leave gas unburned — leave the house and call the utility from outside.
Name the water. While you are making the space safe, decide which of the three categories you are standing in, because the category governs everything downstream — what you wear, what you may touch, and whether this is a DIY job at all. Restoration professionals classify floodwater in three categories, and the distinctions are practical, not bureaucratic. Category 1, clean water, comes from a sanitary source: a burst supply pipe, a failed water heater, a burst washing-machine hose, rain that came through a window well without travelling through soil. Category 2, grey water, has picked up contamination along the way: washing-machine or dishwasher discharge, sump-pit water, rainwater that has pushed through foundation soil and walls. Category 3, black water, is sewage or anything equivalent: water that rose out of a floor drain or toilet, and — the rule owners most often miss — surface floodwater that flowed in from streets, yards or streams, which is treated as Category 3 no matter how clear it looks. Category 1 is a cleanup. Category 2 is a cleanup with gloves, boots and respect. Category 3 changes the job: no bare skin, porous materials that soaked in it are contaminated rather than dirty, and professional cleanup is the default, not the upgrade.
Stop the source. Only now — safe, and knowing what the water is — stop it coming. A burst pipe means the main shutoff: if you have never located yours, it is where the water line enters the house, usually at the front foundation wall or beside the meter, and our guide Find It Before You Need It: Your Main Water Shutoff, Gas Shutoff & Electrical Panel walks the whole shutoff map for exactly this moment. A failed water heater means its cold-water inlet valve, on the pipe entering the top of the tank. A sump pump that has quit means any pump you can borrow or buy, run now and diagnosed later. Water still entering from outside in a storm gets slowed, not stopped: sandbags or a rolled tarp against the entry point, a cleared window well, the overflowing gutter noted for later. And if the water is rising from a drain, stop adding to it — no flushing, no laundry, no showers anywhere in the house until the sewer clears, because every gallon you use upstairs is a gallon looking for the lowest exit, which is your basement.
Read the depth: four floods, four responses
One measurement organises everything that follows, so take it early — at the deepest point you can safely see, and again from the water line the flood leaves on the wall. A film to half an inch is seepage scale: a wet/dry vac, a dehumidifier and a hunt for the entry point, with the 48-hour clock running but the playbook compressed into an afternoon. One to three inches is the standard flood this guide is written for: baseboards wet, carpet pad soaked, everything stored at floor level in the loss-or-drying pile, extraction by utility pump. Four to twelve inches is a different event wearing the same name. At that depth the water is inside the motors of the washer, dryer and freezer, into the furnace's lower controls and blower housing, and through the entire first tier of anything shelved — and since receptacles typically sit 12 to 18 inches above the floor, a foot of water means you assume electrical involvement until an electrician says otherwise. Over a foot, the rules from the safety section take over completely: no entry until power and structure are cleared, because deep water loads the walls, hides every hazard the floor owns, and turns the cleanup into a restoration project with a structural question attached. Owners consistently under-read depth because a basement floor slopes — two inches at the stairs can be six at the far corner, which is why the tape measure goes in the documentation photos.
Hours 2–12: document everything, then get the water out
Photograph before you touch. The single most expensive mistake in a basement flood is cleaning up first and documenting later. Your insurance claim is built in this hour or it is built on your memory, and adjusters price memory at a discount. So, before anything is moved: walk the whole basement slowly with your phone recording video, narrating the date, the time and where the water came from. Photograph the water line where it marks the walls and foundation — put a tape measure in the frame so depth is a fact, not an adjective. Photograph every damaged item where it sits. Photograph serial-number plates on the furnace, water heater, washer, dryer and freezer. If flooring or carpet is likely to be torn out, cut and keep a small sample of each; adjusters use samples to match quality grades, and "builder grade" is what unproven flooring gets priced as. Then start a written inventory — item, approximate age, what you paid if you know — and keep adding to it as you work. Ten minutes of this is worth more than any single piece of equipment you will rent today.
Call the insurer in this window, not after the cleanup. You are not filing a finished claim; you are opening one and asking three questions: is this source covered, what do you need from me before I dispose of damaged material, and do you want to dispatch a restoration company or authorise me to hire one? The call also starts the paper trail your policy's mitigation clause expects — more on that below. The call goes before the first item is thrown out, because the most common documentation failure is a curb full of bagged evidence.
Then, the water. Work with what actually moves volume. If you have a sump pit, the pump in it is your first engine; if it failed, that failure is a later chapter — for now, a submersible utility pump from the hardware or rental store, with a garden hose run to daylight well away from the foundation (never into a floor drain that may itself be backing up), is the standard tool. A wet/dry vacuum is the finishing instrument for the last fraction of an inch and for corners; it is not an extraction plan for a flooded room, and the arithmetic shows why: two inches of water over 800 square feet is roughly a thousand gallons, which is sixty-odd trips with a 16-gallon vac, uphill, in boots.
One exception to "as fast as possible," and it matters in storm floods: pump in stages when the ground outside is saturated. Groundwater in soaked soil presses inward and upward on your walls and floor slab; the water standing in your basement presses back. If you drain the inside to dry in an hour while the soil outside is still a lake, the outside pressure acts unopposed, and the results range from a cracked slab to, in genuinely bad cases, a shifted foundation wall. The field rule used by the better restoration guides is to remove roughly a third of the depth at a time, pause, and let the levels settle — repeating across the day. Mark the starting level on the wall, pump a third, and watch the return rate: a level that barely falls tells you groundwater is still arriving and patience is the correct tool; a level that holds tells you the soil is draining and you can take the next third.
Move contents up, not out. As the water drops, carry salvageable contents to dry ground — the garage, an upstairs room, a tarp on the driveway — rather than straight to the curb. Wet cardboard disintegrates and sheds its contents into the water, so work from the most damaged boxes upward and expect the bottom layer of anything stored on the floor to be the loss layer. Furniture goes up on blocks or out of the room entirely; the drying stage below needs empty, accessible floor and wall bases, not an obstacle course.
The clock: why 24–48 hours decides the bill
Here is the deadline the whole sequence is built around. The US EPA's mold guidance is that water-damaged areas and items should be dried within 24 to 48 hours to prevent mold growth. That is not a scare number; it is germination biology. Mold spores are already present in every house, in the dust, doing nothing. What they wait for is sustained moisture against a food source — and a flooded basement serves both at once: drywall paper, carpet pad, wood framing, cardboard, the dust film on every cool surface. Given those, colonies establish within a day or two and then keep growing after the surfaces feel dry, including inside wall cavities you cannot see.
The financial meaning is direct. A basement dried inside the window is a cleanup bill: pumping, some tear-out, rental equipment, your weekend. A basement that misses the window becomes a remediation bill: containment barriers, negative-air machines, removal of colonised material, antimicrobial treatment — and per the EPA's guidance for larger events, growth covering more than roughly 10 square feet is professional territory whether you wanted it to be or not. Everything before this section (document fast, extract fast, don't wait for permission to start drying) and everything after it (tear out what can't dry, dry with real equipment, measure rather than guess) exists to keep you on the right side of those 48 hours.
Tear-out: what goes, what stays, and the flood cut
Drying fails where water is trapped, so the middle hours belong to deliberate demolition — smaller than you fear, more specific than you expect. The governing question for every material is the same: can air reach it and can it actually dry in place, in this category of water?
Carpet pad goes. In essentially every flood, the pad is a loss: it is a sponge glued to the slab by water pressure, it cannot be dried in place, and it is cheap. Pull the carpet back, remove the pad in strips, and the carpet itself can then be judged — clean water and fast extraction, it can often be cleaned, dried and relaid on new pad; grey water makes it doubtful; sewage makes the decision for you.
Baseboards come off. They look like trim and behave like a lid, sealing moisture into the bottom of the wall. Prying them off (score the paint line first, work gently, and much of it can go back on later) opens the wall base to the drying air and lets you see how high the water wicked.
Drywall gets a flood cut. Gypsum wicks water upward well above the standing-water line — a wall that saw two inches can be wet eight or twelve inches up. Check with a moisture meter, then cut horizontally above the wet line; many crews cut at a clean 2-foot or 4-foot height so the repair uses standard sheet goods efficiently. Wet fiberglass insulation behind the cut comes out with it. Rigid foam insulation, by contrast, absorbs little and can often be dried in place. The cut feels violent; it is in fact the cheap version. A wall closed up wet is the remediation crew's favourite kind of future work.
The save-or-toss table. For the contents, decide by material and water category:
| Item | Clean water (Cat 1) | Grey water (Cat 2) | Sewage (Cat 3) |
|---|---|---|---|
| Carpet pad | Toss | Toss | Toss |
| Carpet | Clean and dry, often saves | Usually toss | Toss |
| Drywall and fiberglass insulation that soaked | Cut out above the wick line | Cut out | Cut out, treat as contaminated |
| Solid wood furniture | Dry promptly, usually saves | Clean and disinfect, often saves | Pro assessment; often toss |
| Particleboard / MDF furniture | Toss once swollen | Toss | Toss |
| Upholstered furniture, mattresses | Extract and dry fast, may save | Toss | Toss |
| Books and papers | Freeze to buy time, then dry | Freeze, assess | Toss (photograph first for records) |
| Appliances and electronics | Dry out fully, test before use | Pro evaluation | Motors that sat in it: toss |
| Food, medicines, cosmetics touched by water | Toss | Toss | Toss |
The freezer trick in that table is real and worth knowing: wet paper frozen solid stops mold cold, literally, and buys you weeks to dry or digitise what matters — insurance papers, photographs, the documents you cannot replace. Bag everything you discard and stage it where the adjuster can see it if they visit; photograph the pile either way.
Drying setup: moving air, dry air, and proof
With the water out and the trapped material opened up, the job becomes applied physics. Evaporation needs three things: air moving across the wet surface (not just around the room), air dry enough to accept the moisture, and time. Warmth helps — evaporation runs faster in a warm room — but airflow and dehumidification are the levers you control.
Air movers, aimed correctly. The low, snail-shaped rental fans are not oversized box fans; they exist to push a fast sheet of air along a surface. Place them blowing along the base of wet walls and across wet floor, angled so each one feeds the next around the room. A working rule from the rental counter is roughly one air mover per 10 to 15 linear feet of wet wall. A household fan or two helps a small clean-water spill; it does not dry a flooded finished basement inside the window, and pretending otherwise is how the window gets missed.
A dehumidifier that matches the job. The 30- or 50-pint residential unit in the corner is a maintenance appliance for ordinary basement humidity; a flooded basement overwhelms it. Rent a commercial unit — the rental counter will know it as a large-capacity or LGR dehumidifier — and set it up to drain continuously into a sink, a floor drain you have confirmed is clear, or the sump pit. A dehumidifier whose bucket fills and shuts off at 2 a.m. is a dehumidifier that worked a third of the night. In summer storm weather, keep the basement closed up while drying: outdoor air after a storm is nearly saturated, and ventilating with it imports the moisture you are paying to remove. In cold, dry winter air the logic flips and open windows can genuinely help — judge by whether the incoming air is drier than the air inside, not by habit.
Measure dryness; do not feel for it. Surfaces lie. Drywall can feel dry to the palm while the cavity behind it is still wet, and wood framing gives up its moisture days after the floor looks done. A pin-style moisture meter costs $30–$60 and settles the argument: probe the wet wall and floor materials, then probe the same materials in a part of the basement that never got wet, and dry until the wet readings come within a couple of points of the dry reference. Keep a short log — material, reading, time — twice a day. Falling readings are the job working; readings that have stalled by hour 48 are the signal to escalate (next section). One caution: if the furnace or ductwork took water, do not use the heating system as a drying shortcut until it has been checked — a wet air handler run "to help" can distribute contaminated air through the whole house.
When the professionals are mandatory
Plenty of floods are honest DIY. These are not. Call a restoration company — and in two cases, other trades first — if any of the following is true:
- The water is Category 3. Sewage cleanup means containment, protective equipment, removal of contaminated porous material and antimicrobial treatment, done by people with all four. This is the bright line.
- Water reached the electrical system. A submerged panel, outlets or a furnace control board is an electrician's and HVAC technician's call before it is a cleaner's. Flooded gas appliances need the gas utility or a licensed technician before relighting.
- The depth passed about a foot, or the finished area is large. Volume and finish multiply everything: more trapped water, more tear-out, more drying capacity than a rental counter weekend supplies.
- Anyone in the house has asthma, allergies or a weakened immune system and growth is visible — and per EPA guidance, growth beyond roughly 10 square feet is professional territory regardless.
- Your own drying is not winning by hour 48. Readings flat, smell rising, walls still wet: the window has closed and the scope has changed. Calling on day three costs more than calling on day one, but far less than calling in week three.
Know what you are buying, so you can judge the quote. A proper restoration visit runs: emergency extraction; moisture mapping with meters (and often a thermal camera) to define the true wet footprint, which is always bigger than the visible one; controlled demolition of what cannot dry; antimicrobial application to affected surfaces; a calculated drying setup with commercial equipment; and daily return visits to take and record moisture readings until the structure reaches its dry standard. The quote should state, in writing: the rooms and scope, what gets torn out, the equipment list and the number of drying days included, how disposal is handled, and whether reconstruction (new drywall, flooring, trim) is included or is a separate contract — it is usually separate, and learning that on day five is unpleasant. Ask for their moisture logs and before-and-after photos for your own file; good firms hand them over as a matter of course, and your insurer will want them.
Insurance, honestly: the source decides
Owners are reliably surprised to learn that "flooded basement" is not one insurance event but three, and which of the three you had is decided by where the water came from — not by how much damage it did.
Sudden internal water — a burst pipe, a failed water heater, a split washing-machine hose — is the covered one. A standard homeowners policy generally responds to the resulting damage: the cleanup, the drying, the ruined flooring and contents. Sewer or drain backup is the excluded-unless-you-bought-it one. Standard policies generally do not cover water that backs up through sewers or drains, or a sump that overflows; that protection lives in a water-backup rider or endorsement, sold with its own limit, commonly in the $5,000–$25,000 range. It is inexpensive relative to the risk, it is the rider that matches the single most common basement flood, and most owners discover whether they have it in the worst possible week. Rising surface water — true flooding, from rain-swollen ground, streams or streets — is the not-in-your-policy-at-all one. Homeowners insurance excludes it categorically; only a separate flood policy responds, usually through the National Flood Insurance Program, and NFIP policies carry a 30-day waiting period, which is why flood insurance is a spring decision, not a storm-week one.
Whatever your category, your policy imposes a duty to mitigate: you are required to take reasonable steps to stop further damage. Pumping, drying and boarding up are not optional extras you perform as a favour to the insurer — they are obligations, and the receipts for them (rentals, the pump you bought at midnight, the dehumidifier, even the pizza is excluded, keep it honest) are claim documents. Keep every one. Pair them with your hour-two documentation — the water-line photos with the tape measure, the inventory, the samples of flooring and carpet, the restoration company's moisture logs — and you have the file that gets claims paid at replacement value instead of argued down to adjectives. If the adjuster's coding of the loss does not match the source you know you had, say so early and in writing; the category is the claim.
After it's dry: make it a one-time event
A dried basement is a diagnosis with the water still legible in it, so before the memory fades, walk the perimeter and answer the question the flood asked: how did the water get in, and what failed? If it arrived with rain, work through Basement Water After Rain? Read Where It Comes In, Then Fix It in the Right Order — the entry point you just lived through is in there, with its fix ladder. If it came up through the slab itself, Water Coming Up Through the Basement Floor? It's Pressure, Not a Leak covers the groundwater version. If the sump pump quit, ran and lost, or never existed, Sump Pump Not Working? Diagnose It by Sound, Then by Symptom is the repair path — and add the battery backup this time, because the storm that floods you is the storm that cuts the power.
Then change how the basement is used, cheaply and permanently. A water alarm costs $15–$25, sits beside the sump pit and the water heater, and converts the next event from a discovery into a notification. Nothing irreplaceable lives on the floor again: boxes go on shelves or pallets, and the bottom six inches of the basement are treated as a zone that belongs, occasionally, to water. Photograph the dry, restored basement once, from the same angles as your flood photos — that pair of pictures is the opening page of any future claim and the closing page of this one.
The DIY-or-pro decision, and what the money buys
Lay the two paths side by side and the choice usually makes itself. The DIY path — rental pump, air movers and a commercial dehumidifier for three days, PPE, a moisture meter you keep — lands in the low hundreds of dollars and is entirely adequate for a shallow, clean-water flood in an unfinished basement that you start on immediately. What the professional path buys for its thousands is not magic; it is speed (a crew extracting within hours, not a solo owner within a day), capacity (drying equipment sized to finish inside the window), Category 3 safety, and documentation — the moisture maps and daily logs that make insurers cooperative. The hybrid deserves its popularity: the company does the extraction and sets the drying the day of the flood, you monitor the equipment and readings, and the tear-out and rebuild stay yours.
So the decision reduces to the triggers, not the budget. Clean water, shallow, unfinished, started now: yours. Sewage, electricity, depth, a large finished space, vulnerable lungs, or a drying curve that has flattened at hour 48: theirs. The expensive outcome is rarely either path chosen deliberately — it is the third path, the one where an owner half-dries a finished basement, closes the walls, and meets the same water again in the spring as a remediation quote with a mold chapter. The 48 hours are short. Spend them in order, and this stays what it should be: the worst weekend of your first year in the house, and a story with an ending.
Cost at a glance
| Item | Typical cost | Notes |
|---|---|---|
| DIY drying kit rental, 3 days (submersible pump, 2–3 air movers, commercial dehumidifier) | $150–$450 | The rental counter is the first-morning stop; a wet/dry vac ($80–$200 to buy) is the finishing tool, not the extraction plan |
| PPE and consumables (boots, gloves, respirator, contractor bags, disinfectant) | $60–$150 | Non-negotiable for grey water; for sewage, this line item becomes 'call a professional instead' |
| Professional extraction and structural drying — clean water | $1,500–$5,000 | Priced by area, depth and tear-out extent; should include moisture mapping and daily meter readings in writing |
| Professional cleanup — sewage backup (Category 3 water) | $3,000–$8,000+ | Containment, removal of contaminated porous materials, antimicrobial treatment and disposal are all inside this number |
| Mold remediation if the 48-hour window is missed | $1,500–$6,500+ | EPA guidance treats growth over roughly 10 square feet as professional territory — this row is the price of losing the drying race |
Frequently asked questions
What should I do first when my basement floods?
Three things, in this order, before any cleanup. First, safety: if the water is touching or near outlets, baseboard heaters, the electrical panel or any appliance, turn the power off at the panel — and if reaching the panel means wading, do not enter at all; call an electrician or the utility. Second, stop the source: close the main shutoff for a burst pipe (or the water heater's inlet valve for a failed tank), and stop using all water in the house if the water is coming up from a drain. Third, document: walk the basement with your phone and video everything, including the water line on the walls, before you move a single item. Only then start pumping. Owners who reverse steps two and three routinely pump first and photograph later — and hand their insurer a claim with no evidence in it.
Is it safe to walk into a flooded basement?
It depends on depth and what the water is touching. An inch or two of clean water, with the power to the basement off and rubber boots on, is workable for most people. Stay out entirely if: the water is over roughly a foot deep (the floor drain, sump pit and anything submerged become invisible hazards, and the water itself may be hiding a structural problem), the water has reached the electrical panel, outlets or a gas appliance and you cannot kill the power from a dry spot, you smell gas, or the water came from a sewer backup and you have no protective gear. Floodwater also conceals the ordinary basement hazards — the open sump pit is the classic one. When in doubt, the fire department's non-emergency line will advise you, and an electrician can make the space safe to enter.
How long before mold starts growing after a flood?
Fast — that is the number this whole playbook is built around. The US EPA's mold guidance is to dry water-damaged areas and items within 24 to 48 hours to prevent mold growth. Mold spores are already present in every house; what they need is moisture and a food source, and wet drywall paper, carpet pad, dust and wood framing provide both. Growth that establishes inside a wall cavity converts a drying job into a remediation job, and EPA guidance treats mold covering more than about 10 square feet as a reason to bring in a professional. This is why the order of work matters: extraction and tear-out in the first day are not tidiness, they are what keep you on the cheap side of that deadline.
Does homeowners insurance cover a flooded basement?
It depends entirely on where the water came from, and the three answers are different. A standard homeowners policy generally covers sudden internal water: a burst pipe, a failed water heater, a burst appliance supply line. Sewer or drain backup is generally excluded from the standard policy and covered only if you bought a water-backup rider or endorsement — commonly with its own limit in the $5,000–$25,000 range — which is unfortunate, because backup is one of the most common basement floods. Rising surface water (true flooding) is excluded from homeowners policies altogether and responds only to a separate flood policy, usually through the National Flood Insurance Program, which carries a 30-day waiting period before it takes effect. Whatever the source: you have a duty to mitigate, meaning pump and dry promptly, keep every receipt, and document before you dispose of anything.
Can I pump all the water out at once — or can pumping too fast damage the walls?
If the water came from inside the house (a burst pipe, a failed water heater), pump it out as fast as you can. If it came from a storm and the soil around your foundation is saturated, pump in stages — roughly a third of the depth at a time, then pause and let the levels equalise, repeating over the following day. The reason is pressure balance: groundwater in saturated soil pushes inward and upward on your walls and floor, and a basement full of water pushes back. Drain the inside instantly and the outside pressure acts alone, which can crack a floor or, in the worst cases, shift a wall. Mark the water level on the wall, pump a third, and watch how fast it returns; the return rate tells you how much groundwater you are actually dealing with.
What has to be thrown out after a basement flood, and what can be saved?
Judge everything by two questions: is it porous, and what category of water touched it? Carpet pad goes in essentially every case — it holds water against the floor and cannot be dried in place. Particleboard and MDF furniture that soaked through has swollen and lost its structure; it goes. Drywall that wicked water is cut out above the wet line, along with wet fiberglass insulation behind it. Solid wood furniture, metal, glass and hard plastics usually survive clean-water flooding if they are dried promptly. Upholstered furniture, mattresses and soft furnishings are salvageable only in clean water with immediate extraction — in grey water they are doubtful, and in sewage water they are out, full stop. Anything that touched sewage, including items that look cleanable, should be treated as contaminated. Photograph everything before it goes to the curb; the photos are your inventory for the claim.
Should I handle the cleanup myself or call a restoration company?
Do it yourself if the water is clean (Category 1), the depth is an inch or two, the basement is unfinished or lightly finished, and you can start within hours — that job is a pump, a tear-out of pad and baseboards, and rented drying equipment run for two to three days. Call professionals immediately if any of these are true: the water is or might be sewage, water reached the panel, furnace or other electrical equipment, the depth exceeded about a foot, the finished area is large, someone in the household has asthma or a weakened immune system and growth is visible, or your own drying is not visibly winning by the 48-hour mark. A legitimate middle path is common: the company extracts and sets up drying the same day, you monitor and manage the equipment, and their moisture logs double as your insurance documentation.
Checked November 16, 2026. This guide is general information, not a substitute for a licensed professional.
Related guides
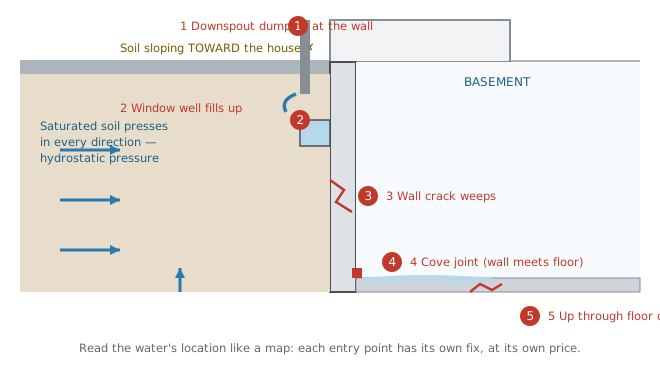
Basement Water After Rain? Read Where It Comes In, Then Fix It in the Right Order
Water at the cove joint, through a crack, up through the floor — each location is a different diagnosis with a different price. The outside-in fix order, hydrostatic pressure explained, sump pumps, and 2026 waterproofing costs.
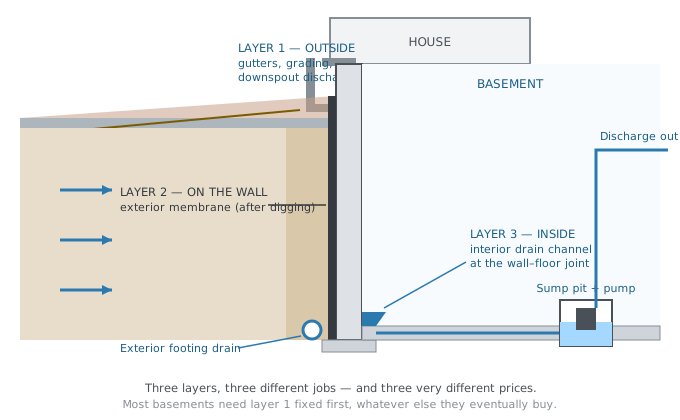
Basement Waterproofing Cost: What Each Method Really Costs
Waterproofing quotes run from $300 to $25,000 because the word covers five different jobs. 2026 costs per method and per linear foot, the order to buy them in, how to read an itemised quote, and what a lifetime warranty actually promises.
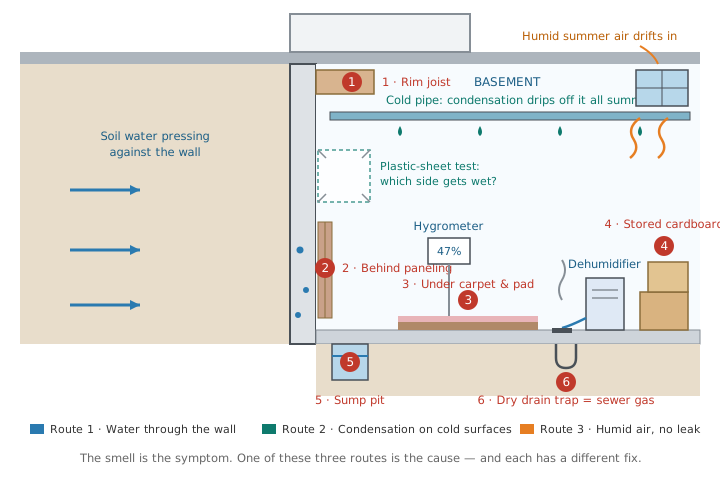
Musty Basement Smell: Find the Moisture Source First, Then Kill the Smell for Good
A musty basement smell is mould and mildew exhaling — and it always points at moisture somewhere. The room-by-room hunt, the dry drain-trap mimic that fools everyone, the humidity band the EPA wants, dehumidifier sizing, and when a pro is worth it.