 Keep
Toilet Keeps Running? The Dye Test Finds the Guilty Part in 15 Minutes
 Daniel Mercer · Editor & Researcher·
Published November 16, 2026·
Updated November 16, 2026
The sound that gives it away
You hear it at 2 a.m. first. The toilet in the hall bathroom — which nobody has used for hours — gives a short hiss, runs water for a few seconds, and goes quiet again. By morning you have half forgotten it. Then it happens while you are reading in the next room. Then you start noticing it every day.
That little refill has a name among plumbers: a phantom flush. And it is not the toilet flushing itself. What is happening is slower and sneakier. Water is seeping out of the tank, down into the bowl, a trickle at a time. As the tank level falls, it eventually drops far enough to trip the fill valve, which tops the tank back up — that is the hiss you hear. Then the seeping starts again. Leak, refill, leak, refill, around the clock.
Here is the part that matters: a toilet that runs on its own is not broken in some mysterious electronic way. A standard toilet has no electronics and almost no moving parts. Everything that fills it, flushes it and seals it sits in the tank under a lid that lifts off with your fingers. The fault is one of a short list of cheap rubber-and-plastic parts, and a test that costs a few drops of food colouring will tell you which one — before you spend a dollar or call anyone.
Inside the tank: four parts do everything
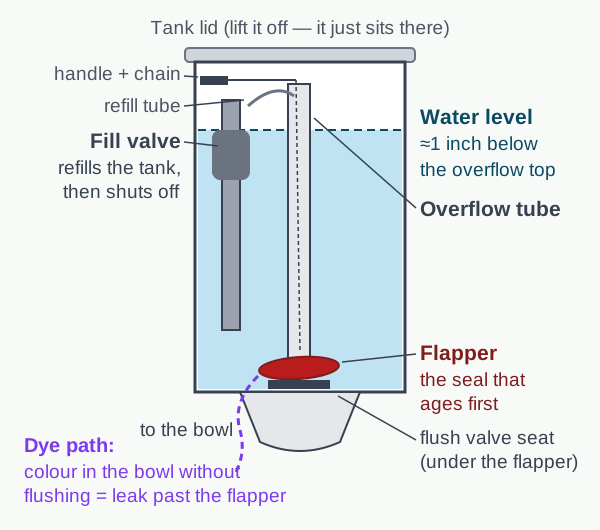
Lift the lid (it is not screwed down; set it somewhere it cannot fall) and you will see the whole machine at once. The diagram at the top of this page labels it:
- The fill valve stands in the left corner. It lets water in after a flush and shuts off when the tank is full. Its float rides the water level up and down.
- The overflow tube is the tall pipe in the middle. It is a safety drain: if the fill valve ever fails to shut off, water spills down this tube into the bowl instead of onto your floor. The finished water level should sit about an inch below the top of this tube.
- The flapper is the rubber disc chained to the flush handle. Pull the handle, the chain lifts the flapper, tank water rushes into the bowl — that is the flush. Then the flapper falls back and seals the tank so it can refill.
- The flush valve seat is the rim the flapper seals against. It is part of the drain the flapper plugs.
Every "toilet keeps running" complaint comes from one of these, or from the water level itself. Which brings us to the suspects, in the order they actually fail.
The five suspects, most likely first
1. A worn flapper. This is the answer most of the time — the EPA names worn flappers the most common toilet leak in the home. The rubber lives submerged in treated water for years, and chlorine and chloramine in municipal water slowly harden, warp and blister it. A seal that was watertight at year two weeps at year five. The EPA's guidance is to expect roughly five years from a flapper and to check for leaks before the phantom flushing even starts.
2. The chain. The flapper's chain needs a little slack — about half an inch. Too tight, and it holds the flapper fractionally open forever. Too loose or tangled, and it can slip under the flapper as it falls, propping the seal open. Owners create this fault themselves more often than they would like to admit, usually after a previous repair.
3. Water level set too high. If the tank fills until water reaches the top of the overflow tube, the excess simply drains down the tube into the bowl, continuously. The toilet "runs" without anything being worn at all — the fill valve's float is just set wrong, or has drifted.
4. A tired fill valve. Fill valves fail in two voices: one that never quite shuts off (a constant faint hiss and water trickling down the overflow tube), and one that leaks internally and lets the level creep. Mineral grit in the valve is the usual cause.
5. A damaged flush valve seat. The least common and least convenient: the rim the flapper seals against is pitted, cracked or furred with mineral scale, so even a brand-new flapper cannot seal it. This is the fault you diagnose by elimination — it is what remains when a new flapper changes nothing.
Diagnosis here is not guesswork, though. One test separates suspect 1 and 5 (water escaping downward) from suspects 3 and 4 (water escaping over the top), and it takes fifteen minutes, most of them spent doing something else.
Reading the signs before you lift the lid
You can narrow the suspect list from outside the tank, just by paying attention for a day:
- How often does it refill? Time it. A refill every few minutes means a fast leak — a flapper held open by its chain, or badly warped. A refill every hour or two is the classic slow flapper seep. A toilet that only "runs" in long, steady spells is more likely overfilling or a fill valve that will not close.
- Look at the bowl water. A faint constant ripple or movement at the bowl's surface means water is arriving continuously — either down the flush valve (leak) or down the overflow tube (overfill). A still bowl between refills points back to the slow tank-to-bowl seep.
- Look for the mineral line. A rusty or greenish streak staining the porcelain under the rim jets is the signature of water that has been trickling through for weeks — long before the phantom flushing got loud enough to notice.
None of this replaces the dye test; it tells you what to expect from it, and a diagnosis you predicted and then confirmed is one you can trust when you choose the fix.
The dye test: 15 minutes, one verdict
This is the same test the EPA recommends and the one plumbers run first. It answers a single question: is tank water escaping into the bowl without a flush?
- Pick your moment. The toilet needs to sit unused for the test. Just before bed or before leaving for work is perfect — nobody will absent-mindedly flush it.
- Lift the lid and add colour. Drop in about 10 drops of dark food colouring, or a dye tablet if you have one. Blue or red shows best. Stir nothing; the colour disperses on its own.
- Note the water level while you are in there. Is it about an inch below the top of the overflow tube? Already at or over the rim? File that away — it matters below.
- Wait 15 minutes. Do not flush. Do not jiggle the handle. Go and do something else.
- Look in the bowl. This is the whole test. Colour in the bowl water = the tank is leaking downward, past the flapper or its seat. The water in the bowl started clear; the only way colour got there is through the flush valve. No colour = the seal is holding, and your running water is going somewhere else — over the overflow, or the fill valve is misbehaving.
- Flush when you are done. The EPA makes a point of this: flush right after the test so the dye does not sit long enough to stain the porcelain.
Read the result together with what you saw in step 3:
- Colour in the bowl, level normal → flapper (or, rarely, its seat). Go to the flapper swap below.
- No colour, but the level sits at the overflow rim → the level is simply too high. Go to the adjustment below; it is a two-minute fix and free.
- No colour, level normal, but you can see or hear water trickling into the overflow tube → the fill valve is not shutting off. Go to the fill valve section.
- No colour, level normal, nothing trickling → run the test again overnight. A very slow leak may need a few hours to move visible dye. If the overnight test is still clear, watch the pattern for a week; an intermittent fill-valve fault may only show when the house water pressure peaks at night.
Fix 1: swap the flapper (ten minutes, no tools)
If the dye test convicted the seal, start here even if the flapper looks fine — a warped seal often looks perfectly respectable out of the water. Run your fingertip around its underside edge: if it feels wavy, rough or slimy, or leaves black residue on your finger, it is done.
- Turn the water off at the oval valve on the wall behind the toilet. Turn it clockwise until it stops.
- Flush to drain the tank. Hold the handle down until most of the water leaves. A sponge or old towel gets the last inch out of the bottom if you want it dry; working slightly wet is fine too.
- Unhook the chain from the flush lever arm inside the tank.
- Unclip the old flapper. Most hinge on two pegs at the base of the overflow tube — the rubber ears flex off. Some slide off a ring around the tube. Either way, it comes off by hand.
- Take the old flapper to the store (the EPA suggests exactly this, or a clear photo of it). Flappers come in 2-inch and 3-inch sizes and a few model-specific shapes; matching yours beats guessing.
- Clip the new flapper on the same way the old one came off.
- Reattach the chain to the lever arm, leaving about half an inch of slack — one or two loose links — with the flapper seated. This slack is the difference between a seal and a slow leak, so check it twice.
- Turn the water back on, let the tank fill, and flush twice. Watch the flapper drop: it should fall flat and centred.
- Repeat the dye test after an hour or so. Clear bowl water means you are done, and the whole job cost less than lunch.
While the old flapper is off, run a fingertip around the flush valve seat it seals against. It should feel smooth, like a plate rim. If it feels gritty, a wipe with a cloth or a gentle pass with a scouring pad to remove mineral fur may be all it needs. If it feels pitted or you can see a crack, remember that finding — it is the reason a new flapper sometimes does not fix the leak, and it changes the job from ten minutes to a tank-off repair.
The flapper killer hiding in your tank
Before you fit the new flapper, look at what else is in the tank. If there is a drop-in bleach tablet sitting in the corner — the kind that promises a disinfected bowl with every flush — you have probably found why the old flapper died young, and why the next one will too.
Those tablets work by keeping the tank water permanently chlorinated, which means the flapper, the fill valve seals and every other rubber part in the tank marinate in bleach solution 24 hours a day. Rubber that should last five years can soften, swell and warp in a fraction of that, and several toilet manufacturers treat tablet damage as grounds to refuse warranty claims on tank parts. The bowl does not need the help: the tank's job is to store clean water, not to brew disinfectant.
So the rule is simple. Take the tablet out (fish it out with a gloved hand or an old cup and bin it — do not flush it down), fit the new flapper, and if you want a treated bowl, use a cleaner that goes in the bowl itself and gets flushed away. If your old flapper came out slimy, swollen or falling apart rather than merely stiff, this was very likely the story.
Fix 2: set the water level and chain (two minutes, free)
If your dye test was clear but the tank was filling to the overflow rim, nothing is broken — the fill valve is just set to fill too far.
- Screw-type floats: most modern fill valves adjust with a thumb screw or a squeeze clip on the float. Lower the float about an inch and let the tank refill; the water should now stop roughly an inch below the overflow top.
- Ball floats on an arm (older tanks): gently bend the arm downward a fraction, or use the adjustment screw where the arm meets the valve.
- Mark the correct level. Many tanks have a waterline stamped into the porcelain at the back. If yours does not, make a small pencil mark at the right level once you have it — future you will be glad of it.
Then check the chain while the lid is off (half an inch of slack, hanging free, not looped around the flush lever), and confirm the refill tube — the small hose from the fill valve — points into the overflow tube but is not pushed down inside it, which can siphon water and mimic a leak.
Fix 3: swap the fill valve (30 minutes, one wrench)
If water keeps trickling into the overflow tube with the level set correctly, the fill valve itself is failing to shut off. You can try flushing grit from it first — many valves have a cap that twists off so you can pulse water through to clear debris (do this with a cup held over the top, unless you want a fountain). If that does not cure it, replacement is a defined, learnable job:
- Water off at the wall valve. Flush and sponge the tank dry.
- Disconnect the supply line under the tank (a bowl or towel underneath catches what drains).
- Unscrew the mounting nut under the tank that holds the fill valve, and lift the old valve out.
- Set the new valve's height so its top sits a few inches above the overflow tube — the instructions in the box give the measurement for your tank.
- Fit the new valve, hand-tighten the mounting nut plus a quarter turn with the wrench — snug, not forced; you are threading plastic against porcelain.
- Reconnect the supply line, clip the refill tube to the overflow tube, and attach the float if it is a separate piece.
- Turn the water on slowly and check under the tank with a dry hand or a sheet of toilet paper (dampness shows instantly on paper). Let it fill, confirm the shut-off lands an inch below the overflow rim, and flush twice.
A universal fill valve costs $10–$25 and fits nearly every tank made in the last few decades. It is the second-best-value repair in the bathroom.
No flapper in there? Canister and dual-flush toilets
If your house is less than about fifteen years old, there is a fair chance the tank holds something that does not look like the diagram: a tall canister sitting over the flush valve, or a dual-flush tower with two buttons on the lid. Owners open these tanks, find no flapper, and assume the guide does not apply to them. It does — only the seal's shape changed.
- Canister valves (common on Kohler and others) seal with a flat silicone gasket at the canister's base. The dye test works identically. The fix: the canister usually lifts or twists out by hand after you disconnect the flush chain or rod; rinse the gasket, and if it is nicked, hardened or slimy, replace it — often under $10 and model-specific, so take it with you.
- Dual-flush towers seal with a ring gasket at their base and are removed by a quarter-turn or release clips, depending on the maker. Same test, same gasket logic.
In both designs the overflow and fill valve behave exactly as described above, and a high water level or a dying fill valve produces the same symptoms. The parts are less universal than a $6 flapper, which is the one real argument for identifying your model (stamped inside the tank or lid) before you shop.
What it costs, honestly
The table at the top of this page exists because the ranking guides mostly scatter prices through paragraphs. The short version: this is a parts-cheap, labour-expensive repair. A flapper is $5–$15. A plumber fitting that same flapper runs about $130 on HomeGuide's average — not because the part grew, but because you are buying a van, an hour and a guarantee. A full rebuild kit with fill valve, flapper and seals is $20–$40 in parts and an afternoon of your time.
That maths produces a simple rule: if the fix is in the tank and above the waterline, try it yourself first. Your downside is a $10 part and thirty minutes; your upside is saving a three-figure call-out for a ten-minute job. The calculus flips only when the job drops below the tank — flush valve replacement means unbolting the tank from the bowl — or when the wall valve will not shut off, because then a mistake has no off switch.
And the "just replace the toilet" line? It is the right call in exactly two situations: the porcelain or the flush valve body is cracked (no seal will ever fix a crack), or the toilet is a pre-1994 model using 3.5–6 gallons a flush, in which case a WaterSense replacement at 1.28 gallons pays for itself in water savings on top of ending the leak. A running toilet that is otherwise sound is never, by itself, a reason to buy a new one.
DIY or pro: the honest line
Confident DIY: the dye test, water-level and chain adjustment, flapper swap, canister gasket, fill valve swap. Everything is reachable with the lid off, the only tool beyond your hands is one adjustable wrench, and the wall valve lets you undo any mistake by turning the water off.
Call a plumber: a leak that survives a new flapper and a cleaned seat (the flush valve itself needs replacing), a wall shut-off valve that will not close or weeps when turned, any water appearing at the base of the toilet or on the ceiling below, and anything involving the supply line if yours is an old rigid copper connection that has not moved in decades. Those are the jobs where the cheap fix can become a flood, and the call-out fee is insurance.
Why "I'll get to it" gets expensive: the water maths
A running toilet is one of the few home faults with a meter attached, so let us run the numbers the way your bill will.
The EPA puts a running toilet at 200 gallons a day or more. That is 6,000 gallons a month. At a combined water-and-sewer rate of about $12 per thousand gallons — a middle-of-the-road US figure; check your own bill — that is roughly $70 a month, $850 a year, for a hiss. Even the gentler versions bite: a slow flapper seep of 25 gallons a day, the kind you can only hear at night, is about 750 gallons a month, $9 or so a month, $110 a year — ten times the price of the flapper, every year, forever, until someone lifts the lid.
Scale it by severity:
- Occasional phantom refill (a few times a day): the tank is losing its level over hours — likely 20–50 gallons a day. Annoying, cheap to fix, worth fixing this month.
- Refills every few minutes, or a visible ripple in the bowl: 100–200+ gallons a day. This is the $50–$90-a-month leak. Fix it this week.
- Constant trickle you can hear standing in the doorway, or water always moving in the bowl: the fill valve is effectively running open. Waste can run well past 500 gallons a day. Fix it today, and shut the wall valve between uses until you do.
One more meter to watch: if your water bill jumped and you cannot find the cause, read the house water meter last thing at night and first thing in the morning with nothing used in between. A changed reading in a sleeping house is a leak confessing — and the toilet is the first place to dye-test.
While the dye is out: audit every toilet in the house
Leaks cluster. Toilets installed in the same building year have flappers that age together, in the same treated water, on the same schedule — so a house with one phantom-flushing toilet very often has a second one quietly starting. The dye test costs pennies and fifteen idle minutes, so while you are in the rhythm, test them all.
Run them one at a time so a flush next door does not confuse the result, and write the verdicts down: toilet, date, dye result, water level, flapper condition if you opened it up. That little list is worth more than it looks. It turns next year's "is that toilet running again?" into a lookup instead of a mystery, it gives you the flapper sizes for every toilet in the house before you are standing in the shop aisle, and if your water bill ever spikes, it tells you which suspects you have already cleared.
The EPA suggests checking toilets for silent leaks at least once a year this way. Pick a fixed cue — the weekend the clocks change works — and make it a ten-minute household ritual rather than a repair you wait to be forced into.
If the new flapper did not fix it
Work the short list before you spend real money. Chain too tight or caught under the flapper (recheck the slack with the lid off and the tank full). Wrong flapper size (a 2-inch flapper on a 3-inch valve seeps no matter how new it is). A seat that needs cleaning (grit you could not feel through the old flapper). A refill tube pushed down inside the overflow tube, siphoning quietly. Only after those four is it the flush valve seat itself — pitted or cracked — and that is the legitimate plumber call, or a full rebuild-kit job if you are comfortable unbolting a tank.
Fix it, retest with dye, and then do the thing that stops this article being needed again in five years: write the date on a piece of tape inside the lid. Flappers are wear parts with a roughly five-year life. The next one should be a scheduled $8 swap, not another month of 2 a.m. hissing and a water bill you cannot explain.
Cost at a glance
| Item | Typical cost | Notes |
|---|---|---|
| Flapper, part only (DIY) | $5–$15 | Universal 2-inch fits most toilets; 3-inch and silicone versions cost a little more |
| Flapper fitted by a plumber | ~$130 | HomeGuide average — you are paying for the visit, not the part |
| Fill valve, part only (DIY) | $10–$25 | Universal fill valves fit nearly every tank; swap takes about 30 minutes |
| Full tank rebuild kit, parts only | $20–$40 | Fill valve, flapper and flush valve seals together — the reset button for an old tank |
| New toilet, supplied and fitted | $350–$800 | Only worth it when the porcelain or flush valve body is damaged, or the toilet is a pre-1994 water guzzler |
Frequently asked questions
Why does my toilet refill by itself every few minutes?
That is a phantom flush, and it means water is leaking from the tank into the bowl. As the tank level slowly drops, it eventually crosses the fill valve's trigger point and the valve tops the tank back up — the two-second hiss you hear. The leak is usually a worn flapper that no longer seals, which is why the dye test comes first: it proves the leak path before you buy anything.
How much water does a running toilet actually waste?
More than most owners guess. The EPA's WaterSense program puts a running toilet at 200 gallons a day or more — about 6,000 gallons a month. At a typical combined water-and-sewer rate that is $50–$90 a month for a leak you may barely hear. Even a slow seep of 25 gallons a day adds up to roughly 9,000 gallons a year.
How do I know if it is the flapper or the fill valve?
Watch where the water goes. Dye in the bowl after 15 minutes without flushing means water is escaping downward past the flapper (or, rarely, the flush valve seat). Water trickling down the inside of the overflow tube, or a tank that overfills and hisses constantly, points at the fill valve or a water level set too high. The two faults look similar from outside and completely different from above with the lid off.
Can I replace a toilet flapper myself?
Yes — it is the easiest repair in the tank. Turn off the water at the wall valve, flush to drain the tank, unhook the chain, unclip the old flapper from its pegs, clip the new one on, reattach the chain with a little slack, and turn the water back on. No tools, about ten minutes. The EPA suggests taking the old flapper (or a photo of it) to the store so the replacement matches.
Why does my toilet run on and off all night but seem fine in the day?
The leak does not change; your hearing does. A slow flapper leak may take an hour or more to drop the tank level to the refill point, so during the day the occasional refill hides in household noise. At night the house is quiet and you hear every cycle. A toilet that refills more often over weeks is telling you the seal is getting worse.
My toilet has no flapper. What leaks on a dual-flush or canister toilet?
Newer toilets seal the flush valve with a flat silicone gasket under a canister, or a sealing ring on a dual-flush tower, instead of a hinged flapper. The failure is the same — the seal hardens, warps or collects grit — and so is the dye test. The fix is usually popping the canister or tower out by hand, rinsing or replacing the gasket (often under $10), and reseating it. Check the maker's diagram for your model before you pull anything apart.
When should I call a plumber for a running toilet?
Call when a new flapper and a clean valve seat do not stop the dye-test leak (the flush valve itself may be cracked or pitted, and replacing it means removing the tank), when the shut-off valve at the wall will not close or leaks when touched, or when there is water on the floor at the base — that is a different leak, at the wax ring or supply line, and it damages floors while you watch the tank.
Checked November 16, 2026. This guide is general information, not a substitute for a licensed professional.
Related guides
Frozen Pipes? Thaw Them Safely — and Catch the Split Before It Floods the House
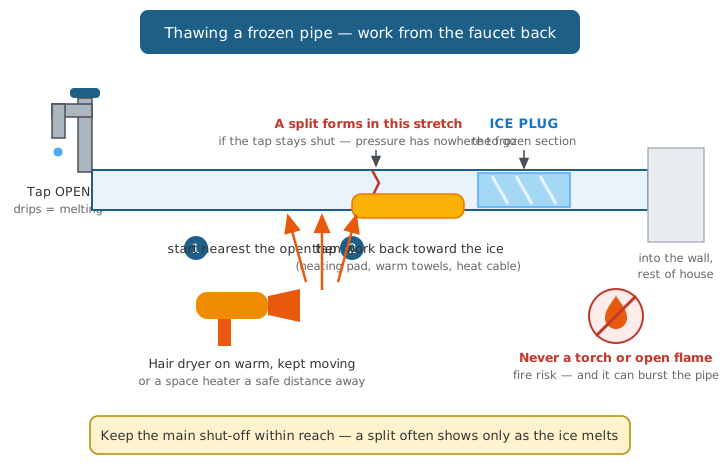
No water from one tap on a freezing morning? Find the frozen section, thaw it safely with the faucet open, spot the split as the ice melts, and prevent the next freeze — with real costs.
Low Water Pressure in the House: How to Find the Cause (and Fix It)
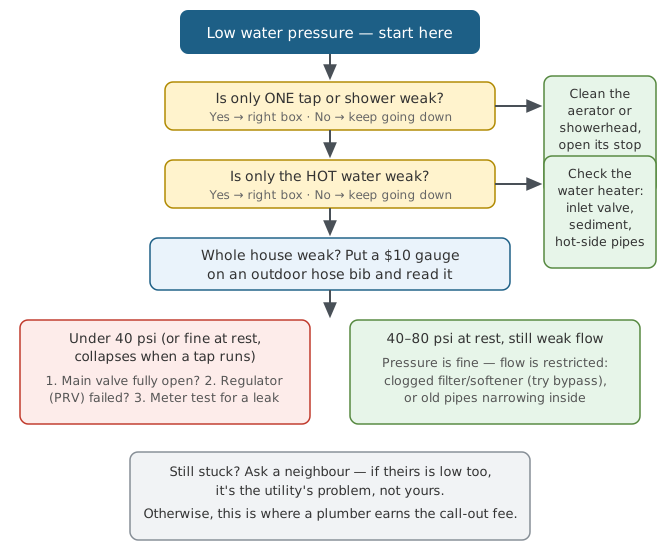
Weak showers and slow-filling tubs? Start with three questions and a $10 gauge. Every common cause of low water pressure — valves, regulator, leaks, corroded pipes — with fixes and costs.
Pipes Bang When the Water Shuts Off? Water Hammer, Fixed in Order of Cost
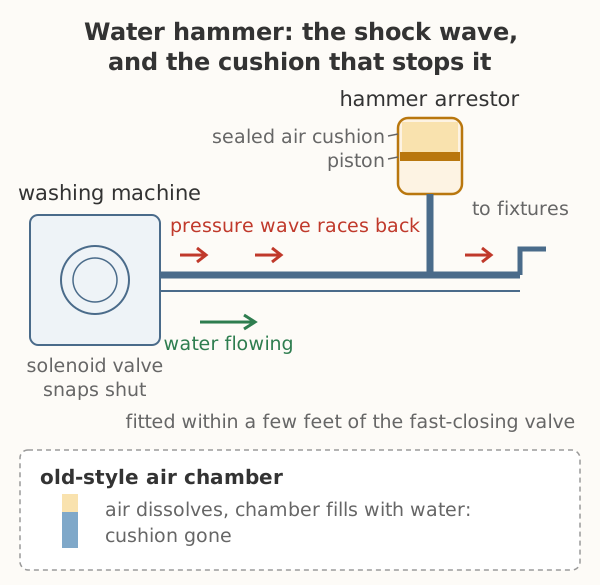
A loud bang every time the washer, dishwasher or toilet stops filling is water hammer — a pressure spike, not just a noise. How to find the trigger fixture, then the fixes in order of cost, from a free drain-down to a $20 arrestor.