 Keep
Frozen Pipes? Thaw Them Safely — and Catch the Split Before It Floods the House
 Daniel Mercer · Editor & Researcher·
Published November 16, 2026·
Updated November 16, 2026
It usually announces itself at the worst moment: the coldest morning of the year, you turn the kitchen tap for the kettle, and nothing comes out. Or worse, a sad trickle that dies as you watch. Somewhere between the street and that tap, the water in a pipe has turned to ice and blocked the line solid.
Here is the part worth understanding before you touch anything. The frozen pipe itself is not the disaster. Plenty of pipes freeze and thaw with no harm done. The disaster is the split — the crack the ice may already have opened in the pipe wall, which right now is plugged by the very ice that caused it. The moment that ice melts, the crack starts leaking under full pressure, possibly inside a wall. So this job has two halves: thaw the pipe gently, and watch it like a hawk while you do, ready to kill the water in seconds.
The good news is that thawing an accessible pipe is genuinely a beginner job. It asks for patience and a hair dryer, not skill. Work through this guide in order: find your shut-off first, locate the freeze, thaw from the tap back, and check for the split as the water returns. Then, while the memory is fresh, spend one autumn weekend making sure you never do this again.
Before anything else: find and test your main shut-off
Every other guide starts with the thawing. Start with the shut-off instead, because the whole risk of this job is a leak appearing mid-thaw, and the difference between a wet towel and a flooded floor is how fast you can stop the water. If you have owned your house for less than a year, there is a fair chance you have never laid eyes on this valve. Cold-snap morning is not when you want to go hunting for it with a torch between your teeth — but it is better than hunting for it while water pours through a ceiling.
The main shut-off is usually one of these places: on the basement wall that faces the street, close to where the water service enters through the foundation; near the water meter; in a crawl space near the entry point; or in a utility closet or garage in slab homes. On well water, look near the pressure tank, where the line from the well comes in. The valve itself is either a round gate valve (turn it clockwise, several turns, to close) or a lever ball valve (a quarter turn, lever across the pipe means closed). Ball valves are the modern, reliable kind; old gate valves sometimes refuse to seal fully, which is worth knowing now rather than mid-flood.
Test it. Close it, then open a tap somewhere and confirm the flow stops. Open the valve again afterwards. If it will not budge, will not close fully, or weeps around the stem, note that as a plumbing job for a calm week — and know that your backup is the meter shut-off at the street, which usually needs a meter key and, in some towns, the utility's permission to touch. Once you have found the valve, do the two things that turn this from trivia into a system: put a tag or a piece of bright tape on it, and tell everyone in the house where it is. Photograph it with your phone while you are down there. This five-minute job is the single most valuable thing in this entire guide, and it pays off in every water emergency you will ever have, not just this one.
Confirm it really is a freeze — and rule out the look-alikes
A dead tap in January is usually ice, but spend two minutes confirming it, because the alternatives have completely different fixes. Walk the house and try the other taps. If one tap is dead and everything else runs, you have a frozen branch line, and the freeze is somewhere along the run feeding that fixture. If several taps are weak or dead, the freeze is probably further back toward where the water enters the house, and more of the system is involved.
If nothing in the house runs at all, widen the lens before you start thawing. Ask a neighbour whether their water is on — a street main break or utility work will take out the whole block and is the utility's problem, not yours. If you are on a well, a dead house is as likely to be the pump, a tripped breaker, or a failed pressure switch as it is ice; check the breaker panel and the pressure gauge on the tank before assuming a freeze. And check the obvious: if anyone recently closed a valve — a plumber, a guest, a curious child — a tap can be "frozen" in the sense that somebody simply turned its supply off. Frozen pipes also leave one more signature the look-alikes don't: they happen after a cold night, they favour taps on exterior walls, and a trickle that fades is the classic first symptom, because the ice plug lets a little water past before it seals or before the last of the line pressure bleeds away.
Find the frozen section
You cannot thaw what you cannot find, and the ice is not always where you expect. The Red Cross list of the usual suspects is short and worth memorising, because your house almost certainly matches it: pipes against exterior walls with little or no insulation; pipes in unheated crawl spaces, basements, attics and garages; outdoor hose bibs and their supply lines; and the stretch where your water service enters through the foundation. Start from the dead tap and follow its pipe run back toward the main, looking for where that run enters one of those cold zones. That transition point is where the freeze almost always lives.
Then use your hands. An exposed pipe with ice inside feels noticeably colder than the same pipe a few feet away, and you can often find the boundaries of the frozen section by touch alone: cold and hard-feeling here, merely cool there. Look for frost on the outside of the pipe, which marks the coldest stretches. Look, too, for a slight bulge or a frost-split line along the pipe — a bulge is the pipe wall already stretched by the ice, and that spot deserves your closest attention during the thaw, because it is the most likely place to leak. If you own an infrared thermometer, this is its finest hour: scan along the run and the temperature cliff will show you the plug. Remember that the frozen section may be longer than the part you can reach, and more than one section can freeze in the same night. If the pipe disappears into a finished wall right where the cold zone is, note that now — it changes the plan, and we will come back to it.
Set up safely before you apply any heat
Three preparations, in this order, before any warmth goes near the pipe.
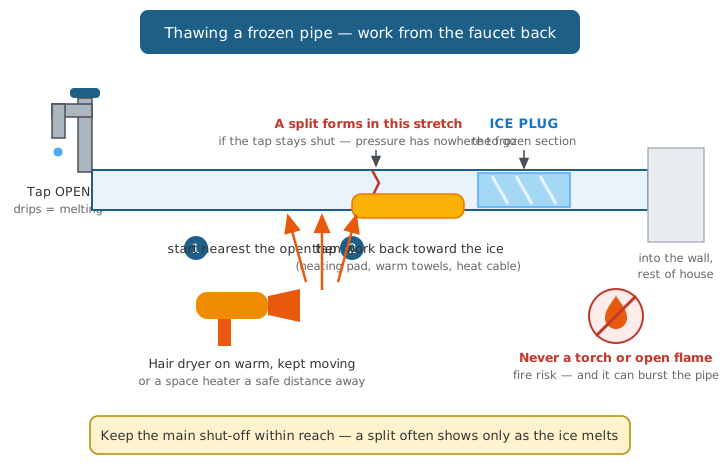
First, open the faucet the frozen pipe serves, and leave it open for the entire job. This does three things at once. It gives expanding water and melting ice somewhere to go, instead of trapping pressure inside the pipe. It gives you a progress gauge: the first drip tells you the ice is yielding. And once water starts moving, the flow itself helps melt the rest of the plug from the inside. To understand why this matters, picture the split itself. Water expands as it freezes, but the ice plug alone rarely cracks a pipe. The crack comes from pressure: ice grows, traps liquid water between the plug and a closed faucet, and keeps squeezing until the pipe wall gives way — usually in the stretch between the plug and the tap, not inside the plug itself. An open faucet removes the trap. This is the step people skip because it seems pointless to open a tap that doesn't run. It is the most important step in the guide.
Second, stage for the leak you hope won't happen. Main shut-off located and reachable (you did that above). Towels and a bucket under the frozen section. Anything stored nearby that water would ruin, moved. If the pipe runs above a ceiling, put a bucket under the likeliest drip point below and know that a ceiling stain spreading is your alarm bell. If you can already see a crack, a bulge that has opened, or water weeping from a joint, do not thaw at all: shut the water off, and move to the burst-pipe plan further down, because that pipe needs repair, not warmth.
Third, choose your heat source from the approved list and respect the one absolute ban. Approved: a hair dryer, an electric heating pad wrapped around the pipe, towels soaked in hot water and wrapped around the section, a portable space heater aimed at the area from a safe distance, or electric heat cable if you happen to have it. Banned, without exception: anything with an open flame. No blowtorch, no propane or kerosene heater, no charcoal stove — the Red Cross names these specifically, and fire services back them up every winter. A torch on a pipe in a wall cavity is how a plumbing problem becomes a house fire; it can also boil the water inside the pipe into a burst of steam pressure and split the very pipe you are trying to save. Gentle heat, patiently applied, thaws pipes perfectly well. There is no version of this job where flame makes it better.
The thawing procedure, step by step
Step 1 — Start at the faucet end. Begin heating the pipe at the point nearest the open tap, not at the middle of the ice plug. This feels backwards and matters enormously. If you melt the far side of the plug first, you trap meltwater between the remaining ice and the closed-off section, recreating exactly the pressure trap that splits pipes. Working from the tap back means every drop you free has an open escape route.
Step 2 — Apply heat in sections, and keep it moving. With a hair dryer on its warm setting, play the air back and forth over a short stretch of pipe, a foot or so at a time, never parking it in one spot. Work the dryer along the pipe, not just across it. With a heating pad, wrap it around the section nearest the tap, give it time to work, then move it along. With hot towels, wrap, wait for them to cool, re-soak, and repeat — slower, but effective and completely safe on any pipe material. A space heater should sit far enough away that it warms the area rather than blasting one point, and it should never be left running unattended in a closed space.
Step 3 — Respect the pipe material. Metal pipe tolerates patient heat well. Plastic pipe (PEX, CPVC) needs more restraint: keep the dryer further back and keep it moving, because plastic softens at temperatures a hair dryer can reach if held close and still. Never use a heat gun on plastic. If you do use a heat gun on metal, low setting, constant motion, and nothing flammable within reach of the airstream — including the insulation and timber you can't quite see inside the wall opening.
Step 4 — Watch the faucet, not just the pipe. Your progress report comes from the tap. First, after some minutes, a drip. Then a thin trickle. Then, as the plug shrinks, a sudden improvement. Keep heating as the flow builds — running water is now your ally, melting the plug from inside. Continue until the tap runs at full, normal pressure, then let it run for a minute or two to clear the last of the ice out of the line.
Step 5 — Inspect the whole run immediately. The instant water is moving again, switch from thawing to inspecting; the next section explains exactly how. Do not skip this because the tap works. The tap working is the beginning of the risky period, not the end of the job.
Step 6 — Check every other faucet in the house. If one pipe froze, others may have frozen too, as the Red Cross warns. Walk the house, run each tap, and repeat the process anywhere else that is dead or weak — while you are set up, warmed up, and in the rhythm of the job.
Step 7 — Know when to stop. If the frozen section is inside a finished wall or ceiling and you cannot reach it, if two hours of honest work produces no drip at all, or if the freeze is in the main service line between the street and the house, stop heating and call a plumber. Professionals bring an electric pipe-thawing machine that passes a current through a metal pipe and melts the ice from inside, including in places no hair dryer will ever reach. Heating a wall cavity blindly for hours is how insulation gets scorched; there is no shame in this call, and it is cheaper than the alternatives.
The split-pipe check: catching the leak as the ice melts
Here is the habit that separates a thaw from a flood. A split made during the freeze is plugged by ice while the pipe is frozen. It reveals itself only as the ice lets go — and it may not reveal itself at the plug. Remember where the pressure does its damage: the stretch between the plug and the faucet, at joints, and at any bulge you spotted earlier. Those are the places to watch.
Dry the pipe with a towel first, along the whole accessible run, so that any new wetness is unmistakably new. Then, as the thaw progresses, run your hand slowly along the pipe every few minutes. You are feeling for dampness, a fine spray, or a drip forming at a joint. Keep a torch or your phone light on it; a pinhole leak often shows as a mist catching the light before it shows as a puddle. A strip of dry tissue or toilet paper wrapped around a suspect joint is a cheap telltale: it darkens the moment water touches it.
Once full flow is restored, do the second check, because some splits only leak under full pressure. Close the faucet and watch the pipe again — pressure is now at its highest, and a crack that wept during the thaw may now spray. Then do the meter check the EPA recommends for hidden leaks generally: with every tap in the house off, look at your water meter. If the dial or the small leak-indicator triangle is moving, water is going somewhere it shouldn't. On a well system, watch whether the pressure tank cycles when nothing is running. Finally, check once more an hour later and again the next morning, including any ceiling or wall below the pipe's route. Slow leaks are patient; your second look is what catches them while they are still a towel problem rather than a restoration problem.
If the same pipe freezes again the same week
It happens, and it is information, not bad luck: a pipe that re-freezes within days of being thawed is telling you its spot is colder than the house can protect, and no amount of careful thawing changes that. Until you can do the insulation work properly, treat the pipe as a patient under observation. Keep the cabinet doors open permanently while the cold lasts. Let that tap drip on every cold night, not just the worst one. If you can reach the pipe, wrap it in towels with a heating pad on its low setting during the coldest hours — attended, and never left running while the house sleeps — or fit the heat cable now rather than in October; it installs just as well in January, only less comfortably. A small space heater in a crawl space can hold the line for a night or two, but only where it can sit clear of everything flammable and only while someone is home and awake to check on it. And move the permanent fix to the top of the list: every repeat freeze rolls the dice on a split again, and the pipe has already used up some of its luck.
If it has already burst: the first ten minutes
Maybe you came home to water. Maybe the thaw found the split for you, enthusiastically. Either way, the sequence is the same and the order matters.
Minute one: shut off the main. Not the tap, not a local valve — the main shut-off you located earlier. This single action ends the emergency; everything after it is just cleanup and phone calls. If the main won't stop it, the meter valve at the street is the fallback.
Then: drain and make safe. Open the lowest taps in the house to drain the lines and relieve pressure. If water is anywhere near sockets, appliances, or the electrical panel, switch off the power to the affected circuits at the breaker before you wade in. Keep clear of any ceiling that is bulging or sagging under water weight — it can come down; poke a small hole in the lowest point with a screwdriver, over a bucket, to drain it in a controlled way rather than all at once on your head.
Then: limit the damage. Buckets under drips, towels as dams, furniture and boxes up off wet floors, photographs of everything before you move it — your insurer will want them, and your memory of the scene will fade faster than you think. Call the plumber for the repair, and call your insurer the same day to open the claim; as the FAQ below covers, the water damage from a sudden burst is typically covered even though the pipe repair itself usually is not. A plumber repairs a burst by cutting out the split section and splicing in new pipe — on accessible copper or PEX it is often an hour or two of work. What you are really paying to avoid, with the careful thaw, is everything around that simple repair: the opened wall, the drying machines, the replaced floor.
What it costs: the free afternoon versus the five-figure week
Frozen pipes are the purest example in home ownership of a problem whose price depends almost entirely on when you catch it. The table at the top of this guide lays out the ladder; here is how the rungs connect.
A DIY thaw costs nothing but time if you already own a hair dryer, and very little if you count a heating pad or a roll of towels. A plumber's thaw visit, at roughly $150–$400, buys you experience and speed — and during a regional cold snap, expect the top of that range, a wait, and some triage, because every plumber in town is fielding the same calls on the same morning. The electric thawing machine call-out, $250–$600, is the specialist tool for ice hidden in walls. If the pipe has split, an accessible repair is $150–$500; inside a finished wall, add the opening and patching and you are at $500–$1,500 or more. And the rung nobody wants: if a split pipe runs unnoticed for hours — while you are at work, asleep, or away for the weekend — the water damage cleanup commonly lands between $1,500 and $8,000, and a serious flood with flooring, cabinetry and mould work goes well beyond that. Your insurance deductible alone is probably $500–$1,000, which means even a fully covered burst costs you more than every prevention measure in the next section combined. That asymmetry — dollars now, thousands later — is the entire argument for the autumn weekend below.
DIY or call a plumber?
Thaw it yourself if the frozen section is exposed and reachable, you have found no crack or bulge that has opened, and you can stay with the job until the water is back. That describes most basement, crawl space and under-sink freezes, and it is a satisfying, genuinely learnable first repair: the tools are already in your house and the feedback (drip, trickle, flow) tells you exactly how you are doing.
Call a plumber if any of these are true: the freeze is inside a finished wall or ceiling; you have put in two patient hours with no drip to show for it; you find a split, an opened bulge, or a leaking joint at any point; the frozen pipe is the main service line; or the pipe that froze is one you cannot identify or reach safely. Also call without hesitation if you are on a well and the dead house turns out to involve the pump or pressure system rather than ice. When you call, the details from your own diagnosis — which tap died, where you think the freeze is, what you have tried — will get you taken more seriously and quoted more accurately in the middle of a cold-snap queue.
Prevention: the October weekend plan
Everything above is the cure. This is the part that makes the cure unnecessary, ordered as a single weekend of work while the weather is still kind, with the prices the other guides leave out.
First, insulate the runs you now know are vulnerable. Foam pipe sleeves are the cheapest insurance in the hardware store — a few dollars buys a six-foot sleeve, pre-slit, that you push onto the pipe and tape at the joints. Cover every accessible pipe in the crawl space, basement rim area, garage and attic, and pay special attention to the stretches that froze this winter, because a pipe that froze once is a pipe in a cold spot, and it will freeze again. Sleeves rated for the pipe's diameter, fitted snugly with no gaps at elbows, do most of the work. For the worst spots — a run hard against an exterior wall — slip the sleeve on and then add wall insulation between the pipe and the cold side, never between the pipe and the warm room: you want the house's heat to reach the pipe and the cold kept out, in that order.
Second, seal the air leaks. Most "cold pipes" are really "pipes in a draught." Cold air washing over a pipe from a foundation crack, an open crawl-space vent, or a hole drilled for a cable will freeze it in weather the rest of the house shrugs off. A can of spray foam and an hour of hunting gaps around the foundation, sill plate and pipe penetrations removes the draught. Close or cover crawl-space vents for the winter where your local practice allows it.
Third, protect the pipes you cannot insulate your way out of. Electric heat cable (often sold as heat tape) with a built-in thermostat wraps or runs along the pipe and switches itself on as temperatures fall; a kit for a typical vulnerable run costs roughly $20–$60 and installs in under an hour, following the manufacturer's instructions exactly — never overlap cable on itself unless the product says you may, and never bury it under insulation unless it is rated for that. For outdoor taps, do the autumn ritual: disconnect hoses (a connected hose traps water in the bib and is a classic split cause), close the interior shut-off for that line if you have one, open the outdoor tap to drain what remains, and push on a foam faucet cover, a few dollars each.
Fourth, set your cold-snap habits. When a hard freeze is forecast: open the cabinet doors under sinks on exterior walls so warm room air reaches the pipes; keep the thermostat at a steady temperature day and night rather than letting the house cool overnight; and let a faucet served by exposed pipes drip. The dripping maths reassure people: a slow trickle overnight uses on the order of a few gallons — pennies of water — because moving water resists freezing and the open tap relieves pressure if ice does form. Compare pennies with the cost table above and the drip wins every time. Choose the tap furthest along the vulnerable run, and run both hot and cold a little if both lines pass through the cold zone, since hot lines freeze too — often first, because they sit still longer between uses.
Fifth, write it down. Note which pipes froze, where the shut-off is, and what you insulated, in the same place you keep the house's other records. Next winter's cold snap will find you prepared rather than re-learning the house at 6 a.m. in a dressing gown.
Leaving the house in winter
Absence turns a small freeze into a catastrophe, because nobody is there to hear the drip or see the meter move. If you travel during cold weather, the Red Cross advice is the baseline: leave the heat on, set no lower than 55°F (13°C), and open the cabinet doors under sinks before you go. Add a human layer — a neighbour or friend who walks through every couple of days during a cold spell, knows where your shut-off is (show them before you leave, not by text from the airport), and has your number.
For longer absences, go further: shut off the main and drain the lines by opening the lowest taps, which removes the water that could ever freeze or flood. If you do this, follow your water heater manufacturer's guidance about whether to switch it off or leave it on its lowest setting, and remember the system needs refilling and air-purging when you return. A battery or Wi-Fi water sensor placed near the water heater, the washing machine and under the kitchen sink — inexpensive devices that scream or message you when they get wet — is the closest thing to being home, and worth it in any house that has already frozen once.
The one habit that matters most
Strip this whole guide down and one habit does most of the protective work: know your shut-off, and keep the vulnerable pipes warm, insulated and draught-free. The thaw itself is simple — open tap, gentle heat, faucet end first, never a flame — and the split check is just attentiveness at the right moment. Do the October weekend, tag the valve, and the next cold snap becomes a story about a hair dryer instead of a claim number.
Cost at a glance
| Item | Typical cost | Notes |
|---|---|---|
| DIY thaw (hair dryer or heating pad you own) | $0 | Your time only — typically 30 minutes to a few hours |
| Plumber thaw visit | $150–$400 | Cold-snap and after-hours call-outs sit at the top of the range |
| Electric pipe-thawing machine call-out | $250–$600 | For frozen sections hidden inside walls, where surface heat can't reach |
| Burst pipe repair, accessible pipe | $150–$500 | Cutting out and replacing a split section of copper or PEX |
| Burst pipe repair inside a finished wall | $500–$1,500+ | Includes opening the wall and patching it afterwards |
| Water damage cleanup after a burst | $1,500–$8,000+ | Drying, flooring, and mould remediation — the bill the careful thaw avoids |
Frequently asked questions
How long does it take to thaw a frozen pipe?
For an exposed pipe in a basement or under a sink, a hair dryer usually restores flow in 30 to 60 minutes. Long frozen runs, pipes inside walls, and very cold spaces can take several hours. Judge progress at the faucet: first a drip, then a trickle, then full flow. If two hours of steady, careful heat produces not even a drip, the freeze is somewhere your heat isn't reaching — that's the point to call a plumber with an electric thawing machine rather than turning your own heat up.
Can a frozen pipe thaw on its own without bursting?
Yes, and it happens all the time when the weather warms up. Many frozen pipes survive with no damage at all. The catch is that you cannot tell whether yours split until water is flowing and pressurised again, which is why letting it thaw unattended is a gamble: if it did split, it will leak the moment it opens up. Either thaw it yourself while watching, or — if you leave it to the weather — check the pipe, the meter, and the floors around it carefully as soon as flow returns.
Why did only one tap in the house stop working?
Because only one branch froze. Each fixture is fed by its own run of pipe, and the run to that tap passes through a cold spot the others don't — an exterior wall, a draughty crawl space corner, the cabinet under a sink on an outside wall. The rest of the house is fine because its pipes stayed warmer. That single dead tap is actually useful information: it tells you roughly which run to follow when you go looking for the freeze.
Will a frozen pipe always burst?
No. Plenty freeze solid and thaw without any damage. A burst happens when ice blocks the pipe and the water trapped between the ice and a closed faucet gets squeezed as more ice forms — that pressure, not the ice itself, is what splits the pipe wall. Keeping the faucet open while you thaw removes the trap, which is why it is the first step and not an afterthought. You should still treat every frozen pipe as a pipe that might have split, and check it as it thaws.
Is a space heater or heat gun safe for thawing pipes?
A portable space heater is one of the approved options, provided it sits on a clear, stable surface away from anything flammable and you stay in attendance — never leave one running against a wall cavity and go to bed. A heat gun works but is easier to misuse: on its high setting, held still, it can scorch wood, melt plastic pipe and solder joints, and ignite insulation. If you use one, keep it on low and keep it moving. A hair dryer is slower and much harder to get wrong, which is why it's the default recommendation. Open flame of any kind — torch, propane or kerosene heater, charcoal stove — is never acceptable.
At what temperature do pipes freeze?
The widely used rule of thumb from the American Red Cross is that the risk becomes serious when outdoor temperatures fall to around 20°F (-7°C) or below, especially for pipes in unheated spaces. But pipes can freeze at higher temperatures than that if they sit in a draughty exterior wall, a vented crawl space, or a spot where wind strips away what little warmth the house gives them. In other words, your house has its own freeze point, and the pipes that froze this winter are the ones that told you where it is.
Does homeowners insurance cover a burst frozen pipe?
Usually, yes for the damage, with conditions. A standard policy typically covers the sudden water damage from a burst pipe — the ruined flooring, drywall and belongings — but not the cost of repairing the pipe itself. The common grounds for a denied claim is neglect: if the house was left unheated during a cold snap, the insurer may argue the loss was preventable. Keep the heat on, keep records of what you did, photograph everything before you clean up, and report the loss promptly.
Checked November 16, 2026. This guide is general information, not a substitute for a licensed professional.
Related guides
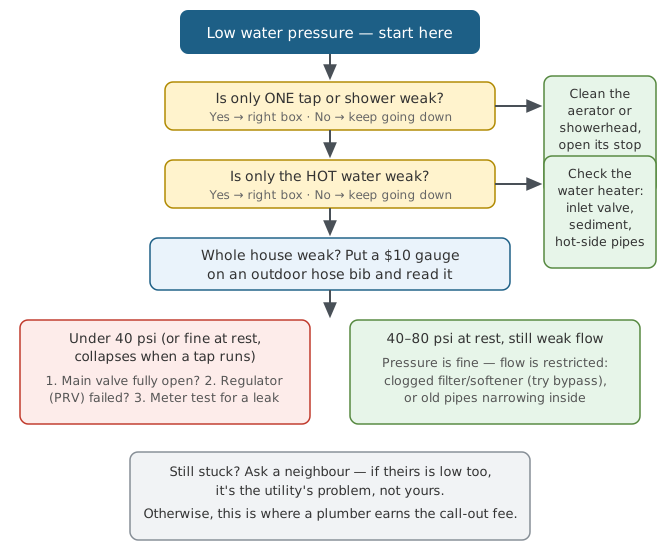
Low Water Pressure in the House: How to Find the Cause (and Fix It)
Weak showers and slow-filling tubs? Start with three questions and a $10 gauge. Every common cause of low water pressure — valves, regulator, leaks, corroded pipes — with fixes and costs.
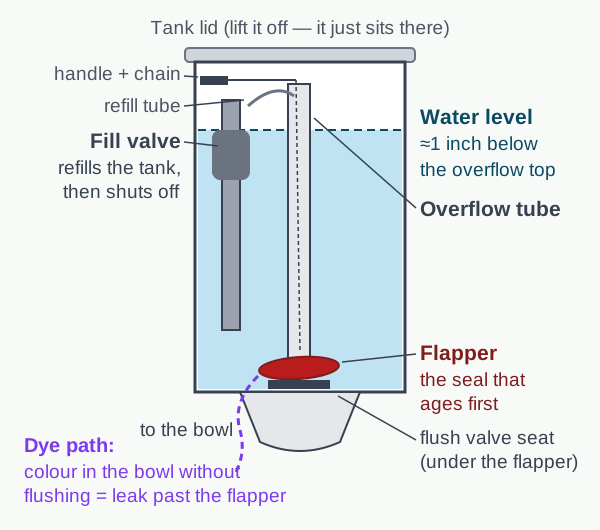
Toilet Keeps Running? The Dye Test Finds the Guilty Part in 15 Minutes
A toilet that refills by itself is leaking from tank to bowl, and one part is almost always to blame. Run the dye test, find it in 15 minutes, and fix it for the price of a coffee.
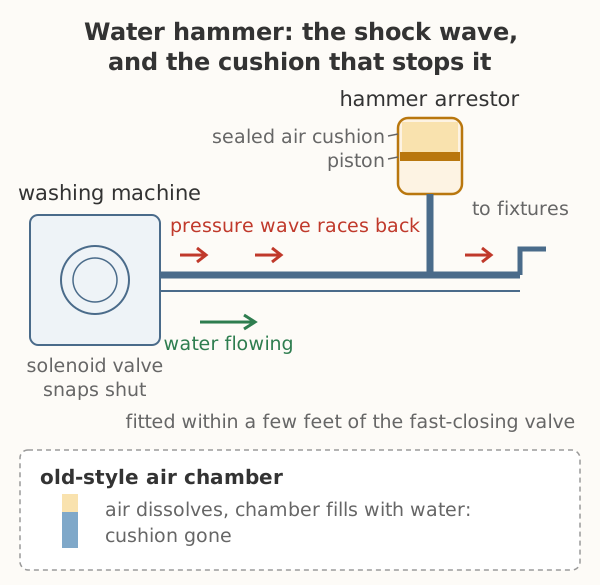
Pipes Bang When the Water Shuts Off? Water Hammer, Fixed in Order of Cost
A loud bang every time the washer, dishwasher or toilet stops filling is water hammer — a pressure spike, not just a noise. How to find the trigger fixture, then the fixes in order of cost, from a free drain-down to a $20 arrestor.