 Keep
First-Time Homeowner Maintenance Checklist: The First 30 Days
 Daniel Mercer · Editor & Researcher·
Published November 16, 2026·
Updated November 16, 2026
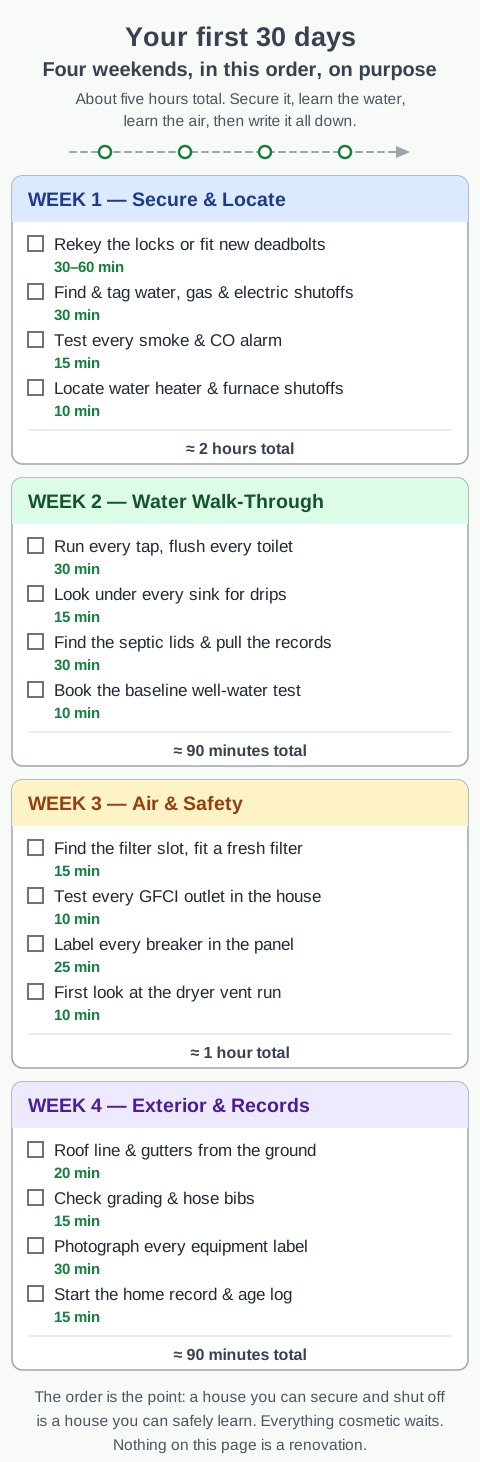
You have the keys, the boxes are in the wrong rooms, and the house is making noises you cannot identify yet. Every system in it — the furnace, the water heater, the panel, the septic tank if you have one — is a stranger. The instinct is to start improving things: paint a room, plan a project, make it yours. Resist that for one month. The first 30 days in a new house are not for renovation. They are for orientation.
That is not a motivational slogan; it is a practical ordering. Almost every expensive disaster in a house gets cheaper the earlier it is caught, and everything early depends on two things you do not have yet: knowing where the controls are, and knowing what "normal" looks like. You cannot spot that a drain has slowed if you never ran it when it was healthy. You cannot find the main shutoff at 2 a.m. with water coming through the ceiling if you never found it at 2 p.m. with a cup of coffee. This month buys you both kinds of knowledge, in about five hours of total work, spread over four weekends so it fits around the unpacking.
The order below is by consequence, not by room and not by what looks worst. Week 1 makes the house secure and stoppable. Week 2 teaches you the water, because water does most of the damage in most houses. Week 3 teaches you the air and the electrical safety devices. Week 4 takes you outside and then turns everything you have learned into a written record — the home record that will make every future repair quote, warranty question and budget decision easier. Each task carries its time and, where there is one, its cost. Most tasks cost nothing but minutes.
One more promise before the list: this month is deliberately short. A checklist you finish beats a perfect checklist you abandon in week 2, which is why the next section exists.
How to use this checklist (and what "done" means)
Work the weeks in order, but do not let a week hold you hostage. If your house has no gas service, the gas shutoff takes zero minutes and you move on. If the previous owner left a labelled panel and a folder of manuals, week 4 gets shorter. The sequence matters more than the schedule: secure first, water second, air third, records last, because each stage assumes the one before it. Finding a leak in week 2 is a nuisance; finding it in week 1, before you know where the shutoff is, is a flood.
"Done" for each task means you could do it again in the dark, or tell someone else exactly where to go. A shutoff you located but did not tag is not done — in an emergency, nobody will remember which of the four valves in the basement corner was the right one. A filter size you meant to remember is not done; a photo of the frame with the size printed on it is done. This is why so many tasks below end with a label, a tag or a photograph. The physical fix is the small part. The retrievable knowledge is the asset.
Expect to find one or two things wrong. Every house has them: an alarm that chirps and dies, a valve that has not moved in a decade, a sink trap with a slow weep. Finding them in a planned walk-through, in daylight, with the shutoff already located, is the cheapest possible way to meet them. Write each one on a single running list — the month-one list — instead of fixing as you go. At the end of the month you will have a short, specific list, and specific lists get accurate quotes.
When the month is over, this checklist hands off to a rhythm rather than ending: our maintenance calendar lays out the monthly, seasonal and annual jobs for the rest of your first year, so the habits you build here have somewhere to live.
What can safely wait 90 days
Part of starting well is permission to ignore things. Everything on this list is visible, tempting and genuinely unimportant for the first three months:
- Paint, wallpaper and cosmetic repairs. They change nothing about how the house runs, and living in a room for a season teaches you what it actually needs.
- Landscaping and lawn projects, beyond the one functional check in week 4 (soil sloping away from the foundation). Beds, borders and planting can all wait for the right season anyway.
- Fixture upgrades — faucets, showerheads, light fittings that work but offend you. Working-and-ugly beats new-and-leaking.
- Smart-home devices. A smart thermostat installed before you know your heating system's quirks is a gadget on top of a mystery. Learn the system first.
- A deep gutter clean, unless you can already see water spilling over the side in rain. Gutters are a seasonal task with a proper slot in the year; week 4 only asks you to look.
- Garage and storage organisation. It will happen in month three with far better information about what you actually use.
- Every renovation idea. Kitchens, bathrooms and decks will keep. Decisions made after 90 days of living in a house are visibly better than decisions made in the first fortnight, and the home record you build in week 4 is the raw material for pricing them.
If it does not protect the house from water, fire, cold or strangers, and it is not on the four-week list, it waits. That single rule is what makes the first month finishable.
Week 1: Secure and locate (about 2 hours)
Rekey the locks, or replace the deadbolts
Start with the uncomfortable arithmetic of a house purchase: you have no idea how many copies of your front-door key exist. The sellers kept some. Their adult children, parents, cleaner, dog walker and at least one contractor from 2019 may have others. None of those people is a villain; the point is simply that you cannot list them, so you cannot trust the key. Until you act, the house is not fully yours.
You have two fixes. Rekeying keeps your existing locks and changes the pins inside the cylinder so the old key stops working and a new one takes over. A locksmith prices it per cylinder, typically $15–$45 per lock plus a call-out charge, so a house with three to five exterior locks usually lands between $100 and $300 for the whole job in one visit, and it takes under an hour. Replacing the deadbolts means new hardware: $40–$90 per door for a decent deadbolt you install yourself, or $75–$200 per door if a locksmith supplies and fits it.
Choose rekeying if the locks work smoothly and are reasonable quality — it buys the identical security outcome for a fraction of the money. Choose replacement if a lock sticks, feels loose, is the flimsiest builder-grade hardware, or if you were going to upgrade to a keypad or smart lock soon anyway (rekeying a lock you replace in six months is paying twice). While you are at the doors, note any exterior door with no deadbolt at all; that one gets new hardware, not a rekey.
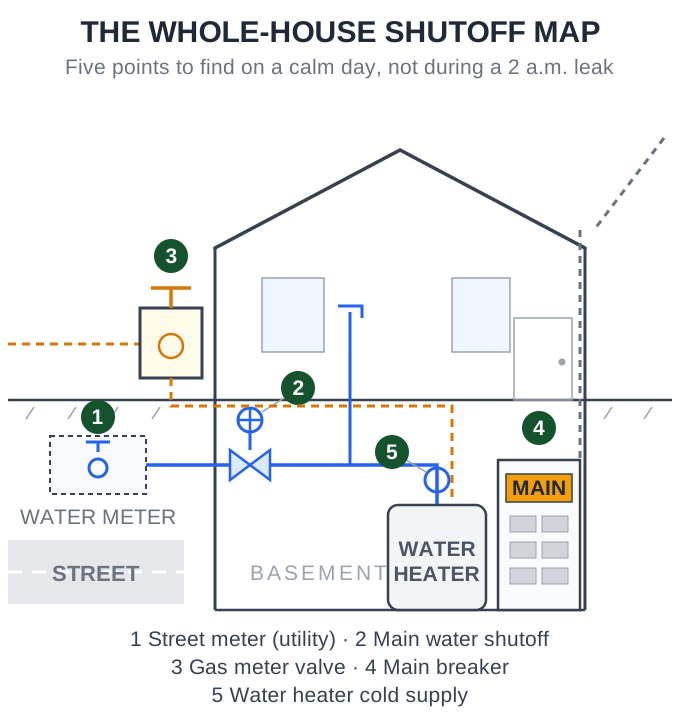
Find and tag the three shutoffs
Ready.gov's preparedness guidance makes the same point this week does: the time to find a shutoff is before you need it, and the valve should be tagged so anyone in the household can find it under stress. You are looking for three controls:
- Main water shutoff. Usually where the water service line enters the house — the basement wall facing the street, a crawlspace, or, in slab-on-grade homes, near the water heater or in a ground box by the meter. Turn it off, open a tap, and confirm the water actually stops. A valve that will not budge, or that only slows the flow, goes on the month-one list: it is a small plumbing job now and a catastrophe later.
- Gas shutoff. At the meter, on the supply side. Know where it is and that it needs a wrench; you do not practise with this one. Gas is turned off only for a leak or damage, and only the gas company turns it back on.
- Electrical panel and main breaker. Typically in the basement, garage or a utility closet. Find it, open it, and identify the main breaker that kills power to the whole house. Full labelling of every circuit is a week 3 job; this week you only need to know where the panel lives and that the main switch works.
Tag each one: a loop of painter's tape or a luggage tag with "MAIN WATER" in marker takes ten seconds and pays off exactly once, on the worst day. Our guide "Find It Before You Need It: Your Main Water Shutoff, Gas Shutoff & Electrical Panel" goes deeper on each location, the gate-valve-versus-ball-valve question, and how to prove a shutoff really closes — read it this week if any of the three hides from you.
Test every smoke and CO alarm
The U.S. Fire Administration's guidance is short enough to memorise: test alarms monthly, and replace any alarm — smoke or carbon monoxide — that is more than 10 years old, because sensors degrade whether or not the test button still chirps. In a house you just bought, treat every alarm as being of unknown age until you have pulled it down and read the date printed on the back. Sellers rarely replace them on schedule.
Walk the house with a step stool. Press each test button and listen for a strong, full alarm, not a feeble chirp. Check the date on every unit. Replace dead or expired alarms the same week — they run $20–$50 each, and most homes need three to six across bedrooms, hallways and each floor. Note which rooms have no alarm at all; a missing CO alarm near sleeping areas, in a house with any fuel-burning appliance or an attached garage, is a genuine gap, not a detail.
Locate the big machines and their shutoffs
End week 1 by simply standing in front of your water heater and your furnace or boiler and learning three things about each: what fuel it burns, where its shutoff is (the cold-water valve above the water heater; the furnace's switch, which often looks like a light switch on or near the unit, plus its gas valve if applicable), and where its label is. You will photograph those labels properly in week 4. This week, knowing that the equipment exists, where it sits and how to stop it is enough. If either machine has a puddle, rust streaks or a scorch smell, it goes on the month-one list in bold.
Week 2: The water walk-through (about 90 minutes)
Water is the most destructive ordinary force in a house, and it is quiet. This week's job is to establish your baselines: how every tap, drain and toilet behaves today, so that a change six months from now registers as a change.
Run everything, and pay attention like it matters
Go room by room. Run every tap for a full minute. Flush every toilet and watch it complete the cycle and stop — a toilet that keeps sighing or refills itself briefly every few minutes is leaking past its flapper already. Fill and drain every sink and tub, and watch the drain speed; you are not grading, just noticing, so that "the guest bath has always been slow" is a fact you know rather than a surprise you meet later. Run the shower and look at where the water lands and whether the diverter actually diverts.
As you go, use your other senses on the water itself. Pressure: strong everywhere, or one weak room? Colour: clear from the first second, or a rust tint that clears? Smell: nothing, chlorine, or the rotten-egg note of sulphur? On city water these answers are mostly curiosity. On a well, they are your first data about the system, and they feed directly into the water test below.
Get under every sink
Take a flashlight and a dry paper towel to every sink cabinet, vanity and the laundry connections. Look at the trap, the supply lines and the shutoff valves under each fixture — those little oval-handled valves are the ones you will want in a hurry someday, so turn each one a quarter-turn and back to confirm it is not seized solid. Wipe every joint with the dry towel; a slow weep that is invisible to the eye shows up immediately on paper. Check the cabinet floor for soft spots, staining or a musty smell, all of which say a leak predates you. Behind the washing machine, find its shutoff valves too, and note the age and material of the hoses; braided steel outlasts plain rubber, and rubber hoses older than you can account for belong on the list.
While you are in the utility area, check the water heater's temperature setting. The dial should sit at about 120°F — hot enough for showers and dishwashers, cool enough to sharply reduce scald risk. Many houses are set far hotter by habit. Note the setting in your record either way.
If you have a septic system: lids and records
No rival checklist will tell you this, because most are written as if every house were on a sewer. If your house has a septic tank, two week-2 jobs matter more than anything else in this section.
First, find the tank and its lids. You cannot maintain what you cannot locate, and the first pumping visit is far cheaper when the crew is not spending it hunting. Our guide "How to Find Your Septic Tank: Records, Clues, and Probing, Step by Step" covers the full method — county records, the line from the house, careful probing — and most owners can at least narrow it to a few square yards in half an hour.
Second, pull the records. Ask the seller's paperwork, the county health department and your closing file for the system's age, tank size and last pumping date. Then apply the honest rule: if nobody can tell you when it was last pumped, assume it is due. Our guide "How Often Should You Pump Your Septic Tank? (By Tank Size & Household)" works through the interval table, but the short version is that a typical household pumps every three to five years, at $300–$600 a visit. You do not need to book it this week; you need it on the calendar and in the budget, not discovered via a soggy lawn.
If you have a well: book the baseline test
A well delivers whatever the ground gives it, and the only way to know what that is, is to test. If the sale did not include a recent lab result, book a baseline test at a state-certified laboratory now: a standard panel covering coliform bacteria, nitrates and the common basics typically runs $100–$300, and it becomes the reference point every future result is compared against. Our guide "How to Test Your Well Water: What to Test, How Often, and What It Costs" covers which panels are worth paying for and which add-ons are salesmanship. Note the date and keep the report with the house papers; in week 4 it joins the home record.
Week 3: Air and safety (about 1 hour)
Find the filter, and start with a fresh one
Somewhere between your house's air and its furnace or air handler sits a filter, and in a newly bought house its condition is a small biography of the previous owner's diligence. Expect the worst and be pleasantly surprised if wrong.
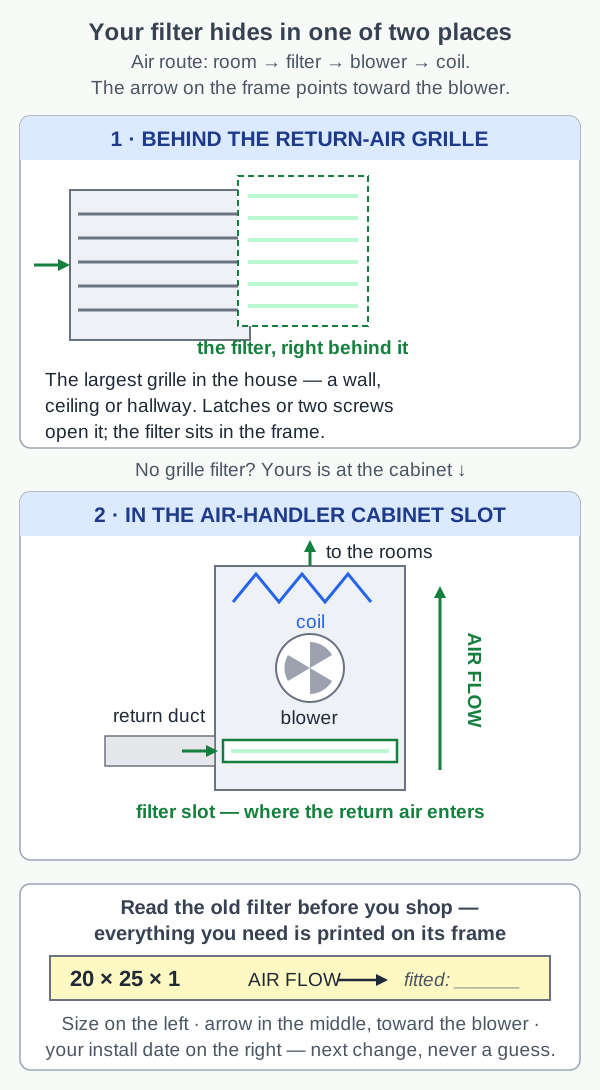
The slot hides in one of two places: at the air handler or furnace cabinet itself, behind a panel or in a rack at the base, or behind the largest return-air grille in the house, often in a hallway wall or ceiling. Slide the old filter out and read the size printed on its cardboard frame — that string of numbers is the size you buy, forever, and it goes into your home record in week 4. Note the arrow on the frame, too: it points in the direction of airflow, toward the blower. Fit a fresh filter ($8–$25 for standard pleated sizes) and write the date on the frame with a marker, so the next person to look — future you — can see exactly how long it has served. ENERGY STAR's rule from here on is simple: check the filter monthly, and change it at least every three months, sooner if it looks grey and loaded. Our guide "How Often to Change Your HVAC Filter (It Depends on the Filter You Have)" explains why the right interval depends on the filter's thickness and your household, and why a higher MERV rating is not automatically better.
If the old filter comes out black, collapsed or bypassed by gaps, do not just replace it and forget it: a filter in that state means the blower and coil have been breathing dust, and a professional cleaning and tune-up moves up your list for this season.
Test every GFCI
Ground-fault circuit interrupters are the outlets with the two small buttons, found in kitchens, bathrooms, garages, basements and outdoors — anywhere water and electricity keep company. Plug a lamp or phone charger into each one, press TEST, and confirm the power dies; press RESET and confirm it returns. An outlet that will not trip is not protecting anyone, and one that will not reset has already failed; both go on the month-one list for an electrician or a confident DIY replacement. Ten minutes, every outlet, no exceptions — these devices only work if their mechanism still moves, and mechanisms that sit untested for a decade seize quietly.
Label the panel properly
Go back to the electrical panel you located in week 1, this time with a helper, two phones, and a marker. The existing labels, if any, will be a mixture of accurate, vague ("plugs") and wrong. Work breaker by breaker: helper flips one, you walk the house finding what died, and you write the label for what you actually found — "kitchen counter outlets, north wall" beats "kitchen" the first time you need only half a room dead. Be honest about uncertainty: a breaker you could not identify gets labelled "unknown — checked [date]", which is useful information, not failure. Two cautions: work only on the breakers, never remove the panel cover (the wiring behind it is a professional's territory), and if you find scorch marks, a buzzing breaker or a breaker that will not reset, stop labelling and put an electrician at the top of the month-one list.
Give the dryer vent a first look
Not a full cleaning — that is a seasonal job with its own slot in the year — just reconnaissance. Find where the dryer vents outside and confirm the flap opens when the dryer runs and closes when it stops. Pull the lint screen, wash off the film that dryer sheets leave behind (water should pass through it freely), and check the visible run of duct for kinks, crushing behind the machine, or the white plastic flex duct that modern guidance has retired. If the exterior flap is packed with lint, that is your notice that the full clean is due sooner rather than later.
Week 4: Exterior and records (about 90 minutes)
Walk the roof line and gutters from the ground
You are not climbing anything. Walk the perimeter slowly, with binoculars if you have them, and read the roof like a headline: missing or curled shingles, sagging lines, flashing that has pulled away at chimneys and valleys, gutters that tilt the wrong way or hang off their spikes. From below, look at the soffits and fascia for staining and peeling paint, which usually report a leak rather than cause one. Inside the attic, if you can enter it safely, a two-minute look with a flashlight on a rainy day (or just after one) is worth more than any of this: water stains on the decking tell you where the roof has already spoken. Everything you find goes on the list as "monitor", not "fix this weekend" — the point of the walk is a baseline, taken while the seller's disclosures are still fresh in your mind.
Check the grading and the hose bibs
Stand at each corner and look at the ground against the foundation. Soil and mulch should slope away from the house on every side, so rain sheds outward instead of pooling against the wall and finding the basement. Note any side where the grade has settled flat or negative; regrading is a wheelbarrow job for a dry weekend later in the season, and it is one of the cheapest basement-water preventions there is. Then find every outdoor faucet (hose bib), turn each on briefly, and check both the outside wall and, if the pipe runs through a basement or crawlspace, the inside run for leaks — a bib that froze and split last winter often announces itself only when first used in spring, indoors, inside the wall. Each bib should also have an interior shutoff; find it now and add it to your tag collection from week 1.
Build the home-record starter kit
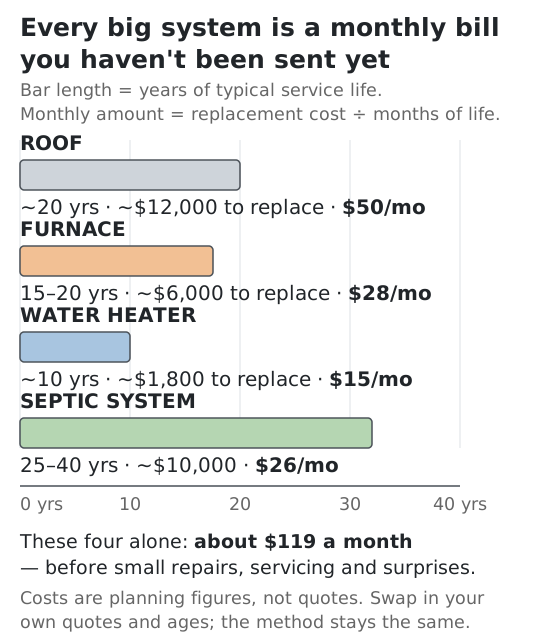
This is the task no other checklist insists on, and it is the one that will save you the most money over the next decade. Every major machine in your house carries a label stating its brand, model and serial number, and from the serial number its age can usually be decoded. Ages are power: they tell you what is mid-life, what is living on borrowed time, and what a replacement should be budgeted at — which is why our guide "How Much to Budget for Home Maintenance in Year 1: The 1% Rule, Tested" starts from exactly this list.
Give it 30 minutes with your phone:
- Photograph every label: furnace or boiler, air handler and outdoor AC unit, water heater, electrical panel (the specification label inside the door), refrigerator, dishwasher, oven, washer and dryer, garage door opener, and any well pump controller, pressure tank, softener or septic control panel you found in week 2.
- Start the age log: one note or spreadsheet with a line per item — what it is, brand, model, serial number, the year you decode from it, its fuel or power source, and its consumable (filter size for the HVAC, anode rod for the water heater, salt for the softener).
- File the paper: closing documents, the inspection report, manuals the seller left, your well-water report and septic records, and the month-one list, all in one folder or one cloud album called by the house's name.
That folder is now the single most useful document you own about your house. Every contractor quote gets checked against it, every "how old is the furnace?" gets answered from it in ten seconds, and the next owner will bless your name for it at resale.
What the first month costs, and the pro version
Add up the checklist and the money is modest. The rekey runs $100–$300 for most houses (or $40–$90 a door if you replace deadbolts yourself). Alarms are $20–$50 for each unit that turns out to be dead or expired. Filters are $8–$25. Well owners add $100–$300 for the baseline test. Total for most buyers: $150–$450, with a septic pumping visit ($300–$600) as a first-season contingency only if your system's history is a blank. Everything else on the list is time — roughly five hours of it.
If even that time is scarce, there is a legitimate pro version of this whole month: a half-day handyman orientation visit. Book a well-reviewed local handyman for three to four hours (expect roughly $150–$400 depending on your market) and walk this exact checklist together. They bring the ladder, the valve wrench and the flashlight; you bring the tags, the phone camera and the questions. A good visit covers the shutoff hunt and valve checks, the alarm dates, the filter change, panel labelling help, and a written list of everything they noticed, in priority order. You still do week 4's record-keeping yourself — that part is the owner's job — but the physical orientation compresses into one appointment, and you finish it knowing your house with a professional's eyes having gone over it once. It is money well spent for a first-time owner of an older house, and unnecessary for a handy buyer of a newer one.
DIY, pro, or split it
Nearly everything in these four weeks was designed to be owner work: locating, testing, labelling, photographing and recording require no licence and no special tools, and doing them yourself is precisely how the knowledge gets into your head. Hire the locksmith if deadbolts intimidate you; hire the handyman if time is the constraint. But the moment a task stops being orientation and becomes a fault — a main shutoff that will not close, a panel with heat or scorch marks, an alarm circuit that is dead at every unit, water arriving somewhere it should not — it leaves this checklist and becomes a specific professional call. You will make that call well, because you will be able to say exactly what is wrong and where it is. That, in the end, is what the month was for.
The bottom line
Thirty days from now, if you work these four short lists, you will know where every control in your house lives, how every system behaves when it is healthy, how old every major machine is, and what the short list of real problems looks like — which is more than most owners ever learn about the houses they live in for years. The house will still be a stranger in some ways. It will no longer be a stranger with its hand on your wallet. From here, the rhythm takes over: our "Monthly Home Maintenance Checklist: The 15-Minute Routine" turns the monthly version of these checks into a quarter-hour habit, and the seasonal calendar spreads the bigger jobs across the year. Month one was never about fixing the house. It was about becoming the person the house can rely on — and that job is now done.
Cost at a glance
| Item | Typical cost | Notes |
|---|---|---|
| Rekey every exterior lock (locksmith, one visit) | $100–$300 | Priced per cylinder (about $15–$45 each) plus the call-out; a typical 3–5 lock house lands in this range and every old key stops working the same day |
| New deadbolts instead (DIY hardware, per door) | $40–$90 | Worth it when the existing locks are worn, sticking or the cheapest builder grade; a locksmith installing them runs $75–$200 per door |
| Replacement smoke and CO alarms | $20–$50 each | The US Fire Administration says replace any alarm older than 10 years, or of unknown age; most homes need three to six |
| First HVAC filters | $8–$25 each | Buy the size printed on the old filter's frame; ENERGY STAR's rule is check monthly, change at least every 3 months |
| Baseline well-water test (well homes only) | $100–$300 | A certified-lab panel covering bacteria, nitrates and the basics; skip this line entirely if you are on city water |
Frequently asked questions
What should a first-time homeowner do in the first 30 days?
Four things, in this order. First, secure the house: rekey the locks, find and tag the water, gas and electric shutoffs, and test every smoke and CO alarm. Second, learn the water: run every tap and toilet, look under every sink, and if you have them, find your septic tank lids and book a baseline well-water test. Third, learn the air and the safety devices: fit a fresh HVAC filter, test the GFCIs and label the breaker panel. Fourth, walk the exterior and photograph every equipment label into a home record. That is the whole month — about five hours of actual work across four weekends.
What do you do first when you move into a new house?
Before the first night, three things. Test every smoke and CO alarm and replace any that are dead, silent or older than 10 years. Find the main water shutoff and make sure it turns — it is the single control that limits the worst common disaster in a house. And arrange the lock change: until the locks are rekeyed, you do not actually know who has a key to your home. Everything else, including unpacking most of the boxes, can follow over the next four weeks.
Should you change the locks when you buy a house?
Yes — or rekey them, which achieves the same thing for less. You cannot know how many copies of the old key exist or who holds them: previous owners, their family, cleaners, dog walkers, contractors. Rekeying changes the pins inside your existing locks so old keys stop working; a locksmith typically charges $15–$45 per cylinder, and a whole house usually lands between $100 and $300 in one visit. Replace the hardware instead only when the locks themselves are worn, sticking or bottom-grade — new deadbolts run $40–$90 per door as DIY hardware.
What maintenance tasks matter most in the first month?
The ones whose failure would hurt you before you noticed: alarms that do not sound, a water shutoff nobody can find during a burst pipe, locks a stranger's key still opens. After those come the baselining tasks — learning how your water pressure, colour and drains behave when everything is normal, and recording the age of every major appliance — because you cannot spot a change in a system you never observed working properly. Cosmetic tasks matter least, which is why this checklist deliberately leaves them for month three.
How do I find my home's shutoffs, panel and filter?
The main water shutoff is usually where the water line enters the house — a basement wall facing the street, a crawlspace, or near the water heater in slab homes; the gas shutoff sits at the meter; the electrical panel is typically in the basement, garage or a utility closet, and its main breaker is the large switch at the top or bottom. The HVAC filter hides in a slot at the air handler or behind the largest return-air grille. Our guide 'Find It Before You Need It: Your Main Water Shutoff, Gas Shutoff & Electrical Panel' walks through each location and how to test that the shutoff actually closes, and week 3 of this checklist covers the filter hunt.
What can safely wait until month three?
Almost everything cosmetic and most things seasonal. Painting, picture-hanging, landscaping beyond checking that soil slopes away from the foundation, faucet and fixture upgrades, smart-home gadgets, a deep gutter clean (unless water is already spilling over), garage organisation and every renovation idea you had on the drive home from closing. None of it protects the house, all of it will still be there in 90 days, and several of them get easier once your home record tells you the age and condition of what you already own.
How much will the first month of home maintenance cost?
For most buyers, $150–$450. The typical basket is a whole-house rekey ($100–$300), a few replacement smoke or CO alarms at $20–$50 each, and a fresh HVAC filter or two at $8–$25. Homes on a well add a baseline lab water test at $100–$300. The one large contingency is a septic tank with no service history: if nobody can tell you when it was last pumped, budget a pumping visit ($300–$600) in the first season rather than the first month. Everything else on the checklist is your time, roughly five hours of it.
Checked November 16, 2026. This guide is general information, not a substitute for a licensed professional.
Related guides
Find It Before You Need It: Your Main Water Shutoff, Gas Shutoff & Electrical Panel
Every house has five shutoffs that matter in an emergency: the street meter valve, your interior main, the gas meter valve, the main breaker and the water heater supply. How to find each one, test it, tag it, and fix the one that fails, before the 2 a.m. leak.
How Much to Budget for Home Maintenance in Year 1: The 1% Rule, Tested
The 1% rule says budget 1% of your home's value a year for maintenance. Here's where it works, where it breaks, what Fannie Mae actually recommends (1–4% by age), and the sinking-fund worksheet that replaces the guess with your own systems' numbers.
How Often to Change Your HVAC Filter (It Depends on the Filter You Have)
The honest filter schedule: check monthly and change at least every 3 months is only the floor. Fibreglass lasts about 30 days, thin pleated 60–90, deep media 6–12 months — plus how to find the slot, read the size, face the arrow the right way, and why a filter can be too good.