 Keep
How to Find a Roof Leak: Why the Stain Isn't Under the Hole, and How to Trace the Real Source
 Daniel Mercer · Editor & Researcher·
Published November 16, 2026·
Updated November 16, 2026
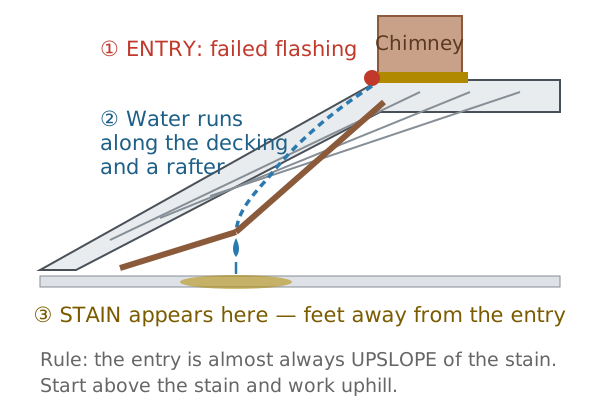
Every roof leak investigation starts with the same wrong instinct: stand under the stain, look up, and assume the problem is directly overhead. It almost never is. The stain on your ceiling is where the water finished its journey — and between the hole in your roof and that brown ring, the water has usually travelled several feet sideways, sometimes more than ten, along paths you can't see from below. Homeowners who patch the shingles above the stain are the roofing industry's steadiest source of repeat business: same stain, next storm, because the actual entry was never touched.
This guide is the method roofers actually use: read the timing, search from the attic uphill, work the list of usual suspects in their true order, and prove the entry with a controlled water test before anyone seals anything.
Why water lies: the two sideways trips
Rain that defeats the shingles doesn't fall through the house like a stone through a well. It lands on the underlayment or the roof deck and starts travelling — along the underside of the sheathing, down the top edge of a rafter, wicking along a seam in the decking, following a nail shank — always downhill, always sideways relative to where you're standing below, until something lets it drop: a joint, a gap, a low point. That's trip one.
Then it lands on the top of your ceiling drywall, which behaves like a shallow tray. Water pools and spreads across it — ceiling joists deflect slightly toward mid-room, so water entering near an outside wall can present as a stain in the middle of the room — until it saturates the gypsum and shows through the paint, or finds a seam or a light fixture to drip from. That's trip two.
Two sideways trips, and the visible evidence can sit feet away from the entry in any downhill direction. Hold on to the one reliable geometric fact: water doesn't run uphill, so the entry is upslope of the stain — on the slope above it, or on a feature (chimney, wall, valley) that drains onto that slope. Your search area is a wedge above the stain, not a point above it.
First, interrogate the timing
Before you climb anywhere, the leak's schedule narrows the suspect list enormously. Keep notes — a phone note with dates is genuinely useful to whoever fixes it:
- Leaks in every rain, even light rain. An open defect: a cracked vent boot, a displaced shingle, a flashing gap. Water needs no help getting in.
- Leaks only in heavy rain. A capacity or lap problem: valleys overwhelmed, flashing laps that shed normal flow but not deluge, a low-slope section ponding. Light rain never builds enough volume to reach the defect.
- Leaks only when wind blows from one direction. Wind-driven entry: laps, siding junctions and flashing on the windward side that gravity-fed rain never challenges.
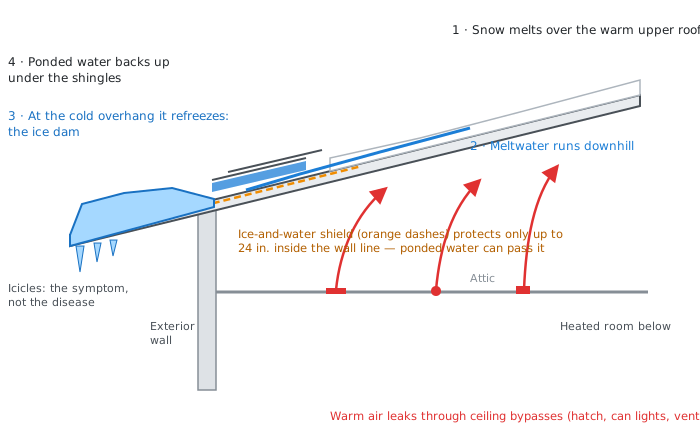
- Leaks in winter thaws or during snow cover. Ice dams (in cold climates): meltwater ponding behind an ice ridge at the eaves and backing up under the shingles — an entry at the bottom of the slope, the exception to the upslope rule.
- Staining with no rain at all, tracking cold snaps. Probably not a roof leak: attic condensation (see the FAQ) or a plumbing or HVAC leak. Timing that ignores the weather is the loudest clue in this whole guide.
Ice dams: the winter exception, in full
The ice dam deserves its own section because it breaks the guide's core rule — here, the entry is at the bottom of the slope. The mechanism is a heat story, not a shingle story. Warm air leaking from the house into the attic (through recessed lights, hatches, plumbing chases — the unsealed gaps every house has) warms the upper roof deck, so snow melts high on the roof even in deep cold. The meltwater runs down to the eaves, which overhang the house and stay at outdoor temperature — and there it refreezes, building a ridge of ice at the edge. Each day's melt ponds behind that ridge, and ponded water does what ponded water does: it works backward under the shingle laps, which were designed to shed flowing water, not to hold a reservoir. The leak appears at the exterior wall line or just inside it, often days into a cold snap, and it stops when the snowpack goes.
Short-term: a calcium-chloride ice melter in a stocking laid across the dam (never rock salt on shingles, never an axe or torch — both trade a leak for a roof) can open drainage channels, and removing the snow load above the dam with a roof rake from the ground starves it. Heat cables are the popular band-aid — they melt a channel, at an electricity cost, without touching the cause. The actual cure is indoors and unglamorous: air-sealing the attic floor so house heat stops reaching the deck, insulation to a proper depth, and ventilation to keep the deck cold and even. An ice dam is your attic's insulation report card, delivered in water.
Before you touch anything: photograph it
If this leak might become an insurance or roof-warranty claim — storm damage, or a roof still under warranty — the evidence expires the moment you move insulation, start drying out, or let a roofer tear in. Spend ten minutes as a photographer first, in this order:
- The ceiling stain, wide and close. One shot of the whole room for location, one close-up with a coin or ruler for scale. Shoot it again after each storm — a dated sequence showing a stain growing is the most persuasive document in a claim file.
- The attic, exactly as found. The water trail, the wet insulation, any drip in progress — photographed before you kneel or shift anything. Adjusters pay for damage as it presented, not as it looked after cleanup.
- The roof from the ground. The slope above the stain and any visible storm damage — lifted or missing shingles, a limb, debris in the valley — with a recognisable feature of the house in frame.
- The paperwork. Install and repair invoices, warranty documents, and a note of the storm date and when the stain first appeared.
Then carry on with the rest of this guide. Documentation doesn't delay the fix — it just stops anyone else who should be paying from arguing the damage was never there.
The attic inspection: where leaks are actually found
The attic is the diagnostic room: safer than the roof, and the underside of the deck keeps a written record — stains, trails and rust — that the weathered top side hides. Go on a dry day if you can, or during light rain if you want to catch it in the act. Bring a real flashlight (bright enough to rake across the decking — raking light reveals trails a head-on beam washes out), your phone for photos, chalk or a marker, and something to kneel on. In the attic, step only on joists or boards laid across them, never on the insulation or the ceiling below it.
Start above the stain and work uphill. Position yourself over the ceiling stain's location, then search the decking and rafters upslope from there for:
- Darkened or stained decking — water's signature, darkest at the oldest, highest point of the trail. Follow the stain to its topmost, narrowest point; entries live at the head of the trail.
- Wet, matted or displaced insulation — insulation that's darker, flattened and clumped compared to its neighbours has been rained on from above.
- Rusted nail tips poking through the deck — nails rust where moisture repeatedly reaches them, and a cluster of rusty nails maps the wet zone.
- Daylight — flashlight off, eyes adjusted: any visible light through the deck or around a penetration is a candidate door for water. (The inspector's version: if you can see out, water can find its way in.)
- Stained rings around penetrations — a dark halo around a vent pipe, or one wet side of the chimney chase, is frequently the whole answer.
Circle everything with chalk and photograph it with a rafter or pipe in frame for reference. One caution that separates diagnosis from guessing: a dry stain is not proof of a dead leak, and a damp one is not proof of an active one — old stains persist for years. If the distinction matters (it does, before paying for repairs), a cheap moisture meter on the decking settles whether the wood is wet now.
The usual suspects, in the order roofers check them
Leaks almost never punch through the middle of a healthy shingle field. They happen where the roof is interrupted — cut through, joined, or terminated. Work this list in order:
1. Vent pipe boots. Every plumbing vent poking through your roof wears a flashing collar with a rubber boot that seals around the pipe. Sun and weather crack that rubber in roughly 8–12 years — well before the shingles around it wear out — and the crack lets water run down the pipe and into the attic, often dripping somewhere other than beside the pipe. Roofers in sunny climates call this the single most common leak source they find. From the ground with binoculars, a cracked boot shows as a split or gap in the collar; from the attic, the pipe has a stained ring. Replacement: $150–$600, and on a roof past ten years old, check all the boots while someone's up there — they were installed the same week and they age together.
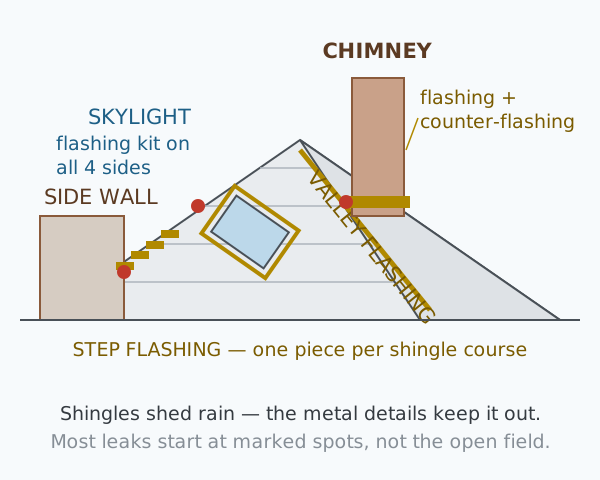
2. Flashing at chimneys and walls. Wherever a roof meets something vertical — chimney, dormer, sidewall — metal flashing does the waterproofing: step flashing woven between shingle courses along the slope, counter-flashing let into the chimney mortar or siding above it. The metal usually outlives its welcome; what fails is the sealant behind it, the fasteners, or flashing that was caulked rather than properly lapped in the first place. The special case worth knowing by name: kick-out flashing, the small diverter at the bottom of a roof-to-wall joint that throws water into the gutter. Missing kick-outs (common on older work) pour roof water behind the siding and rot the wall from inside with barely a trace outside — inspectors flag them constantly. Flashing repairs run $300–$800; a full chimney reflash, $500–$2,500.
3. Valleys. Where two slopes meet, the valley carries both slopes' water in one channel — the highest-volume real estate on the roof. Debris dams (leaves, needles, shingle grit) slow the flow and push water sideways under the laps; aged valley metal or improperly lapped shingles leak under load, which is why valley leaks so often present as heavy-rain-only. Clear the debris first — sometimes that's the whole repair — and look for shingles creeping into the valley centre, where they never belong.
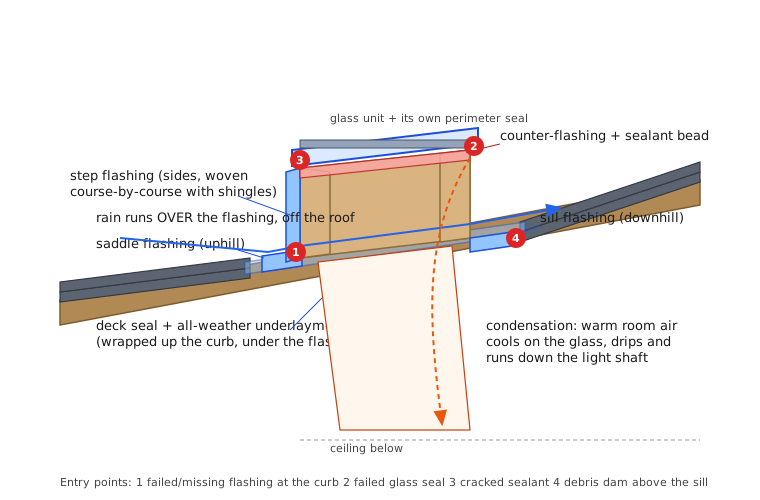
4. Skylights. A skylight is a hole with a window in it, defended by flashing and seals, and it ages on both fronts. Distinguish the two failures: condensation between the panes means the skylight unit itself has failed (a glazing problem, not a roof leak); water at the corners or the downhill side means its flashing. Roofers check the flashing kit first and the unit second, and so should you.
5. Nail pops and damaged shingles. A nail that backs out tents the shingle above it and opens a pinhole path — one nail, one small, maddening intermittent leak. Wind-lifted, cracked, or missing shingles after a storm are the visible version. These are the cheapest repairs on the list when caught singly, and the reason a post-storm walk-around with binoculars pays.
6. The ridge and hips. Ridge cap shingles take the weather from both sides and crack with age; a leak that traces to the very top of the slope, with no penetration nearby, often lives here.
Notice what the list has in common: transitions, penetrations, joints. If your search keeps returning to the middle of a clean slope, suspect that the water entered at a feature above and travelled — go back to the trail, not the shingles.
Other roof types: how the search changes
Low-slope and flat roofs make liars of distance: with barely any pitch, water can travel remarkable distances along the deck before dropping, and it can also pond — standing water finds seams and pinholes that shedding water never would. The suspects change order: membrane seams and laps, scuppers and internal drains (a clogged drain turns a flat roof into a paddling pool with a ceiling under it), and penetrations again. The hose test still works but the sections must be smaller and the waits longer.
Metal roofs rarely fail through the panels. They leak at their thousands of fasteners — screws whose rubber washers age and back out with thermal cycling — at seam laps in wind-driven rain, and at flashing, as always. A special impersonator lives here too: condensation on the underside of metal panels in humid weather can drip like a leak on a schedule that ignores rain. If your metal roof "leaks" on clear, humid mornings, think condensation before seams.
Tile and slate roofs invert the beginner's assumption: the tiles are largely a durable rain screen and sun shield, and the actual waterproofing is the underlayment beneath them. Broken tiles look catastrophic and often leak nothing at all; a pristine-looking tile roof can leak everywhere once its underlayment reaches the end of its life — which is shorter than the tiles' by decades. On tile, the attic trail matters even more, and "we'll replace the broken tiles" is not an answer to a leak until someone has assessed the membrane under them.
No attic? The outside-only version
Vaulted ceilings and low-slope additions sometimes leave no attic to inspect. The method adapts: from the ground, binoculars over the whole wedge upslope of the stain — lifted or missing shingles, a visibly cracked boot, displaced chimney flashing, a debris-choked valley. Then the hose test (below) carries the whole diagnostic weight, worked in small sections with the watcher inside the room below, phone in hand, watching the stain's area and listening. It takes longer without the attic's evidence, which is exactly why professionals charge for water testing on complex roofs — $180–$340, usually credited against the repair.
The hose test: proving it before sealing it
When the trail is ambiguous, this is the experiment that ends arguments — the same one good roofers run. It needs two people, a hose, a phone connection, and patience:
- Wait for a dry roof and a dry attic (or as dry as it gets). The inside watcher stations in the attic above the stain, flashlight ready.
- Start the water low — at the eaves edge of the section upslope of the stain — running gently over a small area, the way rain would, not blasted under shingles with a nozzle (which creates leaks that don't exist and invalidates the test).
- Give each section 15–30 minutes. Water travels slowly through a roof's layers; a five-minute wetting proves nothing either way.
- Move uphill section by section. When the watcher sees the drip begin, the section being wet at that moment contains the entry. Mark it, photograph it, and only then talk about repairs.
The discipline is the low-to-high order and the waiting. Flood everything at once and the drip still appears — with the entire slope as its alibi.
The repairs themselves: what fixing it actually involves
Finding the entry is half the job. Here's what the fix looks like for the common sources — the first as a DIY procedure, the rest as the pro version, so you know what you're buying.
The vent boot: the one repair you can honestly do yourself
A cracked plumbing-vent boot is the most common leak source on the list and the most DIY-able: the part is cheap ($10–$30 for the flashing-and-boot unit), the work is localised, and nothing structural is involved. It is still roof work — dry day, gentle pitch, proper footwear, a helper on the ground. Missing any of those, hire it: $150–$600 professionally is cheap insurance against a fall.
- Mark the spot from inside. From the attic, push a long nail or thin wire up through the deck beside the vent pipe, so you can find the exact penetration from above.
- Work the shingles loose. With a flat pry bar, break the sealant bond of the shingles overlapping the old flashing, and lift them gently — warm shingles flex; cold ones snap.
- Remove the old unit. Pull the nails holding the old flashing (they sit under the shingles you lifted), work the cracked boot up off the pipe, and slide the flashing out.
- Set the new one. Slide the new flashing down over the pipe so the boot seats snugly: lower flange over the shingles below the pipe, upper flange under the shingles above. Water must always land on top of the layer below it, never be invited underneath — that is the whole science of flashing in one sentence.
- Nail and reseal. Nail the flange where the shingles will cover the heads, press the lifted shingles back down, and reseal their tabs with a dab of roofing sealant under each corner.
- Check the neighbours. Every other boot was installed the same week and has had the same sun. A second cracked boot found now is a $20 part; found next winter, it's a second leak.
Allow a first-timer an hour or two, mostly ladder trips. One shortcut: where the metal flashing is sound and only the rubber has split, a slip-over repair collar stretches over the pipe and seals against the old boot — ten minutes, no shingle work, a respectable medium-term fix rather than a permanent one.
Flashing, valleys and shingles: what the roofer actually does
Flashing repairs are layered metalwork, not sealant work. For a chimney, the roofer strips the shingles around the base, removes the failed flashing, cuts and bends new step flashing for the sloped sides, fits counter-flashing into a groove cut in the mortar joint, then re-shingles course by course so every layer sheds onto the one below. A straightforward reflash takes half a day to a day. If a flashing quote consists mainly of the word "caulk," it isn't a flashing repair — sealant supplements correct layering, never substitutes for it.
Valley repairs mean opening the valley: shingles off both sides, old metal or membrane out, ice-and-water shield down the centre, new valley metal set, shingles re-laid and cut to line, kept back from the centre channel. Half a day for a short valley, a full day for a long one.
Shingle replacement is the smallest job in roofing: lift the course above, slide out the damaged shingle, slide in the match, nail in the covered zone, reseal the tabs. Fifteen minutes per shingle once set up — hence minimum service charges rather than per-shingle prices.
Whatever the repair, the written quote should name four things: the located entry point (not "leak area"), the materials and method (new flashing metal vs. sealant; boot replaced vs. collar fitted), whether damaged decking is included or extra (rotted deck under a long leak is the classic surprise), and the repair's warranty and its length.
Prove the fix: the re-test, and drying out what got wet
A repair isn't finished when the roofer leaves; it's finished when water has been given a fair chance to get in and hasn't.
Re-run the hose test on the repaired section. Same discipline as the diagnostic version — start below the repair, work up over it, 20–30 minutes, your second person in the attic watching the spot you chalk-marked. One exception: if the leak only performed in wind-driven rain, a calm-day hose test can't fully clear it — then the honest verification is the next two storms from that direction, with a moisture meter on the decking after each.
Dry the attic side deliberately. A fixed leak leaves wet wood and wet insulation behind, and mould colonises damp drywall within 24–48 hours of wetting — the repair stops the water, not the clock. Get air moving: a fan across the wet decking and insulation for several days, a dehumidifier in the room below if the ceiling is damp. Verify with a moisture meter, not a fingertip: the decking should read in line with the dry wood around it (roughly under 15%), and the ceiling dry, before primer or paint. Insulation that got soaked and stayed matted should come out — it never recovers its insulating value, and it holds moisture against the ceiling. Replace it once everything reads dry. Only then is the leak actually over.
The leaks that aren't
Before any roof money is spent, rule out the impersonators. Attic condensation (FAQ above) is the big one. Bathroom fans and dryer vents ducted into the attic dump gallons of moist air up there weekly — check where those ducts actually terminate; "into the attic" is a depressingly common finding. Plumbing leaks in an upstairs bathroom or a supply line crossing the attic imitate roof leaks with perfect manners, except their timing follows water use, not weather — a stain that grows on laundry day in a dry week is plumbing until proven otherwise. And HVAC condensate — a clogged air-handler drain in an attic unit — soaks ceilings on the air conditioner's schedule, which in a wet summer looks a lot like rain's schedule. Match the timing to the system before you match it to the roof.
How long has it been leaking? Reading the damage clock
Not every stain is this week's news, and the age of the leak changes what you should do about the inside of the house. A fresh leak (first storm, faint ring, decking damp but sound) is purely a roof problem: find the entry, fix the detail, let things dry, repaint with a stain-blocking primer when the ceiling reads dry. A season-old leak adds insulation to the casualty list — matted, wet insulation loses its value and holds moisture against the ceiling — and decking that has begun to soften or delaminate at the trail's head. A years-old leak, the kind that announces itself with a musty smell in a cupboard or paint bubbling far from any obvious stain, has usually been feeding mould inside a wall cavity or the attic (mould colonises wet drywall within days; it is patient thereafter) and may have rotted the deck or a rafter tail. The roof fix stays the same size; the interior bill is what grows. This is the arithmetic behind the urgency line at the top of this guide: the entry repair costs roughly the same in month one and month twelve, and everything else is what the delay buys.
While it leaks: limiting the damage
Diagnosis can take a dry day or two; water damage doesn't wait. Inside: a bucket under the drip, and if the ceiling bulges, a small hole poked in the centre of the bulge with a screwdriver to drain it in a controlled way — counterintuitive, but a ceiling that drains into your bucket beats one that saturates, sags and comes down on its own schedule. Move what's under it, photograph everything for the insurance file, and kill power to any fixture that's dripping through if you're unsure about it. Outside, an emergency tarp ($200–$1,200 professionally installed, weighted and battened rather than nailed through good shingles where possible) is legitimate mitigation that insurers generally reimburse on covered claims. What not to do: smear roofing cement or caulk on the area above the stain "to try something." Sealant in the wrong place traps water inside the roof system, hides the trail the roofer needs to read, and converts a diagnosis into an excavation. A tarp says later; caulk says guess — and the guess is almost always wrong, because the stain isn't under the hole.
Working with a roofer: what a good leak call looks like
You can judge the company in the first ten minutes. A good leak technician starts where this guide starts — in the attic, flashlight in hand, looking for the trail — and goes to the roof to confirm a located suspect, not to wander it hopefully. They'll show you photos: the cracked boot, the separated flashing, the stained decking with the trail's head circled. If the trail is ambiguous, they'll propose the water test and price it honestly (often credited against the repair). The written quote names the entry point and the specific repair — "replace plumbing vent boot at rear slope, reseal counter-flashing at chimney north face" — not "roof leak repair, one lot." Ask three questions of any bidder: Where exactly is the water getting in, and how did you prove it? What does the repair consist of, in parts and steps? Is the repair warranted, and for how long? A company that found the real entry answers all three without blinking, because a located leak is a warrantiable repair — they know it will hold. Vagueness at this stage is information: it means the diagnosis is a guess, and guesses get caulked, not warranted. Get the second quote when the first one fails any of the three.
Paying for the fix — and knowing when the roof itself is the story
A single located leak is usually a $400–$1,500 repair, and the honest quotes itemise the source: boot, flashing, valley, shingles. Be politely suspicious of two quote patterns: the one that proposes sealing a wide area without naming an entry point (that's the caulk guess, invoiced), and the one that converts every leak into a full replacement conversation on a roof with a decade of life left. The legitimate version of the replacement talk exists — a roof at end-of-life, with brittle shingles and leaks multiplying at several details, is a roof where repairs stop compounding in your favour — but it should arrive with evidence: shingle condition, the count of failing details, and the arithmetic shown. On a sound roof, fix the detail. On a dying one, fix nothing twice.
Because that's the real economics of the brown ring: the stain is cheap information, delivered early, about a small failed detail — a $30 boot, a perished seal, a lap that needs re-doing. Traced properly and fixed at the source, it's a few hundred dollars and a story. Guessed at, caulked over, or ignored, it becomes decking rot, mould in the insulation, and a ceiling on the floor. The water already did the travelling. All you have to do is follow it back uphill.
Cost at a glance
| Item | Typical cost | Notes |
|---|---|---|
| Vent / pipe boot replacement | $150–$600 | The most common single leak repair; the part is cheap, the roof access is the cost |
| Flashing repair (chimney, wall, valley) | $300–$800 | A full chimney reflash runs $500–$2,500 depending on size and masonry work |
| Leak repair, source located (typical single leak) | $400–$1,500 | Most 2026 leak repairs land $350–$1,800; national average near $850–$1,150 |
| Professional water test / leak diagnosis | $180–$340 | Often credited toward the repair if the same company does the work |
| Emergency tarping | $200–$1,200 | Usually reimbursable by insurance as storm-damage mitigation — keep the invoice |
Frequently asked questions
Why is the ceiling stain not directly under the leak?
Because water runs before it drops — twice. Rain that gets past the shingles lands on the underlayment or decking and follows gravity and surface tension along the underside of the sheathing, the top edge of a rafter, even a nail shank, travelling several feet (roofers report traces of more than ten) before it finds a gap and falls. Then it lands on top of the ceiling drywall, pools and spreads there, and comes through at a seam or fixture — a second sideways trip. The stain marks where the water's journey ended, not where it began. The reliable rule: the entry point is almost always upslope of the stain.
What is the most common cause of a roof leak?
Failed details at interruptions, not failed shingles. Roofers consistently find the same order: the rubber boot around plumbing vent pipes, which dries and cracks after roughly 8–12 years of sun — often called the single most common entry point; flashing at chimneys, walls, dormers and skylights, where sealant perishes or metal separates; valleys, which carry the combined flow of two slopes; then nail pops, damaged or missing shingles and ridge issues. Open fields of healthy shingles almost never leak. Around 90% of intrusions happen at transitions, penetrations and joints.
My roof only leaks when the wind blows a certain way. Why?
Wind-driven rain is a different entry mechanism. Rain falling straight down is shed by laps and flashing designed for gravity; rain driven sideways or even upward by wind can be pushed under laps, behind siding junctions and into flashing gaps that never leak in calm weather. A stain that appears only after storms from one direction points at the windward side's flashing and wall junctions — and it's a genuinely useful clue to give a roofer, because a hose test on a calm day may never reproduce it. Note the storm direction when it happens; that's diagnostic data.
Can I find a roof leak with a garden hose?
Yes — the hose test is the industry's own fallback, and it works when it's done as a controlled experiment rather than a soaking. Two people: one in the attic with a flashlight and a phone, one outside with the hose. Start LOW on the slope above the stain and wet one small section at a time, giving each section 15–30 minutes — water needs time to travel. Move uphill in sections until the inside watcher sees the drip start; the section you just wet contains the entry. Flooding the whole roof at once finds nothing, because the drip appears but its source could be anywhere upslope.
The stain appears in cold weather, not when it rains. Is it still a roof leak?
Probably not — and this misdiagnosis wastes real money. Attic condensation produces identical ceiling staining: warm, moist house air reaches the cold underside of the roof deck, condenses (or frosts, then melts), and drips. Classic accomplices are bathroom fans vented into the attic instead of outside, missing vapour barriers, and poor attic ventilation. The timing is the tell: staining that tracks cold snaps rather than rainstorms is a moisture-and-ventilation problem, and no amount of sealant on the roof will touch it. Check where your bath fans actually vent before paying for any roof work.
Is it safe to walk on my roof to look for the leak?
For most homeowners, the attic and the ground answer the question without the climb — and the climb carries the real risk in this whole topic. If you do go up: dry weather only, a low and gentle pitch, proper footwear, a helper, and never on a wet, frosty, mossy or steep roof. Never walk on a roof that's sagging or on brittle old shingles you might damage into a second leak. Binoculars from the ground reveal more than people expect — lifted shingles, cracked boots, debris-choked valleys, displaced flashing — and every professional will tell you the diagnosis happens from the attic anyway. The roof is for confirming and repairing, and both can be hired.
Will insurance pay for my roof leak?
It depends on the cause, and the distinction is strict. Sudden, accidental damage — a storm that tears shingles off, a tree limb through the deck — is typically covered, including the resulting interior water damage and emergency tarping as mitigation. A leak from age, wear, cracked boots or perished sealant is maintenance, and insurers decline those: the interior damage from a sudden covered event may be paid, but the worn-out roof itself is yours. Document everything (photos of the stain's progress, the storm date, the tarping invoice), and report promptly — a leak left to rot can convert a covered claim into a denied one.
Checked November 16, 2026. This guide is general information, not a substitute for a licensed professional.
Related guides
Ice Dams: How to Remove One Safely, What Removal Costs, and How to Stop the Next One
An ice dam is an attic problem wearing a roof costume. How the melt-and-refreeze cycle works, the safe removal methods (rake, calcium chloride, steam), what pros charge, what insurance will and won't pay, and the air-sealing fix that ends it for good.
Skylight Leaking? Tell Flashing From Condensation First — Then Fix the Right Thing
A drip under a skylight has two completely different causes — rain getting past the flashing, or your own room air condensing on cold glass. The timed test that tells them apart, the failure points in order, what each fix costs in 2026, and when replacement beats repair.
Roof Flashing Repair Cost: Chimney, Valley, Step and Skylight Flashing
Most roof leaks are flashing leaks. What chimney, valley, step and skylight flashing repairs cost in 2026, the difference between a reseal and a real reflash, and the checklist that tells a proper quote from a tube of caulk.