 Keep
Ice Dams: How to Remove One Safely, What Removal Costs, and How to Stop the Next One
 Daniel Mercer · Editor & Researcher·
Published November 16, 2026·
Updated November 16, 2026
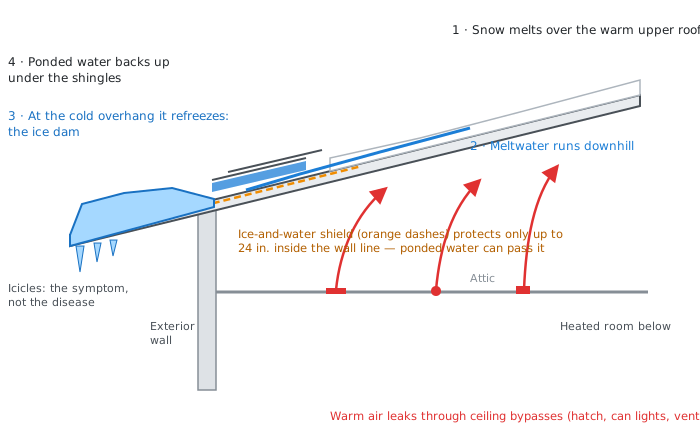
If you bought a northern house in the summer, your first ice dam probably introduces itself politely: a handsome row of icicles along the eave in December, the kind people put on Christmas cards. Then a thaw comes, or a run of sunny days, and a brown stain spreads across the ceiling of an upstairs bedroom, hard against the outside wall. Nothing is wrong with your shingles. It is not raining. And water is coming through your ceiling in the middle of winter, from a ridge of ice you can see from the driveway.
This is the guide for that moment and for every winter after it: what the dam actually is, what to do about the one you have, what removal honestly costs, what insurance will and will not pay for, and the attic work, done in the right order, that stops the next one from forming.
What an ice dam actually is: the melt-and-refreeze cycle
An ice dam is not ice that fell on your roof. It is ice your house manufactured, one melt-and-refreeze cycle at a time. The sequence runs like this:
- Heat escapes into the attic and warms the underside of the roof deck. The upper part of the roof, the part over the attic, rises above freezing even when the air outside is well below it.
- Snow melts on that warm section and the water runs down the slope, under the remaining snow, toward the eave.
- The eave is cold. The overhang sticks out past the house wall, so nothing heats it from below; it sits at outdoor temperature. The meltwater arrives, hits the freezing surface, and turns back to ice.
- The ice ridge grows. Every sunny day and every thaw adds another layer. Behind the ridge, meltwater now has nowhere to go, so it ponds.
- Ponded water backs up under the shingles. Shingles are designed to shed water running down over them. They are not sealed against water sitting still or creeping up under a lap, and ponded water finds the nail holes and lap joints and goes through.
Two details in that sequence matter for everything that follows. First, the dam forms at the bottom of the slope, which is why ice-dam leaks break the usual rule that a leak's entry point is upslope of its stain: here the entry is at the eave, and the stain is at the ceiling below it. Second, modern roofs carry a defence, an ice-and-water shield membrane under the shingles at the eave. Building code (IRC R905.1.2) requires that barrier to extend at least 24 inches inside the exterior wall line. It is genuinely useful, and it is also finite: a tall dam ponds water higher up the slope than the membrane reaches, and past that line the water is under ordinary felt and shingles and through. A shield raises the dam size you can survive. It does not make you immune.
The reframing that matters: this is an attic problem
Here is the fact that reorganises the whole subject, stated plainly by the University of Minnesota Extension: ice dams are caused by heat escaping from the house into the attic, and by uneven roof temperatures, not by gutters, not by shingle condition, and not by bad luck.
The evidence is all around any northern neighbourhood in January. The house with the bare roof and the giant icicles sits next to a house carrying a thick, even blanket of snow and no icicles at all, in identical weather. The difference is not the roofs. It is what is happening under them. A uniformly cold roof keeps its snow frozen until spring or melts it evenly. A roof warmed from below melts its snowpack in patches, sends the water downhill, and builds the dam.
That is why icicles are the symptom, not the disease. Big icicles mean meltwater is reaching the eave in quantity, which means the deck above is warm, which means heat you paid for is leaving through your ceiling. Chopping icicles off treats the photograph, not the problem. And it is why the gutter question, the one every owner asks first, has a boring answer: gutters neither cause dams nor cure them. Dams form happily on gutterless roofs. A gutter just gives the ice a trough to fill and something heavy to tear off the fascia on its way down in spring.
Hold the reframing and the rest of this guide sorts itself: everything in the next two sections is winter management, and the permanent fix, when we get to it, happens entirely inside the attic.
Reading your roof: the snowpack is a heat map
Before you spend anything, your roof will show you its own diagnosis, free, after the next snowfall. Wait for a calm, cold day or two after snow, then look at the roofs on your street, yours included, from the ground. Three patterns tell the story:
- An even, full blanket of snow that stays for days. A cold roof. Whatever else is wrong with the house, it is not manufacturing ice dams.
- Snow melting in patches and streaks while the air is still below freezing. Each bare patch is a warm spot on the deck, and warm spots have addresses: a bare rectangle is often the outline of a poorly insulated room below, streaks follow rafters warmed by a leaky duct or a bathroom fan vented into the attic, and a melted halo around the chimney or a vent stack marks heat pouring up a chase. Photograph the pattern. It is a map of your bypasses, drawn in snow, and it is exactly what an air-sealing contractor would pay a thermal camera to learn.
- A bare upper roof with a thick white band at the eave and icicles below it. The full dam factory, running. The upper roof is warm enough to melt everything that lands on it, and the eave is collecting the proceeds.
This is also why two houses side by side, same storm, same roof age, can have completely different winters. The weather is the same. The ceilings are not. If your snow map shows the third pattern, you already know the permanent fix in the later sections applies to you, and the photographs belong in the file you hand the contractor, because they show which parts of the deck run warmest.
How the water gets in, and why the stain can be rooms away
Once water ponds behind the dam and slips under the shingles, it is inside the roof system and it travels the way all roof water travels: along the underside of the decking, down a rafter, along a seam, until it finds somewhere to drop. Then it lands on the ceiling drywall, pools, spreads along the top of it, and shows through at a seam, a light fixture, or the junction with the outside wall. That sideways travel is why the visible stain can sit a surprising distance from the eave, and why tracing it uses the same method as any roof leak. Our guide "How to Find a Roof Leak: Why the Stain Isn't Under the Hole, and How to Trace the Real Source" walks through that tracing method in full; the ice-dam-specific clue is timing. A stain that appears during winter thaws and sunny snow-melting spells, and never in summer rain, is confessing its source before you climb anywhere.
The damage list, in the order owners meet it: stained and softened ceiling drywall, paint failure, wet insulation that mats down and loses its value, mould in the wall cavity if the wetting repeats, and, in bad cases, rotted decking at the eave and damaged gutters and fascia from the ice load. None of it is structural drama in a single event. All of it compounds across winters, which is why the urgency on a leaking dam is real even though the water arrives as a drip, not a flood.
This winter: managing the dam you have
You have two safe tools, and between them they handle most dams that have not yet started leaking. Both work from the ground or from inside the house. Neither involves climbing onto an icy roof, which is the single rule that matters most in this section: the roof in ice-dam weather is a professional's workplace, not a homeowner's.
Tool one: the roof rake
A roof rake is a wide, flat blade on a long telescoping handle, and it costs $30–$80 once. Its job is prevention by subtraction: after each snowfall, standing on the ground, you pull the snow off the lower 3–4 feet of the roof, the band above the eave. No snow in that band means no meltwater arriving at the cold edge with anywhere to freeze, and the dam starves.
Technique matters more than effort. Work from the ground with both feet planted; never rake from a ladder, because the footing and the falling snow both argue against it. Pull in short strokes straight down the slope, and leave a thin layer, an inch or so, on the shingles rather than scraping to the surface: the blade can catch and tear shingle edges, and the last inch of snow is insulation, not fuel. Take extra care on the first pass of the season, before you know where the vents and cables sit. Rake after every significant snowfall, not once in February; the method works by never letting a deep pack build over a warm deck. On a two-storey house with a long overhang, a rake may not reach the whole band, and that is a limitation to accept, not a reason to climb.
Tool two: calcium chloride socks
When a dam already exists, the goal changes: you do not need the ice gone, you need drainage channels through it, so ponded water has an escape route instead of a route into your ceiling. That is what the calcium chloride sock does. Fill an old sock, a stocking, or a purpose-made tube with calcium chloride ice melt, tie it off, and lay it across the dam at a slight angle, with one end extending over the edge. The salt melts a channel through the ice over some hours, water drains through the channel, and the pond behind the dam empties. Space socks every few feet along a leaking section.
Why calcium chloride specifically, and why rock salt is the wrong tool: sodium chloride (rock salt) barely melts below about 20°F, exactly the temperatures ice dams thrive in, and its runoff is hard on shingles, metal flashing, gutters and the plants below. Calcium chloride keeps working far below that, melts faster, and is the gentler of the two on roofing. The sock format matters as much as the chemistry: it keeps the melt concentrated in a channel instead of scattering granules that melt pits, stain shingles and wash away. A contractor-applied calcium chloride treatment runs about $200–$300 if you would rather not handle it, but the DIY version is a bag of melt and a drawer of old socks.
The never list
Every winter, owners damage roofs and themselves with the same five improvisations. All five are worse than the dam:
- No chipping. Axes, hammers, chisels, ice scrapers: the ice is frozen to the shingles, and the force that separates them tears off granules and cracks the shingle mat. You trade an ice problem for a roof-covering problem.
- No pressure washer. It strips the shingle surface and drives water up under the laps, feeding the leak you are trying to stop.
- No open flame or heat gun. Torches on a roof, near wooden eaves, are a fire story waiting for a date.
- No rock salt scattered on the roof, for the reasons above.
- No climbing the icy roof, with or without tools. If the job genuinely needs someone up there, it needs a professional with the equipment and insurance for it.
Inside the house while it leaks: the first hour
Removal crews book out fast in a thaw, so while you wait, the inside of the house is yours to protect, and an hour of work here is worth real money on the claim and the repair. Put a bucket under the drip and move what is under it. If the ceiling paint is bulging, the bulge is a water balloon: poke a small hole in its centre with a screwdriver and let it drain into the bucket in a controlled way, rather than letting the saturated drywall tear and come down on its own schedule. Photograph everything as you find it, before and after, for the insurance file described below. If water is dripping through or near a light fixture or outlet, kill that circuit at the panel until an electrician or the drying process clears it; water and live fittings are the one combination in this topic that changes the category from property damage to safety. Finally, if you can enter the attic safely, a look at the underside of the deck near the eave tells you how much water is on the move and whether insulation is soaked; do not disturb wet insulation beyond noting it, but do note it, because matted, soaked insulation is part of the repair scope, not something to discover in spring by its smell.
When water is already coming in: professional steam removal
If the dam is leaking into the house, the holding actions above are too slow, and this becomes a professional job, done with steam. A proper ice-dam steamer is a specialised machine that delivers low-pressure, high-temperature steam through a nozzle. The operator cuts the dam into sections and melts them free from the roof surface, and the ice comes away in chunks without touching the shingles. A steaming job on a typical house takes a few hours for one eave and most of a day for a bad, whole-roof case, and crews will usually protect the interior below and clear the meltwater path as they go.
Why steam and only steam is worth paying for: it is the one removal method that does not trade against the roof. Companies that offer to chop, chisel, or pressure-wash a dam are offering to damage the covering in the process of saving it, and the discount is not worth it. When you call, ask the method question directly, and walk away from any answer that is not steam.
What the quote must include, in writing, before work starts:
- The hourly rate (steam removal is commonly billed at $300–$700 per hour) and the minimum charge, because totals of $400–$2,000+ follow from those two numbers and the size of your dam.
- The method stated as steam, and confirmation the crew carries liability insurance.
- What is included around the job: interior protection if you are leaking, disposal of the removed ice, and clearing the gutters and downspouts the meltwater needs.
- An honest estimate of hours for your dam, with the understanding that a dam twice as thick is not the same job.
Book early in a freeze-thaw cycle if you can. After the first big thaw makes every dam in town leak at once, steam crews book out for days, and the owners who called at the icicle stage get the slots.
Insurance: what is covered, what is not, and how to document it
The research question every owner asks, and the answer is a clean split. The damage is usually covered; the dam is not. A standard homeowners policy generally covers the sudden interior water damage a dam causes: the ceiling, the drywall, flooring and contents ruined by the leak. It generally does not cover removing the ice dam itself, and it never covers the prevention work, because both are classed as maintenance. Expect to pay the steam crew yourself and claim the interior repairs, subject to your deductible.
Work the claim like someone who has read the policy's fine print about mitigation, because it is in there: you are expected to take reasonable steps to stop further damage. So photograph the dam and icicles from the ground, photograph every stain as it appears and grows, keep the steam invoice and any emergency receipts, and report the claim promptly rather than at the end of winter. A well-documented, promptly reported ice-dam claim is a routine file. A three-month-old leak presented in April invites an argument about neglect that you do not want to have.
Heat cables: the honest arithmetic nobody prints
Heat cables (also sold as de-icing cable or heat tape) are the most heavily marketed ice-dam product and the most half-explained. Installed in a zigzag along the eave and up valleys, they melt channels through ice so water can drain. Installation typically runs $500–$1,500 depending on the length of run. What the sales pages leave off is the second bill: the electricity.
The maths is simple enough to do on an envelope. A common residential cable draws about 5 watts per foot. A 100-foot run, a normal size for one long eave plus a valley, therefore draws about 500 watts. Left switched on through a 90-day cold season, that is roughly 500 W × 24 hours × 90 days, about 1,000 kWh, which at typical residential electricity prices lands on the order of $150–$200 per winter. Every winter. For as long as you own the house. Five winters of cable running costs approach the low end of the attic work that would have made the cable unnecessary, and the cable still has not fixed anything: your attic is still leaking the heat that melts the snow, and you are paying for that heat too, on the heating bill, the whole time.
None of this makes cables useless. It makes them a targeted patch with a known running cost, worth it where the attic fix genuinely cannot reach: a cathedral ceiling with no attic above it, a complicated valley over an uninsulatable roof section, a historic house whose ceiling cannot be opened. If you fit them, fit them with a switch or timer you control, in the specific problem spots only, and go in knowing the meter is running. What cables are not is a substitute for the fix below on a normal house with a normal attic.
The permanent fix: seal, then insulate, then ventilate
Every authority on this subject, from the University of Minnesota Extension to ENERGY STAR, gives the same answer in the same order, and the order is the part people get wrong. The goal is a roof deck that stays at one cold temperature all winter. Three steps get you there.
Step 1: Air-seal the attic floor, first and before anything else
Moving air is the main heat smuggler. Warm house air rises through every penetration in the ceiling and delivers its heat straight to the deck, and it carries far more heat than conduction through insulation ever will. That is why sealing comes first: insulating over unsealed bypasses is paying to blanket a chimney. The bypass list, in the order they usually matter:
- The attic hatch or pull-down stair, weatherstripped and insulated, the single biggest hole in most ceilings.
- Recessed (can) lights, which are effectively open chimneys unless they are rated and sealed for insulation contact; where they are not, they get sealed covers or replacement.
- Plumbing vent stacks and wiring penetrations, sealed around with foam or caulk where they pass the top plates.
- The tops of interior partition walls, often open into the attic in older framing.
- Bathroom fan housings and ducts, sealed at the housing, and ducted outside, never into the attic.
- The chimney chase, sealed with metal flashing and high-temperature sealant, keeping the required clearances from the flue.
Much of this is a weekend of DIY with foam, caulk and weatherstripping for a few hundred dollars in materials, which is why it is the best-value step in this entire guide. A professional air-sealing scope should name the bypasses it will close, not just quote a lump sum.
Step 2: Insulate to your climate's level
With the air stopped, insulation slows what is left. Cold-climate guidance from the Minnesota Department of Commerce points attic insulation at around R-50 for the coldest regions, well above the R-30 or less found in many older houses. Depth is the usual shortfall, and so is coverage: insulation must run all the way out over the exterior wall, because a thin or missing strip above the wall is a warm stripe on the deck exactly where the dam forms. Baffles at the eaves keep the insulation from blocking the soffit vents while still covering the wall top. Blown insulation over the sealed ceiling is the standard method, and this is the step where the $3,000–$7,000 prevention packages spend most of their money.
Step 3: Balance the ventilation
Ventilation is the deck's temperature equaliser: cold outside air enters at the soffits, sweeps the underside of the deck, and exits at the ridge, carrying away any stray heat so no part of the roof runs warm. ENERGY STAR's attic ventilation guidance lays out the principle: intake and exhaust in balance, and the soffit intake kept clear. Ventilation is third, not first, for a reason. Adding vents to an unsealed, under-insulated attic mostly moves the warm air around; it cannot overcome heat pouring through an open hatch. Sealed and insulated first, a balanced vent system finishes the job, and in many houses the existing vents turn out to be adequate once they are unblocked.
A proper attic job, quoted by a contractor, should therefore read as a sequence: the bypasses to be sealed, the insulation type and the target R-value including the eave coverage, and the ventilation check. A quote that offers insulation alone, or vents alone, is selling you one leg of a three-legged stool.
The money, joined up: removal winters vs the fix
Lay the three money questions side by side and the decision usually makes itself. Steam removal costs $400–$2,000+ per bad winter, and a house that dams will dam again next year, because nothing about the attic changed. Heat cables cost $500–$1,500 to install plus roughly $150–$200 a winter to run, forever, while also changing nothing. The attic package costs $3,000–$7,000 once. An owner facing even mid-range steam bills in two out of three winters crosses the prevention package's price in about three to five years, and after that the winters are free, the heating bills are lower, and the ceiling stays dry. The exception is the owner planning to sell within a year or two, for whom one winter of raking, socks and, if needed, a single steam visit is the rational spend. For anyone staying, prevention is not the expensive option. It is the cheap one, paid in a lump.
DIY or pro: the honest split
Yours: raking from the ground after every snowfall; calcium chloride socks on an existing dam; photographing and documenting for insurance; and, for a confident DIYer with safe attic access, most of the air-sealing step, which is foam, caulk and patience rather than skill. Theirs: steam removal (specialised machine, icy roof, insured crew); insulation blowing at scale, which is miserable, slow DIY and fast, cheap professional work by comparison; and anything that requires walking the roof in winter, which is theirs by definition. The dividing line in this topic is unusually clear: if it happens on the ground or in the attic, it can be yours. If it happens on the ice, it is theirs.
Urgency, stated plainly
A dam with water coming through the ceiling is a today problem: bucket, photographs, insurance call, steam crew, in that order, because every thaw day adds water to the wall cavity. A dam standing with no leak is a this-week problem: rake what you can reach, lay socks across it before the next warm spell, and get on a steam crew's list if it is thick and your eaves are low. Icicles with no dam and no stain are information, not an emergency: they are telling you the attic work belongs on this year's list, booked in spring or summer when insulation contractors are quieter and cheaper than they are in October. The one thing not to do is file the whole subject away until next December. The dam you met this winter has already given you the diagnosis for free. Next winter it will charge for the lesson.
Cost at a glance
| Item | Typical cost | Notes |
|---|---|---|
| Roof rake (buy once, use for years) | $30–$80 | The cheapest prevention there is: pull snow off the lower 3–4 feet of roof from the ground after each storm |
| Calcium chloride treatment (contractor-applied) | $200–$300 | Melts drainage channels through an existing dam so ponded water can escape; a holding action, not a cure |
| Professional steam removal | $400–$2,000+ | Billed hourly, commonly $300–$700/hr with a minimum charge; get the rate, the minimum and the method in writing before work starts |
| Heat cables, installed | $500–$1,500 | Plus running cost every winter: a typical 100 ft cable left on through a 90-day season uses roughly 1,000 kWh, on the order of $150–$200 |
| Attic air sealing + insulation package | $3,000–$7,000 | The one-time permanent fix; price it against two or three winters of repeat steam removal |
Frequently asked questions
How much does professional ice dam removal cost?
Steam removal, the method you want, typically runs $400–$2,000+ for a residential job. Most companies bill by the hour, commonly $300–$700 per hour with a minimum charge, and the total depends on the dam's length and thickness, roof steepness, and how much of the crew's time goes to protecting the interior below. Small, single-eave dams land at the low end; a whole north roof after a hard freeze lands high. Get three things in writing before anyone starts: the hourly rate, the minimum, and confirmation that the method is steam. A quote that involves chisels, axes or a pressure washer is a quote for damaging your roof.
Can I remove an ice dam myself — and what should I never use on it?
You can manage one, and partly melt one, but you should not try to strip one bare. From the ground, a roof rake removes the snow that feeds the dam, and calcium chloride socks laid across it melt drainage channels so ponded water can escape. That combination handles most dams that are not yet leaking. Never use an axe, hammer, chisel or ice scraper on the dam itself: the ice is bonded to the shingles and every blow that frees ice tears granules and cracks shingles. Never use a pressure washer (it drives water under the shingles and strips the surface), never use a torch or heat gun (fire risk, shingle damage), and never climb onto an icy roof to work — that is how the worst injuries in this whole topic happen.
Does homeowners insurance cover ice dam removal or the damage?
The two halves split, and the split surprises people. The interior damage a dam causes — the ruined ceiling, wet drywall, damaged flooring and contents from a sudden leak — is usually covered, because it is sudden water damage from a weather event. The removal of the dam itself is generally not covered, and neither is prevention work like attic insulation: insurers treat those as maintenance. Practical consequences: photograph the dam, the icicles and every stain before you touch anything; keep the steam-removal and any mitigation invoices; and call the claim in promptly, because policies require you to mitigate further damage and a leak left to rot for weeks can be contested. Removal is your money. The damage is usually theirs.
Are roof heat cables worth installing?
Sometimes, in one specific role: as a targeted patch for a spot the attic fix cannot reach, such as a complicated valley or a north-facing eave over an uninsulated cathedral ceiling. Run the full arithmetic first. Installation is typically $500–$1,500, and then the cable bills you every winter: a common 100 ft run draws about 5 watts per foot, so switched on through a 90-day cold season it uses roughly 1,000 kWh, on the order of $150–$200 per winter at typical residential electricity prices, forever. Cables also do not stop the melt cycle; they melt channels through the dam so water can drain, and they do nothing about the heat your attic is losing the whole time. If the attic above the problem eave can be sealed and insulated, that work usually wins on cost within a few winters. If it genuinely cannot, cables are a reasonable managed compromise.
What actually causes ice dams — the gutters or the attic?
The attic. University of Minnesota Extension is blunt about it: ice dams form because heat from the house warms the roof unevenly, and they form on roofs with clean gutters, no gutters, and brand-new gutters alike. Gutters are innocent bystanders — they give icicles something photogenic to hang from and they can be damaged by the ice's weight, but cleaning or replacing them does not change the melt-and-refreeze cycle one degree. The causes are warm air leaking into the attic through ceiling bypasses, too little insulation over parts of the ceiling, and ventilation that leaves the roof deck unevenly warm. Fix those, in that order, and the dam has nothing to form from.
How do I know if an ice dam is leaking into my house?
The classic sign is a stain or drip on the ceiling or wall directly below the eave, appearing during a thaw or a sunny spell after snow, not during rain. Other tells: paint bubbling on an exterior wall near the ceiling line, a musty smell in an upstairs room in late winter, and, in the attic itself, frost or water staining on the underside of the roof deck near the eave and damp insulation along the exterior wall. Check the attic during a thaw if you can do it safely: water trails on the deck underside at the eave are the dam confessing. A stain that shows up only in winter thaws, never in summer rain, is an ice dam signature rather than a roof-covering failure.
How do I stop ice dams from coming back every winter?
In the attic, in this order. First, air-seal the ceiling bypasses — the attic hatch, recessed lights, plumbing and wiring penetrations, the tops of interior walls, and bathroom fan housings — because moving warm air heats the deck far more than conduction does. Second, bring insulation up to the level your climate calls for; Minnesota's energy guidance points cold-climate homes at around R-50 in the attic. Third, make sure ventilation is balanced, with clear soffit intake and ridge or roof exhaust, so the whole deck stays at outdoor temperature, per ENERGY STAR's attic ventilation guidance. Done in that order, the roof stays uniformly cold, snow melts evenly or not at all, and there is no ridge of ice for water to pond behind. Heat cables and raking manage winters; this ends them.
Checked November 16, 2026. This guide is general information, not a substitute for a licensed professional.
Related guides
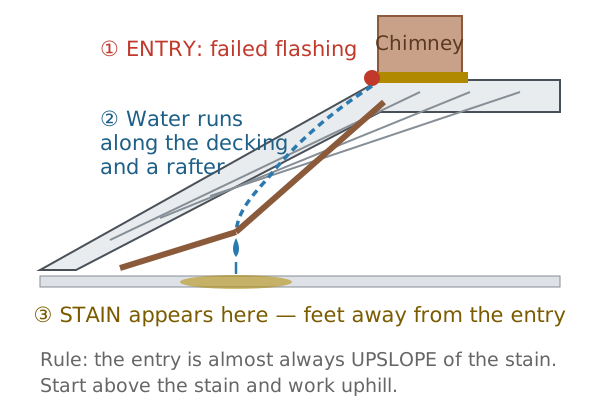
How to Find a Roof Leak: Why the Stain Isn't Under the Hole, and How to Trace the Real Source
Water runs sideways before it drips, so the ceiling stain is a clue, not a location. The attic-first method, the timing clues, the hose test, the usual suspects in order — and 2026 repair costs.
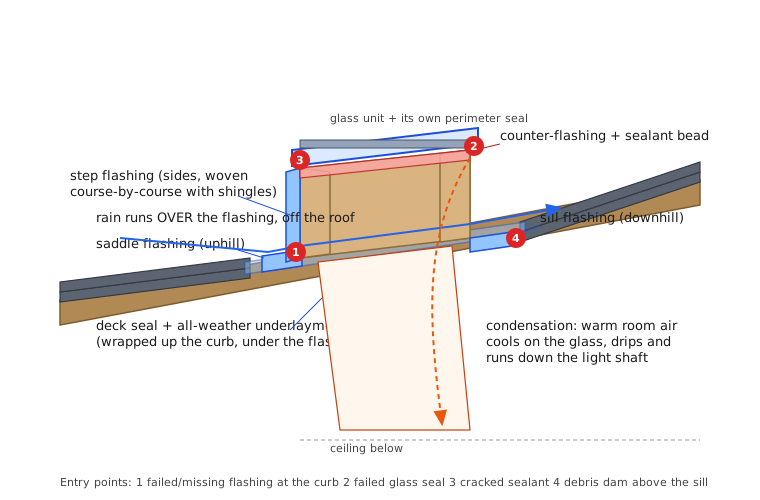
Skylight Leaking? Tell Flashing From Condensation First — Then Fix the Right Thing
A drip under a skylight has two completely different causes — rain getting past the flashing, or your own room air condensing on cold glass. The timed test that tells them apart, the failure points in order, what each fix costs in 2026, and when replacement beats repair.
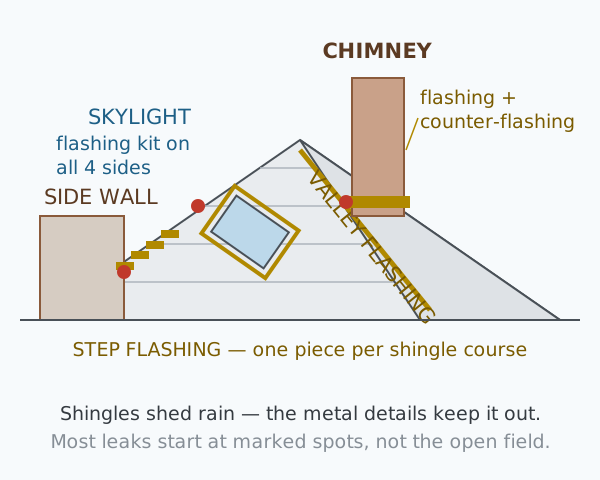
Roof Flashing Repair Cost: Chimney, Valley, Step and Skylight Flashing
Most roof leaks are flashing leaks. What chimney, valley, step and skylight flashing repairs cost in 2026, the difference between a reseal and a real reflash, and the checklist that tells a proper quote from a tube of caulk.