 Keep
Skylight Leaking? Tell Flashing From Condensation First — Then Fix the Right Thing
 Daniel Mercer · Editor & Researcher·
Published November 16, 2026·
Updated November 16, 2026
It usually announces itself the same way. You are standing in the hallway or the bathroom with your morning coffee, and there is a drip where no drip should be — a slow, patient plink from the skylight shaft above you, or a tea-coloured stain blooming across the corner of the ceiling like a map of somewhere you do not want to go. Your first thought is the skylight is leaking, and your second is that sounds expensive. Both thoughts feel obvious. The first one is wrong surprisingly often, and the second one is wrong more often than the roofing industry would like you to know.
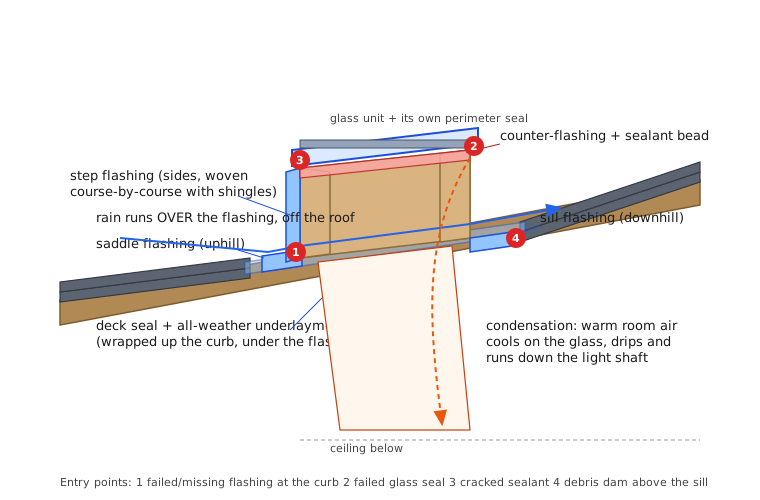
Here is the thing nobody tells a first-time homeowner about skylights: there are two completely different kinds of water that can come off one, and they have almost nothing in common. The first kind is rain — water from outside, getting past the layered metal and membrane work where the skylight meets the roof. That is a roofing problem, it has a definite physical cause, and it can be fixed for a definite price. The second kind never comes through the roof at all. It is your own household air — shower steam, cooking vapour, the moisture from four people breathing all night — rising into the light shaft, meeting glass that the winter night has chilled, and condensing into droplets that run down and drip off the frame exactly as if the roof had failed. That is a humidity problem. No roofer can fix it, no amount of sealant will touch it, and homeowners spend hundreds of dollars a year paying roofers to chase it around a roof that was never leaking.
So this guide does not start with a repair. It starts with a verdict. You are going to learn the timed test that separates a leak from condensation beyond argument, then how a skylight is actually built to stay dry, then every failure point in the order it actually occurs, and only then the fixes — the ones you can do yourself this weekend, and the ones worth paying for, with 2026 prices attached. By the end you will know which of the two waters you have, where it is getting in if it is rain, and what the right repair should cost before anyone gives you a quote.
First, rule out the mimic: the condensation test
Condensation is not a rare edge case in skylight complaints. On some roofers' call logs it rivals true leaks, and it is the single most misdiagnosed cause of "skylight leaking" searches in cold climates. It deserves a real test, not a guess, because the two problems demand opposite responses: a leak means keep water out, condensation means keep moisture away from cold glass, and paying for one when you have the other buys you nothing but a second bill.
The physics is simple. Warm air holds moisture. Your house in winter is a box of warm, wet air — every shower, kettle, pasta pot and sleeping human adds to it. That air rises, and a light shaft is a chimney pointed straight at the coldest surface in the ceiling: the skylight glass, chilled from outside by the night air. When the moist air touches glass below its dew point, the water comes out of the air and onto the surface, the same way it fogs a bathroom mirror. The droplets gather, run down the glass or the frame, collect at the bottom corners of the shaft, and drip. From below, it looks identical to a leak. From the evidence, it is not.
Here is the protocol. It takes a week of patience and no tools beyond paper towels and a pencil, and it ends in a verdict you can trust.
Step 1 — Start a weather log. Tape a scrap of paper inside a kitchen cupboard door. Every time you see a drip, a wet patch or fresh damp on the shaft, write down the date, the time, and what the weather is doing and has done in the last 24 hours: rain, snow, or clear and cold. Note also what the house was doing — showers that morning, a big cooking session, guests staying over. You are looking for the correlation, and a week usually shows it clearly. Drips that track rainstorms are a leak until proven otherwise. Drips that appear on still, frosty mornings after a clear night — especially in a dry spell with no rain at all — are condensation until proven otherwise. A leak cannot drip in a drought. Condensation can, and does, all winter long.
Step 2 — Do the paper-towel test. On a dry day, dry the shaft thoroughly. Tape a strip of white paper towel high on the shaft wall, just under the frame, and a second strip low, near the ceiling line. Use one strip on each side if the shaft has a side that catches the weather. Now wait for the next episode and check which towel gets wet first, and where. Condensation forms everywhere the cold surface is, then runs down: the low towel and the frame's bottom corners get damp first, and the dampness is even, like dew. A leak enters at a point above and travels: the high towel wets first, usually on one side only, and often in a defined track or line. High-and-one-sided means water coming in. Low-and-even means water condensing out.
Step 3 — Read where the droplets form. Get up on a step stool on a cold morning and look at the glass itself. Condensation starts as a uniform mist across the inside face of the glass, heaviest at the edges and corners where the frame chills the pane, and if you wipe it away it re-forms within the hour while the house is warm and the morning is cold. Water beading between the panes, inside the sealed unit, is a third thing entirely — a failed glass seal, covered later in this guide — and it never wipes off from either side. Water that arrives as a drip from one specific corner of the frame, on a mild day, after rain, has nothing to do with dew point at all.
Step 4 — Check the humidity itself. If you have a cheap indoor hygrometer (or a thermostat that reports humidity), look at the number on a winter morning. Indoor relative humidity above roughly 40–45% in cold weather will condense on skylight glass in most houses; bathrooms without a working extractor fan venting outside — many vent uselessly into the attic, which is its own problem — are the worst offenders. If your drips are condensation-timed and your humidity is high, you have your verdict and your fix list already: run the fan during and for twenty minutes after every shower, verify it actually vents outdoors, and keep winter humidity nearer 30–35%.
Do not skip this test because you are sure. The stain pattern fools professionals too — the difference is that a professional who skips it sends you the invoice anyway. Ten minutes of towels and a week of notes is the cheapest diagnostic in this entire guide, and everything after this section assumes you know which water you are dealing with. If yours is condensation, the DIY section near the end covers the full fix. If yours is rain, read on — the rest of this guide is yours.
If it is rain: what the timing is telling you
A true leak talks. When the water appears, and in what weather, narrows the suspect list before you climb anything or open anything — the same timing discipline that works for any roof leak, sharpened here because a skylight has so few places water can get in.
Only during rain, starting an hour or more after the rain does. This is the classic flashing or sealant leak, and the delay is normal: water that slips past a flashing lap does not fall straight down your shaft. It lands on the underlayment or decking, runs along the curb or a rafter, soaks through, and only then shows itself. A delay of one to several hours between the storm and the drip tells you the entry is real but small, and probably not directly above where the drip lands.
Only in heavy rain, never in light rain. Volume-dependent leaks point at a lap or joint that sheds a gentle flow but is overwhelmed by a heavy one — typically a flashing overlap installed too short, a sealant joint that holds until water ponds against it, or a debris dam (below) that only backs water up when the flow is strong. Light-rain-proof but storm-leaky is a flashing geometry problem, not a hole.
Worse when the rain is wind-driven from one direction. Wind pushes rain sideways and uphill, into laps that gravity alone would never challenge. If your leak has a compass direction, the suspect is the flashing on the windward side — most often the uphill, or saddle, side, where driven rain gets under the top flashing and runs down behind the side pieces. Note the storm direction when it happens; that is diagnostic gold to hand a roofer.
Only in winter, during thaws, with no rain at all. Think ice, not holes. Snow sitting against the uphill side of a skylight melts from the house's heat, the meltwater ponds against the curb because ice below it blocks the drainage path, and ponded water finds laps that flowing water never could. This is the skylight version of an ice dam, and it points at attic heat loss and a missing or inadequate ice-and-water membrane around the curb — a build-quality issue, not a worn-out part.
A constant slow drip in all weathers. Rare, and worth taking seriously, because rain does not fall in all weathers. A drip that ignores the forecast can be a plumbing line in the attic or shaft wall (a bathroom above, a supply line routed through the ceiling), or groundwater-scale condensation in a very humid house. If the timing test says always, widen the search beyond the skylight before paying anyone to reflash it.
Write your timing down alongside the weather log from the condensation test. Together they form the brief you will give whoever does the repair — and, not incidentally, they are the first thing a good roofer would establish anyway. You are simply arriving with the homework done.
How a skylight is supposed to stay dry: the layered defence
You cannot judge what has failed until you know what was supposed to work. A skylight is not sealed into the roof like a boat hatch, with one gasket doing all the work. It is defended in layers, each layer assuming the one above it will eventually let a little water through, and each layer's whole job is to hand that water safely back out onto the roof surface. This is why skylight leaks are so often system failures — remove or mis-order one layer and the ones below it were never designed to cope alone.
Picture a curb-mounted skylight, the commonest type in American houses: a raised wooden or factory-made box — the curb — stands up out of the roof slope, and the skylight unit sits on top of it like a lid. The curb's height is itself the first defence: it lifts the glass and the frame's joints several inches above the roof surface, out of the path of flowing water and shallow ponding. Deck-mounted skylights sit lower, with the frame fixed directly to the deck, and lean even harder on their flashing. Either way, working from the roof surface upward, the layers are these.
Layer one: the deck seal. A self-adhesive waterproof membrane — the ice-and-water shield family of products — is wrapped around the base of the curb and out onto the deck before anything else goes on. In the VELUX system this is the deck seal, and its job is to make the hole itself waterproof: even if every metal piece above it failed, water reaching this layer meets a sealed surface and is directed outward, not into the attic. This layer is invisible once the roof is finished, which is precisely why it is the one corner-cutting installers skip — and why its absence produces leaks that no amount of surface work will cure.
Layer two: the all-weather underlayment. Roofing underlayment runs over the whole deck and is dressed up the sides of the curb, overlapping the deck seal. It is the roof's general second line of defence, and around a skylight it catches the small amounts of water that get under shingles in driven rain and carries them down and out over the flashing below.
Layer three: the flashing kit, in sequence. This is the visible metalwork, and it is a kit — engineered pieces made for your exact skylight model — installed in a strict order that follows the water. The sill flashing goes at the bottom (downhill) edge first, lapping over the shingles below so water exits onto the roof surface. Then the step flashing pieces run up both sides, one piece per shingle course, each woven in with the shingles so that every course sheds onto the metal and the metal sheds onto the course below — never behind it. Last, the saddle flashing closes the top (uphill) edge, lapping over the tops of the step pieces and under the shingles above, so water arriving down the slope is delivered onto the skylight's sides, not behind them. Sill, step, saddle: get the order or the laps wrong anywhere and you have built a funnel, not a defence. This is why manufacturers insist — in VELUX's case, as a condition of its 10-year "No Leak" installation warranty — that the flashing kit matched to the unit be installed per its instructions; code points the same way, requiring skylight flashing to follow the manufacturer's listed method (IRC Section R905 territory).
Layer four: the unit itself. The skylight's own frame, its cladding, its perimeter gasket and the sealed glass unit are the last line, not the first. The glass unit is a factory-sealed sandwich; its edge seal keeps moisture out of the space between the panes for decades. The frame's seals are designed to shed the water that reaches them, not to withstand ponding or a constant stream delivered behind the flashing by a failure further up.
Hold that picture and the failure list below reads itself: every common skylight leak is one of these layers missing, aged out, or installed out of order. And notice what is not on the list of defences — a bead of caulk. Sealant is a finishing detail at specific joints. It was never a layer.
The failure points, in the order they actually happen
1. Failed or missing flashing — the number-one cause
Most rain-timed skylight leaks live here. The variations: step flashing pieces that were face-nailed through their exposed face (every nail hole a small well), a saddle flashing tucked behind the side pieces instead of lapping over them, a generic roll of coil stock bent on site instead of the model's engineered kit, or — the worst, and commoner than it should be — no proper flashing at all behind a thick cosmetic bead of sealant. Flashing also fails honestly with age: dissimilar metals corrode, pieces work loose as the house moves through seasons, and a re-roof done carelessly around an existing skylight can disturb laps that had worked for fifteen years. The signature is a rain-timed leak, often one-sided, that a reseal seems to fix for a few months and then doesn't — because the sealant was never the layer that mattered.
2. Dried, cracked sealant at the joints
Sealant is the shortest-lived material on the whole assembly. Sun and thermal cycling harden it, it shrinks back from the joint, hairline cracks open, and water that the flashing would have shed anyway starts finding the gaps at the frame corners and along the curb cladding. This is the one cause where a reseal genuinely is the repair — if the flashing underneath is sound. The test is the pattern: sealant leaks are small, slow, and appear at the joints themselves. Sealant failure on top of flashing failure is the commonest double act in this whole topic, which is why a cheap reseal that fails within a season is diagnostic information, not just bad luck: it is telling you the problem is one layer down.
3. A failed glass seal — the unit, not the roof
When the edge seal of the insulated glass unit gives up, moist air gets between the panes and fogs them from the inside. This is the one failure you can diagnose from your sofa: the fog is between the layers, it does not wipe off from inside or outside, and it comes and goes with temperature as the trapped moisture condenses and evaporates. A failed glass seal often produces no drip at all — it is a cosmetic and insulation failure, not a leak — but it gets reported as "skylight leaking" constantly, and it changes the repair completely: no roof work is involved, the glazing unit is replaced from the frame, and on an old skylight it is frequently the event that tips the repair-versus-replace decision toward replace. Cracked glass and failed acrylic domes on older units belong in this family too: the hole is in the unit itself, visible, and honest about it.
4. Curb and frame rot
Wood curbs and older wood-cored frames live in the wettest neighbourhood on the roof, and any small leak that runs for years feeds rot exactly where you cannot see it — under the cladding, inside the curb, at the corners. By the time a stain shows indoors, the timber behind it may be soft. The field test, if you are up there or the attic gives you access, is a screwdriver pressed into the curb wood: sound wood resists; rotted wood takes the tip like cake. Rot matters because it changes the job category — you cannot reflash onto a curb that no longer holds a fastener, and a rotted frame means the unit conversation, not the flashing conversation.
5. Debris dams above the skylight
The humblest cause and the most satisfying fix. Leaves, pine needles and shingle grit collect against the uphill face of the curb, especially on low-pitch roofs and under trees, forming a dam that holds a small pond of water against the saddle flashing after every rain. Flashing laps are built to shed flowing water, not to sit submerged; a pond held against them for days will find its way through laps that have shed a thousand storms. The signature fits the timing test precisely: leaks in heavy or prolonged rain, worst in autumn, on a skylight that was fine for years. If your leak has a season and your roof has a tree, look here before you spend anything.
Finding the entry: attic first, then the hose
If the timing test says rain and the debris check says clean, the next job is locating the entry point, and the method is the same one that works for any roof leak: start from inside, and remember that the stain is the end of the water's journey, not the beginning.
The attic inspection. On a dry day, take a bright flashlight into the attic (or look up the shaft itself if there is no attic access) and find where the shaft and curb meet the roof. You are reading a trail: darkened decking, rust-freckled nail tips, white or black mould spotting, tide-lines on the curb wood. Water enters upslope of where it shows, runs along the underside of the deck or down the curb, and drops where it finds a gap — so search uphill from the highest stain, along the curb corners first. Photograph what you find; a trail that starts at the saddle corner and a trail that starts halfway down one side are different repairs.
The controlled hose test. This is the industry's own tiebreaker, borrowed from the engineering approach to leak diagnosis, and it works because it is a controlled experiment rather than a soaking. You need two people, a hose, and patience. One person stays inside at the shaft or in the attic, flashlight in hand, phone in pocket. The other starts low: wet only the sill area and the shingles just below the skylight for ten to fifteen minutes, then stop and wait. No drip? Move up one side. Then the other side. The saddle and the roof area above the skylight go last — wetting them first proves nothing, because water from above can run behind everything below. The zone that starts the drip contains the entry. Fifteen unhurried minutes per zone, low to high, in order. It is slow, and it is conclusive, and it is the difference between paying for a reflash of the correct side and paying for a reseal of the wrong one.
A safety note that is not boilerplate: everything in this section can be done from the attic, the ground, or a ladder at the eaves. The hose test's outside partner does not need to stand on the roof at all on most single-storey homes, and on a steep, high or slippery roof the whole outside half of the job belongs to the professional you are about to hire — brief them with your weather log, your timing notes and your attic photographs instead. That file of evidence is worth real money: it is the difference between a diagnosis visit and a repair visit.
The skylight you inherited: dating it and reading its future
First-time buyers inherit skylights. The previous owner's renovation, the builder's 2009 spec, the unit that has simply always been there — and when it drips, you have no paperwork, no install date and no idea whether you own a young unit with a small problem or an old unit at the end of its life. Three pieces of detective work fix that.
Find the maker's stamp. Almost every manufactured skylight carries an identification plate or an etched code — on the frame's edge, on a metal tag on the curb or frame, or etched into a corner of the glass itself. It typically encodes the manufacturer, the model, the size and a production date or batch. Photograph it. With the maker and model you can confirm whether a matched flashing kit exists for your unit (it matters for the pro fix, below), whether replacement glass is still made, and roughly when the unit was produced. A unit you cannot identify at all, with an acrylic dome and a timber frame, is telling you its age by its anonymity: that is 1980s–90s stock, and it belongs in the replacement conversation from the start.
Apply the 20-year line. Skylight service life is roughly two decades — not because the glass wears out, but because the glass seal, the frame seals, the finish and the flashing all arrive at old age together. Under 15 years: repair almost anything; the unit has real life left to protect. Fifteen to twenty: repair the specific failure if the rest of the unit is sound. Past 20 with a leak: price the replacement seriously before pricing the repair, because the failures queue up — reflash this year, glass seal the next, and you will have paid for roof access twice and still own an old skylight. The exception that proves the rule is the young roof, old skylight case and its mirror image: if the roof itself is being replaced within a few years, a modest repair that holds until the re-roof — when the skylight can be replaced and flashed in with the new shingles in one operation — is often the smartest money of all.
Test the old stain before you budget for it. If the mark under your inherited skylight was there at the viewing and nobody knows its history, do not assume a live leak. Run the pencil test from the FAQ: outline the stain, date it, and watch it through real rain. Sellers fix leaks and forget to repaint; stains are history books, not headlines. A stain that does not grow through three proper storms is a paint job, not a roofing job — and the weather log you keep while testing it becomes your baseline for the unit's real behaviour.
The fixes you can do yourself
Three jobs are genuinely owner-sized. Do them in this order, because each one is also a diagnostic step for the next.
1. Clear the debris dam. From a ladder at the eaves or from the roof if yours is low and gentle, clear everything banked against the uphill side and corners of the curb — leaves, needles, grit, the occasional tennis ball. A leaf blower or a soft brush does it; do not rake at the flashing with anything metal. Then hose the area gently and watch where the water goes: it should sheet past the skylight and away. If your leak was a debris pond, the next three storms will tell you — keep the weather log running. Cost: nothing. This fix alone ends a surprising share of autumn skylight leaks.
2. Reseal the joints — correctly, and with honest expectations. If your diagnosis points at perished sealant over sound flashing, a reseal is a fair DIY on an accessible roof. The method matters more than the product. Cut and peel out all the old, failed sealant first — new sealant over cracked old sealant inherits the cracks. Clean the joint, let it dry fully, and lay a neat bead of a quality roofing-grade sealant (a polyurethane or high-grade silicone made for roofing and flashing work) only at the joints the manufacturer actually seals: the frame corners and the cladding joints. What never to do: smear sealant over the flashing laps themselves, across the step flashing, or in a tar-like blanket over the whole curb. Those laps must stay free to shed water; sealing them shut traps water behind them and converts a small leak into a hidden rot farm, and it is the single most common way owners make a skylight worse. Then the honest limit, stated plainly: surface sealant lives in full sun on a moving joint, and it ages in years, not decades. Treat a reseal as buying one to three seasons while you confirm the diagnosis and budget the real fix — because if the flashing underneath has failed, the drip will return, and its return is your signal to stop sealing and start reflashing.
3. Fix the condensation at its source. If your verdict was condensation, the repair list is indoor work. Run the bathroom extractor during every shower and for twenty minutes after — and verify it vents outside, not into the attic; a fan dumping steam into the attic space around the shaft is a condensation machine aimed at your skylight. Keep winter indoor humidity in the 30–35% range in cold weather (a $15 hygrometer tells you the truth), which usually means a dehumidifier or simply cracking the moisture sources: lids on pots, the kitchen extractor on, the tumble dryer vent checked. Where the shaft itself is the problem — an uninsulated shaft in a cold attic sweats along its whole length — insulating the shaft walls from the attic side is a real and permanent cure, and a handyperson-sized job. None of this involves the roof, and all of it works, which is more than can be said for the sealant a roofer would have sold you.
The professional fixes: reflash, reglaze, replace
Reflashing with the manufacturer's kit. This is the correct permanent repair for the number-one cause, and the word kit is doing real work in that sentence. The pro strips the shingles around the skylight, removes the old flashing, inspects and repairs the curb and deck, wraps the deck seal membrane, and installs the new kit made for your exact model in the sill, step, saddle sequence, weaving the step pieces back in with the shingles as they go. A typical single-skylight reflash is half a day to a day of work. Angi's 2026 national figures put flashing repair at $200–$600 — the low end being a localised repair of one side, the high end approaching a full reflash on an easy roof; a steep or high roof, or shingles that crumble when lifted, pushes beyond it. Why insist on the matched kit rather than site-bent metal? Because the kit's laps are engineered for the unit's exact curb dimensions, because the maker's instructions are the code reference, and because a new unit installed with its kit can carry up to a 10-year manufacturer installation warranty against leaks. Site-bent flashing carries the installer's handshake, and nothing else.
What the quote must include. Get this in writing before work starts: the kit brand and model, named; removal and disposal of the old flashing; inspection of the curb and deck with a stated per-item price for rot repair if found (so a discovery mid-job is not a blank cheque); new ice-and-water membrane around the curb; the shingle work included and how mismatched replacement shingles will be handled; and the warranty — whose, how long, and covering leaks or just workmanship. A quote that says only "fix skylight leak — $450" is not a quote; it is a hope.
Reglazing: replacing the glass unit. For a fogged or cracked pane on a sound frame, a glazier or the manufacturer's service network can fit a new sealed glass unit into the existing frame — $300–$900 on Angi's 2026 figures, the spread driven by size, glazing spec and access. The frame, curb and flashing are untouched, no shingles are disturbed, and it is typically a few hours of work once the unit (often made to order, so expect a lead time of some weeks) arrives. On a unit under 15 years old this is clean value. On a unit past 20, read the next paragraph before signing.
Full replacement, and the repair-versus-replace call. A new skylight, supplied and installed with its matched flashing kit, runs $1,000–$2,750 in Angi's figures. Replacement resets every clock at once — glass seal, frame seals, flashing, finish — and a modern unit also brings better glazing and, on venting models, rain sensors and solar blinds that an old fixed unit never had. The decision rule from the inherited-skylight section bears repeating as the summary: repair a young unit's specific failure without hesitation; replace a unit past roughly 20 years rather than funding its failures one at a time; and if a re-roof is coming within a few years, let a sound repair bridge you to it, because replacing the skylight during the re-roof is the cheapest correct installation you will ever buy.
Who to hire, one more time. Rain leak: a roofer who installs skylights, or a skylight specialist. Glass: a glazier or the manufacturer's network. Condensation: neither — an electrician for the fan venting, at most. Bringing your weather log, timing notes and attic photos to the first visit routinely converts a paid diagnosis call into a repair quote, and it marks you out as a customer whose quotes come back itemised.
What it costs, gathered in one place
Skylight money sorts cleanly by the layer that failed, which is why the diagnosis was worth doing. A debris dam costs nothing but a ladder climb. Sealant failure costs $15–$50 in materials to treat yourself, or $150–$400 for a professional reseal. Flashing failure — the commonest real leak — costs $200–$600 to repair, with most skylight repairs of all kinds landing between $454 and $1,514 and averaging around $962 nationally in Angi's 2026 data, labour at $50–$100 an hour inside those figures. Glass failure costs $300–$900. And the full reset, a new unit with its kit, costs $1,000–$2,750. Two honest caveats: access is the great multiplier (a two-storey, steep-pitch skylight can add half as much again to any of these), and a leak left running converts a flashing bill into a flashing-plus-rot-plus-ceiling bill on a schedule measured in seasons, not years. The cheap version of every repair on this page is the one done this year.
DIY or pro: the short version
Do the diagnosis yourself, always — the weather log, the towel test, the attic inspection and the hose test cost nothing and determine everything. Do the debris clearing and the humidity work yourself. Attempt a reseal yourself only if the roof is low, gentle and dry on the day, you are confident on it, and you have accepted that the reseal is a diagnostic reprieve rather than a cure. Hire out the reflash, the reglaze and the replacement: the reflash because its value is its sequence and warranty, the reglaze because sealed units are made-to-measure factory parts, and the replacement because it is a roofing operation with a skylight in the middle of it. And whatever the job, never let anyone — owner or pro — talk you into sealing over flashing laps or smearing the whole curb. That is the one move in this entire topic that reliably makes things worse.
How fast do you need to move?
An active rain leak gets a bucket under it today and a repair booked this week: water inside a shaft wall spreads sideways through insulation and plaster far beyond the visible stain, and a stain left through a wet season becomes a mould problem with a ceiling repair attached. Escalate to today, not this week if water is reaching a light fitting or any electrical fitting, if the shaft wall or ceiling is bulging (that is pooled water loading the plaster), or if the flow doubles in a single storm — that pattern can mean a flashing piece has let go entirely. At the other end of the scale: a fogged pane with no drip is a failed seal and a diary note, not an emergency — plan its replacement with the unit's age in mind. And a confirmed condensation pattern is a this-month job on the fan and humidity, with no roofer involved at any speed. The skylight, in other words, rewards the owner who diagnosed first: the timing test at the start of this guide is also the triage.
Keeping it dry: the ten-minute twice-a-year check
Everything in this guide gets cheaper if the failure is caught while it is still small, and a skylight asks for very little: ten minutes, twice a year, folded into the gutter-cleaning rhythm you already keep. In spring and again in autumn, look at four things. Clear the uphill side and corners of the curb — the debris dam is the only cause on the failure list you can delete entirely with a brush. Read the sealant at the frame corners and cladding joints: you are looking for shrinkage, hairline cracks and beads lifting at one edge, the early stages of the failure that a timely $150–$400 reseal still cures. Check the glass from inside on a cold morning: the first whisper of a failed seal is a mist that forms between the panes on cold days and burns off by noon — note the date, because the pattern confirms the diagnosis months before the fog becomes permanent. And look at the shaft walls and ceiling corners for any new shadow of staining, pressing a dry hand to anything suspicious: caught at the shadow stage, a leak is a flashing repair; caught at the dripping stage, it is a flashing repair plus plaster, paint and possibly insulation.
Two records are worth keeping in the house file alongside your weather log. Photograph the maker's plate (you found it during the inherited-skylight detective work) so the model and size survive even if the tag corrodes. And keep every invoice: a reflash invoice that names the kit model is warranty evidence, and a paper trail of professional maintenance is one of the few home documents that genuinely speaks to the next buyer.
One rule ties the whole topic together, and it is the right note to end on: when the roof is replaced, the skylights are dealt with in the same operation — reflashed at minimum, replaced if they are anywhere near the 20-year line. A new roof laid around an old skylight, with new shingles woven into tired flashing by a crew in a hurry, is the single commonest origin story of the leaks this guide exists to diagnose. The layered defence only works when the layers are renewed together. Buy them together, and the drip in the hallway stays what it should be: somebody else's problem, in somebody else's house, that you once read a very long guide about.
Cost at a glance
| Item | Typical cost | Notes |
|---|---|---|
| DIY reseal (materials only) | $15–$50 | One tube of quality roofing sealant and a morning; buys a season, not a cure |
| Professional resealing | $150–$400 | Angi 2026 national range; the right fix only when the flashing underneath is sound |
| Flashing repair / partial reflash | $200–$600 | Angi 2026 national range; the most common real cure for a rain-timed leak |
| Glass unit replacement | $300–$900 | For cracked glass or a failed, fogged seal — the unit, not the roof |
| Full skylight replacement | $1,000–$2,750 | New unit with its matched flashing kit; the sensible spend once a unit passes roughly 20 years |
Frequently asked questions
Why is my skylight leaking — the flashing or the skylight itself?
Usually the flashing. A skylight is a factory-sealed unit sitting in a hole in your roof, and the unit itself is rarely the weak point; the weak point is the hand-built junction where it meets the shingles. Failed, missing or badly sequenced flashing around the curb is the number-one cause of rain-timed leaks, followed by perished sealant at the joints. The unit itself is the culprit mainly in two cases: a failed glass seal (which shows as fog between the panes, often with no dripping at all) and a cracked dome or pane. That is why the first diagnostic question is never 'how old is the skylight' but 'when exactly does the water appear' — timing separates the roof's problem from the unit's problem.
How can I tell if the water is a leak or just condensation?
Correlate it with the weather, not the calendar. Keep a simple log for a week: note each drip or damp patch and what the weather was doing. Condensation appears on cold, clear mornings after a frosty night — no rain required — and is worst under bathrooms and kitchens, where showers and cooking load the air with moisture. A true leak tracks rain, often with a delay of an hour or more while water travels. Then do the towel test: tape a dry paper towel high on the light shaft and one low, near the ceiling. Condensation wets the low towel and the frame corners first, evenly, like dew. A leak wets the high towel first, on one side, because the water is entering above and running down. If the drips arrive on a dry morning, no roofer can fix them — the fix is humidity control.
How much does skylight repair cost?
By repair type, using Angi's 2026 national figures: professional resealing runs $150–$400, flashing repair $200–$600, and glass replacement $300–$900. Most skylight repairs overall land between $454 and $1,514, averaging around $962, with labour typically $50–$100 an hour. A full replacement with a new unit and its matched flashing kit runs $1,000–$2,750. The spread inside each range is mostly roof access — pitch, height and how much shingle work the flashing needs — which is why two quotes for the same skylight can differ by hundreds of dollars and both be honest.
Can I fix a leaking skylight myself?
Parts of it, yes — and the diagnosis entirely. Clearing leaves and debris dammed above the skylight, running the condensation tests, inspecting from the attic and doing a controlled hose test are all safe owner work. A neat reseal of an accessible, low-pitch skylight is within a careful DIYer's reach, with the honest caveat that surface sealant is a season's reprieve, not a repair: if the flashing under it has failed, the leak will be back. Reflashing and replacement are where to stop — the flashing kit must go on in the manufacturer's sequence (sill, step, saddle) over the deck seal and underlayment, and that sequence is what the installation warranty stands behind. Get that order wrong and you have rebuilt the leak.
Who do I call for a skylight leak — a roofer or a glazier?
Match the trade to the verdict of your timing test. A rain-timed leak is a roofing problem: call a roofer, ideally one who installs skylights, because the fix lives in the flashing and shingles. A failed glass seal or cracked pane on a sound frame is a glass problem: a glazier or the skylight manufacturer's service network can replace the glazing unit. Condensation needs neither — it needs a bathroom fan that vents outside and lower indoor humidity. If you genuinely cannot tell, call the roofer first: they can inspect the flashing from the roof and the shaft from the attic in one visit, and a good one will tell you honestly if the problem turns out to be glass or humidity instead.
How long should a skylight last? When does replacement beat repair?
Plan on roughly 20 years as the decision line. The glass seal, the frame finish and the flashing all age together, so a unit past 20 years that starts leaking is usually announcing the end of its service life rather than a single failed part — reflashing a 24-year-old unit often means the glass seal fails two winters later and you pay for roof access twice. Under 15 years with sound glass, repair is almost always the right money. Between 15 and 20, weigh the specific failure: flashing only, repair it; glass and flashing both tired, replace. One more factor: a new unit installed with its matched flashing kit can carry a manufacturer's installation warranty of up to 10 years against leaks, which no repair can offer.
The stain under our skylight was there when we bought the house. Is it still leaking?
Not necessarily — and you can find out before spending anything. Old water stains stay visible for years after the leak that made them is fixed. Two tests tell you whether yours is live. First, the moisture check: press the back of your hand, then a dry paper towel, firmly against the stain on a dry day; an active leak path often stays faintly cool and damp deep in the plaster even between storms, while a dead stain is bone dry and dusty. Second, the pencil test: outline the stain's edge lightly in pencil and date it, then watch through the next two or three rainstorms. A growing outline means live water; an unchanged outline after real rain means history. If it is live, run the timing log from this guide — a stain inherited with the house deserves the same diagnosis as a new one.
Checked November 16, 2026. This guide is general information, not a substitute for a licensed professional.
Related guides
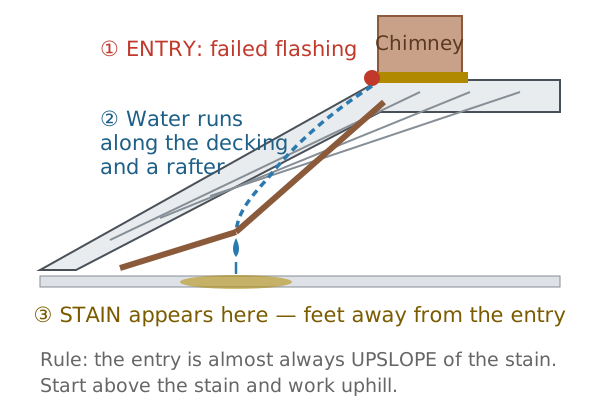
How to Find a Roof Leak: Why the Stain Isn't Under the Hole, and How to Trace the Real Source
Water runs sideways before it drips, so the ceiling stain is a clue, not a location. The attic-first method, the timing clues, the hose test, the usual suspects in order — and 2026 repair costs.
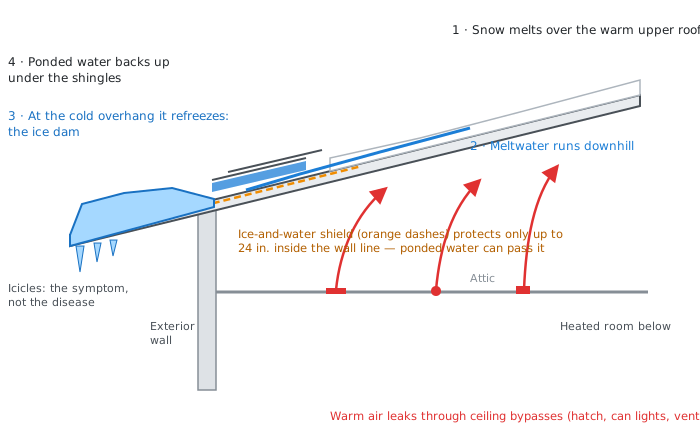
Ice Dams: How to Remove One Safely, What Removal Costs, and How to Stop the Next One
An ice dam is an attic problem wearing a roof costume. How the melt-and-refreeze cycle works, the safe removal methods (rake, calcium chloride, steam), what pros charge, what insurance will and won't pay, and the air-sealing fix that ends it for good.
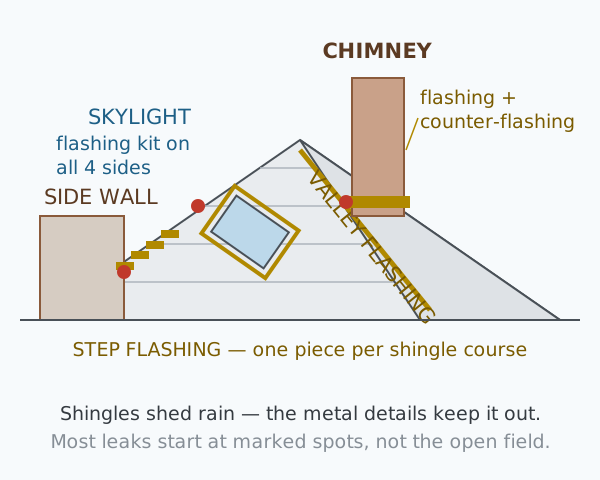
Roof Flashing Repair Cost: Chimney, Valley, Step and Skylight Flashing
Most roof leaks are flashing leaks. What chimney, valley, step and skylight flashing repairs cost in 2026, the difference between a reseal and a real reflash, and the checklist that tells a proper quote from a tube of caulk.