 Keep
Roof Flashing Repair Cost: Chimney, Valley, Step and Skylight Flashing
 Daniel Mercer · Editor & Researcher·
Published November 16, 2026·
Updated November 16, 2026
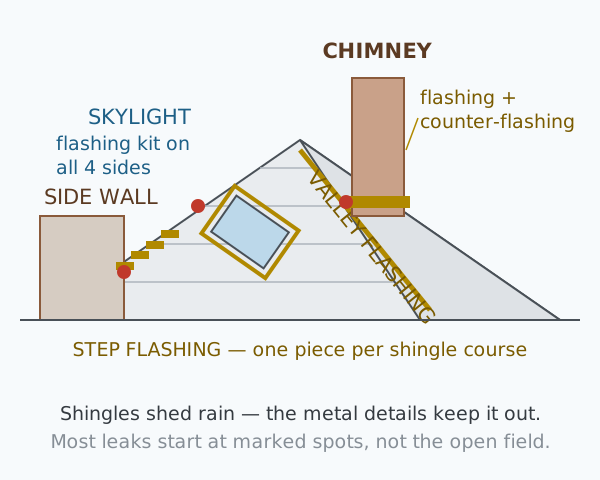
The roofer climbs up, walks the roof for ten minutes, and delivers the verdict most homeowners are not expecting: your shingles are fine. The leak above the fireplace, the stain spreading beside the skylight, the drip that only shows up in hard rain — none of it is the shingle field failing. It is the flashing: the thin metal details that waterproof every place the roof is interrupted. Shingles get blamed because they are what a roof looks like. Flashing does the actual waterproofing at every chimney, valley, wall and skylight, and flashing is what wears out first.
That distinction matters for your wallet as much as for the diagnosis. A flashing repair is a few hundred dollars of targeted metalwork. A re-roof sold to fix a flashing leak is five figures spent on the wrong component — and, embarrassingly often, the leak survives it, because the new roof's flashing was priced as an afterthought. This guide walks the four flashing locations in turn, what each one costs to repair or replace in 2026, how each one fails, and how to read a quote closely enough to know whether you are buying new metal or a tube of caulk with a labour charge attached.
One number to hold in mind throughout: the difference between a $200 fix and a $12,000 disaster is often just two or three weeks of ignored dripping. Flashing leaks start small and stay cheap for a surprisingly short window. Everything below is about spending inside that window.
The flashing map: four details that keep the water out
Flashing is not one product. It is a family of shaped metal pieces, each designed for a specific junction, and each failing in its own way at its own price. If you are a first-time homeowner looking at a roof you inherited, these are the four locations worth being able to name — because the name is what the quote will itemise.
Chimney flashing is the most complex detail on the roof, because a chimney is a wide obstacle standing in the middle of a slope and water has to be persuaded around all four sides of it. It is actually four components working as a system. Base (or apron) flashing runs across the downhill face, carrying water out over the shingles below. Step flashing climbs both sides, one small L-shaped piece per shingle course, woven between the courses so water is handed from piece to piece down the slope. Counter-flashing is the piece most often missing or faked: it is cut into a mortar joint of the chimney (a groove called a reglet), folds down over the top of the step and base flashing, and sheds water over them the way a cuff sheds water over a glove. Behind the chimney, on the uphill side, a wide chimney needs a cricket — a small peaked diverter that splits the water flow so it cannot pond against the brick. When a quote says "chimney flashing," this whole system is what it should mean.
Valley flashing sits where two roof slopes meet in a trough. A valley is the hardest-working line on the roof: it collects the runoff of two entire slopes and concentrates it into a single channel, so in a heavy storm a valley may carry many times the water flow of the open roof. Valley metal (or a woven shingle valley, on some roofs) has to survive that flow plus the debris that washes down with it and dams against it.
Step flashing is the detail where a roof slope runs into a vertical wall — the side of a dormer, a second-storey wall above a one-storey roof, a chimney's sides. It is the same woven, one-piece-per-course system described at the chimney, running along the wall line, with the wall's siding or its own counter-flashing lapping over the top. It is entirely hidden when installed: all you can see from the ground is the line where roof meets wall, which is exactly why its failure surprises people.
Skylight flashing comes as a manufacturer kit matched to the skylight model: a sill piece at the bottom, step pieces up the sides, and a saddle at the top, all designed to integrate with that unit's frame. A skylight is a hole cut in the roof with a window in it, and the kit is the only thing making that arrangement waterproof.
In passing, the same family includes the vent pipe boots covered in our pipe boot guide — a rubber-sealed collar around each plumbing vent — and drip edge along the eaves. The four above are where the serious repair money goes.
How each one fails
Flashing rarely fails all at once. It fails by a short list of mechanisms, and recognising which one you are looking at tells you whether a reseal is honest or a waste of money.
Sealant dies first, and it is supposed to be a backup. Every flashing joint that depends on caulk is a joint on a countdown: roofing sealants harden, crack and pull away under ultraviolet light and thermal movement, typically within a few years. On a correctly built detail, sealant is the second line of defence and the laps and folds of the metal do the real work. On a badly built or badly "repaired" detail, sealant is the only line — and its failure is the leak. This is why so many flashing leaks appear at the five-to-ten-year mark on roofs that are otherwise sound.
Metal rusts, splits and fatigues. Galvanised flashing corrodes once its zinc coating is breached, fastest where water sits — valley bottoms, the uphill face of chimneys, anywhere debris holds moisture against the metal. Metal also fatigues: decades of expansion and contraction work the folds until a corner cracks. A pinhole in a valley or a split fold at a chimney corner leaks exactly as well as a missing shingle.
Edges lift and fasteners back out. Wind works at exposed flashing edges; nails driven through the face of flashing (a shortcut that should never survive inspection) loosen and become leak points themselves. Lifted counter-flashing lets wind-driven rain in behind the whole system while looking, from the ground, like nothing at all.
Mortar joints open at chimneys. Counter-flashing is only as good as the mortar joint holding it. As joints weather and crack, the counter-flashing loosens, and water enters behind it and runs down inside the system. At that point resealing the roof surface does nothing — the failure is up in the brickwork, which is why chimney quotes sometimes include a mason's work and sometimes mysteriously fail to fix the leak when they do not.
The skylight gets blamed for its kit. A leaking skylight is usually its flashing kit or the seals around it, not the unit — but kits are model-specific and age out of availability, and a roofer who cannot source the correct kit will improvise one from flat metal and sealant. That improvisation is the repair most likely to be back within two winters.
Match the symptom to the detail
Before anyone quotes, you can narrow the suspect list from inside the house, because each flashing detail leaks into a recognisable place. This is the attic-and-ceiling half of the diagnosis, and it takes twenty minutes with a flashlight.
Stain on the ceiling or wall beside the chimney breast, or peeling paint on the chimney chase: chimney flashing until proven otherwise. In the attic, look at the decking around the chimney opening for dark staining, worst on the uphill side (failed cricket area or apron) or along the sides (step flashing). A stain that appears only in wind-driven rain points at counter-flashing — straight-down rain is shed by the laps, but driven rain gets behind a loose counter-flashing edge.
Stain along the line where two ceiling slopes or a vaulted ceiling's valley sits, or in a room corner below where two roof sections join: the valley. Valleys telegraph slowly: check the attic for a damp line following the valley board, and from the ground, look up the valley for debris dams — a valley choked with leaves holds water against the metal and under the shingle edges, and sometimes clearing it is half the cure.
Stain high on a wall that has roof below it — the classic case is a second-storey wall above a one-storey roof, or either side of a dormer: step flashing. These stains often appear as vertical streaks following the wall, and they are the most frequently misdiagnosed leak in the set, blamed on the wall's siding or the window above. Sometimes it is the siding — which is why the attic check matters: step flashing leaks wet the decking at the wall line first.
Stain in the ceiling around a skylight, drips at the skylight frame, or condensation-like wetness that only appears in rain: the skylight kit, in that order of probability — sill flashing first if the wetness is at the downhill side, step pieces if it tracks one side. One impostor to rule out: in cold weather, condensation forming on the skylight glass and running down the frame imitates a leak faithfully. If it happens without rain, on cold mornings, it is a humidity problem wearing a flashing costume.
Two timing clues cut across all four. A leak that appears during heavy rain but not light rain suggests a capacity or lap problem — water arriving faster than a marginal detail can shed it, typical of valleys and shallow-lap step flashing. A leak that appears hours after rain, or the next day, suggests water soaking into saturated material — rotted decking, soaked insulation, a masonry chimney absorbing water and releasing it slowly — and warns that the repair bill may include more than metal.
What each repair costs, and why
The table at the top of this page is the summary. Here is the reasoning behind each line, because flashing quotes vary more by scope than by anything else — two quotes $700 apart are often not quoting the same job.
The reseal: $200–$600
The cheapest legitimate job. The roofer cleans the joints, renews failed sealant, refastens lifted edges and replaces any obviously perished rubber seals. Nothing is unbuilt; the metal stays. This is the right purchase in exactly one situation: the metal is verified sound, correctly lapped, and only its sealant has died — common on roofs under ten years old and on counter-flashing whose mortar is still tight. Priced per job it runs $200–$600; some roofers quote simple flashing work at $10–$25 per linear foot installed. A reseal sold on rusted, split or wrongly lapped metal is not a bargain at any price, because you will buy the reflash later anyway, plus whatever the extra seasons of leaking did inside.
Chimney flashing: $500–$1,500, and the masonry question
A full chimney reflash — shingles lifted around the chimney, old metal out, new step flashing woven in course by course, new apron, counter-flashing cut into a fresh reglet and sealed — runs $500–$1,500 for a standard residential chimney, with counter-flashing work alone quoted around $400–$1,200 when the rest of the system is sound. Three things push a chimney job up the range. First, masonry: if the mortar joints are cracked or the reglet has to be ground out and repointed, a mason's day joins the roofer's, and combined jobs reach $2,500–$3,500. Second, the cricket: a chimney wider than about 30 inches on its uphill side should have one, and building a cricket where none existed adds framing, decking and metal to the bill. Third, access and pitch: a chimney high on a steep two-storey slope simply costs more to work around than one reachable from a low, gentle roof. If your chimney quotes differ wildly, ask each roofer one question — "does this include the counter-flashing, cut in, and any mortar work?" — and the spread usually explains itself: the cheap quote is almost always surface metal and sealant.
Valley flashing: repair $300–$800, replacement $800–$2,500
A valley repair — clearing a debris dam, sealing a localised split, correcting a nail placed too close to the centreline — can be a few hundred dollars. A valley replacement is real roof surgery: shingles come off both slopes along the valley's full length, the old metal (or failed woven valley) comes out, new valley metal or membrane goes down, and both slopes are re-shingled into it. That is why replacement runs $800–$2,500 depending on the valley's length and the roof's pitch, and why valley quotes are quoted per job rather than per foot. The honest complication: opening a valley exposes the condition of the underlayment and decking along the most water-stressed line on the roof, and a quote that includes a contingency line for deck repair there is a quote from someone who has done this before.
Step flashing: $300–$700 per section
Priced per wall section rather than per piece, because the labour is in the sequence: shingles along the wall come up course by course, each old step piece comes out, new pieces go in woven with the re-laid courses, and the wall above has to be opened enough to lap siding or counter-flashing over the top. That last step is the one cheap quotes omit — on many houses the siding must come off the wall to flash the junction properly, and a roofer who flashes against the siding with sealant instead has built you another countdown timer. Expect $300–$700 for a typical dormer side or wall run.
Skylight flashing: $300–$800 for the kit job
A reflash with the manufacturer's kit for your skylight model — unit lifted or worked around, old kit out, new sill, step and saddle pieces in — runs $300–$800. Two warnings belong with this number. If the skylight itself is at end of life (fogged glazing, rotted frame, a model old enough that kits are discontinued), reflashed old units are the classic false economy: the labour of a reflash is most of the labour of a replacement, and a full skylight replacement, while it reaches roughly $2,800, buys a new kit, new seals and a new warranty in one visit. And if a roofer proposes to stop a skylight leak with sealant alone, you are looking at the shortest-lived repair in this entire guide.
What drives every number up or down
Across all four types, the same five factors move the price: access (one-storey ranch versus three-storey Victorian), pitch (steep roofs are slower and need more safety rigging), how much roof has to be unbuilt (the true dividing line between a reseal and a reflash), material (aluminium and galvanised steel are standard; copper, used on historic homes and sometimes required to match existing work, multiplies the metal cost several times over), and region (roofing labour in high-cost metros lands in the upper half of every range here, and emergency or out-of-hours rates run 40–60% above standard — one more reason an active flashing leak is a this-week phone call, not a tonight one, unless water is threatening electrics or a ceiling).
A word on metal: what the quote should specify
Flashing material is the line item owners never ask about and roofers most appreciate being asked about, because it separates a 20-year repair from a 40-year one. Galvanised steel is the budget standard: serviceable, paintable, and the first to rust once its coating is scratched or its cut edges are left exposed — fine for step flashing tucked under siding, less ideal in a wet valley. Aluminium is the common upgrade: it does not rust, forms easily around chimneys and skylights, and costs modestly more; its one rule is that it must not sit in direct contact with fresh mortar or certain treated lumber, which corrode it — a detail a good installer handles with a barrier layer without being asked. Copper is the lifetime material, often specified to match existing copper or on historic masonry: several times the metal cost, outlasts the shingles around it, and develops the green patina owners of older homes either love or specifically do not want on a visible valley. Lead still appears on older chimneys because it dresses softly into irregular brickwork, at roughly $3–$8 per linear foot of material. For most asphalt-shingle homes, aluminium flashing correctly installed beats copper carelessly installed every time — the laps and the weaving are the waterproofing; the metal is just what they are made of.
A proper repair versus a tube of caulk
Since a reseal and a reflash can be quoted for the same leak at a $500 difference, here is how to tell what you are actually being sold — the skill this whole guide exists to teach.
A proper reflash description contains verbs like remove, lift, weave, cut in and nouns like step flashing, counter-flashing, reglet, kit. The quote names the metal (aluminium, galvanised, copper) and its gauge or thickness, states the linear feet involved, says whether shingle removal and replacement is included, and says what happens to the old metal (it comes out). It usually includes photos of the existing detail, because the roofer had to look closely to scope it.
A caulk job description contains seal, coat, patch and a brand name of a sealant or roof coating. The metal is not named because no metal is involved. The price is low and the warranty, if any, is short and full of weather exclusions. None of this makes it fraudulent — as a stopgap it has a legitimate place, next section — but it must be bought as a stopgap: priced like one, expected to last like one. The failure mode to avoid is paying reflash money for it, or resealing three times across six years while the deck rots, at a total cost above the reflash that would have ended it.
One more tell: a roofer who proposes flashing work without getting into the attic or asking where the stain is has not diagnosed anything. Flashing is scoped from both sides — the detail above, the water's path below — and our roof leak tracing guide walks that attic-first method if you want to arrive at the quote conversation already knowing which detail is guilty.
The one legitimate DIY: resealing sound flashing, step by step
Everything above argues that replacement flashing is a roofer's job. But the research behind this guide found that nobody tells the other half honestly: a reseal of accessible, sound flashing is a real owner job with a real procedure — and there is also a legitimate temporary seal for an active leak while you wait for a dry forecast and a booked roofer. Here is that procedure, with its limits stated plainly.
First, the limits. This applies to flashing you can reach safely — a low, gentle pitch, dry conditions, proper footwear, a helper on the ground — and to metal that passes inspection: flat against the roof, laps facing the right way, no rust-through, no split folds, counter-flashing still tight in its joint. If the metal fails any of those checks, stop: you are looking at replacement, and sealing over it only hides the evidence. And if the roof is steep, high, wet or fragile, the DIY is the phone call. Falls are the leading cause of home-improvement fatalities, and no line in a cost table is worth a ladder misjudged.
- Clean the joint properly. Brush out debris, old loose sealant and dirt from the flashing joint with a stiff brush and a putty knife. Sealant sticks to clean metal and fails on dusty metal; most DIY reseals die at this step, not the next one.
- Dry it. Sealant will not bond to a damp joint. Work in a dry spell, and if the joint is shaded and slow to dry, wait rather than sealing moisture in.
- Check the fasteners and edges. Press lifted edges back flat. A loose face nail can be reset and sealed over, but note it: face nails through flashing are a defect, and a detail full of them is a replacement candidate wearing a disguise.
- Apply the right sealant, in the joint, not on top of the roof. Use a roofing-grade polyurethane or tripolymer sealant (not household silicone, which lets go of roofing metal), worked into the joint with the nozzle, then tooled smooth so it sheds water rather than catching it. A neat bead in the joint outperforms a wide smear across it every time.
- At a chimney, check the counter-flashing joint separately. If the sealant line where counter-flashing meets mortar has cracked but the metal is still firmly held in the joint, renew that bead too. If the metal moves when you push it, the joint itself has failed — that is reglet and masonry work, beyond this procedure.
- Write the date on your calendar, not just the tube. A reseal is a one-to-three-year measure. Note what you sealed and when, photograph it, and put a reminder a year out to inspect it. The owners who get caught are the ones who seal, forget, and discover the expiry date from a ceiling stain.
The emergency version is shorter and uglier, and it is the right move when water is actively coming in: from inside the attic, a bucket and towels protect the house first. From outside, if it can be reached safely, a temporary patch of roofing cement and a piece of membrane or even a tarp weighted (never nailed through good shingles if it can be avoided) over the suspect detail buys the days until a roofer's dry window. Photograph everything before, during and after — if there is any chance of an insurance conversation, that sequence is your evidence, and emergency mitigation is the one part insurers commonly reimburse.
Getting quotes: the itemised checklist
Flashing is where first-time homeowners most often overpay, not because roofers are dishonest but because the quotes are impossible to compare as usually written. Get two or three, and require each to itemise the same things:
- Which detail, exactly — chimney, valley, which wall, which skylight — and the diagnosis it is based on.
- Reseal or replacement, stated in those words, with the lifespan each implies.
- Metal type and gauge for any new flashing (aluminium, galvanised steel, copper), and the linear feet involved.
- Shingle removal and re-laying: included or not, and whether replacement shingles are matched or best-effort.
- Counter-flashing and mortar work at chimneys: cut into a reglet, or surface-mounted? Masonry included, subcontracted, or excluded?
- Siding removal at step flashing: included, or is the new metal being sealed against the siding?
- Old material removal and disposal, deck condition contingency, and the warranty — on the workmanship, in writing, with its term.
A roofer who answers these readily is telling you how they work. A quote that is one line and one number is asking you to buy the leak's story instead of the repair's. Ask also for before-and-after photos of the finished detail: on a roof you cannot safely inspect yourself, photos are the only receipt that the metal you paid for is the metal up there.
When the flashing rides along with a re-roof
One decision frames all the others: how old is the roof around the flashing? Flashing and shingles age together, and a reflash is woven into the shingle courses — which means the cheapest moment in a roof's entire life to replace flashing is during a re-roof, when the courses are coming off anyway and the flashing line item drops to little more than the metal itself. Roofers price it that way; on a re-roof quote, new flashing everywhere is a modest add-on rather than four separate jobs.
So the practical rule: if the roof has ten or more good years left, reflash the failed detail properly and ignore the rest. If the roof is within a few years of replacement and a flashing leak appears, buy the honest stopgap — the reseal, the boot, the temporary seal — and put the real money into the re-roof fund, with one instruction written into that future contract: all flashing replaced new, none reused. Reused flashing under new shingles is the most common false economy in roofing, because the new roof's warranty clock starts while the old metal's clock is nearly out. And if a leak appears on a roof you already know is dying, let the roofer say so plainly and price both paths; a $1,500 chimney reflash into a roof with two winters left in it is money spent flashing a roof you are about to throw away.
The bottom line
Flashing is a small fraction of your roof's area and the source of most of its leaks, which makes it the best-value repair work in the whole roofing trade — if it is scoped honestly. Budget $200–$600 for a reseal of sound metal, $300–$800 for a skylight kit, $300–$700 for a section of step flashing, $800–$2,500 for a valley, and $500–$1,500 for a chimney, more with masonry. Buy the repair whose description names metal, laps and linear feet. Seal, by all means, when sealing is the right-sized answer — and know the date it expires. And make the calls this week: flashing leaks are one of the few home repairs where the calendar, more than the contractor, sets the final price.
If you have just bought the house, add one line to your first-year list: a flashing inspection, from the attic after the first hard rain and from the ground with binoculars each spring. Ten minutes of looking, once or twice a year, is what keeps every number in this guide at the small end of its range.
Cost at a glance
| Item | Typical cost | Notes |
|---|---|---|
| Reseal and refasten existing flashing | $200–$600 | Sound metal, failed sealant or lifted edges; a stopgap with a 1–3 year life, not a cure |
| Chimney flashing replacement (step + counter-flashing) | $500–$1,500 | Standard masonry chimney; masonry repair or a new cricket can push the job toward $3,500 |
| Valley flashing replacement | $800–$2,500 | Shingles come off both slopes along the valley; length and pitch drive the number |
| Skylight reflash with a new flashing kit | $300–$800 | Manufacturer kit matched to the skylight model; a failed skylight itself is a separate, larger cost |
| Step flashing replacement, per wall section | $300–$700 | One piece per shingle course, woven in; siding often has to come off the wall to do it properly |
Frequently asked questions
How much does it cost to fix flashing on a roof?
For most homes, $200–$600 covers a reseal and refastening of flashing that is still sound. Replacing failed metal costs more and depends on which detail has failed: step flashing runs $300–$700 per section, a skylight reflash $300–$800, a valley replacement $800–$2,500, and a full chimney reflash $500–$1,500 for a standard chimney, climbing toward $3,500 when the mortar joints need cutting out and repointing or a cricket has to be built. Flashing priced per linear foot typically runs $10–$25 installed. Regional labour moves all of these — high-cost metros sit in the upper half of every range.
What is the difference between resealing and reflashing?
Resealing keeps the old metal and renews the sealant and fasteners on it — appropriate only when the metal itself is flat, sound and correctly lapped, and even then it is a one-to-three-year measure. Reflashing removes the old metal and installs new flashing integrated with the shingles: step flashing woven into each course, counter-flashing cut into the chimney's mortar joint, valley metal laid under both slopes. A reflash done properly lasts as long as the roof around it. The price difference is real, but so is the lifespan difference — a $400 reseal repeated every two years costs more than one $900 reflash within a single decade.
Can I repair roof flashing myself?
The honest DIY scope is narrow: resealing accessible flashing whose metal is sound, and temporary emergency seals. Both are covered step by step in this guide. Replacement flashing is different — step flashing only works because each piece is woven between shingle courses in sequence, counter-flashing only works because it is reglet-cut into the mortar, and a valley only works because the metal sits correctly under two slopes of shingles. Each of those means partially unbuilding the roof in the right order and rebuilding it in the right order. A mistake does not announce itself; it just leaks into the wall for a year before the stain shows.
How long should a flashing repair last?
Match the repair to the lifespan and the numbers make sense. Fresh sealant on old metal: one to three years before UV and movement crack it again. New galvanised or aluminium flashing, properly integrated: 20 years or more, roughly the life of the shingle roof around it. Copper flashing can outlast two roofs. This is why a roofer pushing a cheap reseal on a 20-year-old roof may be selling you the same job four times — and why a reflash quoted alongside a re-roof is often the cheapest version of that work you will ever be offered.
Will homeowners insurance pay for flashing repair?
Almost never for the flashing itself: failed flashing is wear and maintenance, and insurers treat it that way. The exception is sudden storm damage — flashing torn off by wind in a documented storm can be covered, and the interior water damage from a covered event may be paid even though the worn component is not. The practical move is the same either way: photograph the leak and the damage as it develops, keep every invoice including emergency tarping, and report promptly. A slow flashing leak left for months can rot decking and grow mould, and insurers routinely decline the enlarged damage as neglect.
Can flashing be replaced without removing shingles?
Generally no, and a quote that promises it deserves a hard question. Step flashing is physically interleaved with the shingles — each piece sits over the course below and under the course above — so replacing it means lifting or removing those courses. Counter-flashing can sometimes be replaced alone because it lives in the mortar joint above the roof surface, and surface-mounted 'flashing' screwed and sealed over the top of shingles exists, but it depends entirely on sealant and is a patch, not a reflash. If the shingles are staying untouched, what is being sold is a reseal, and it should be priced and warranted as one.
How long does a flashing repair take?
A reseal or a single pipe boot is an hour or two. A skylight reflash or one section of step flashing is typically half a day. A full chimney reflash runs half a day to a full day, longer if mortar has to cure or a cricket is being framed. A valley replacement is usually a day, stretching to two on long or steep valleys where both slopes come apart. Weather rules all of it: flashing work needs a dry roof and a dry forecast, so in a wet spell the honest answer from a good roofer is a temporary seal now and the real job booked into the first dry window.
Checked November 16, 2026. This guide is general information, not a substitute for a licensed professional.
Related guides
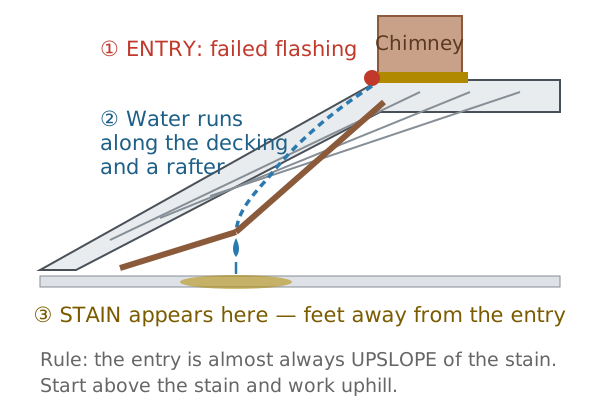
How to Find a Roof Leak: Why the Stain Isn't Under the Hole, and How to Trace the Real Source
Water runs sideways before it drips, so the ceiling stain is a clue, not a location. The attic-first method, the timing clues, the hose test, the usual suspects in order — and 2026 repair costs.
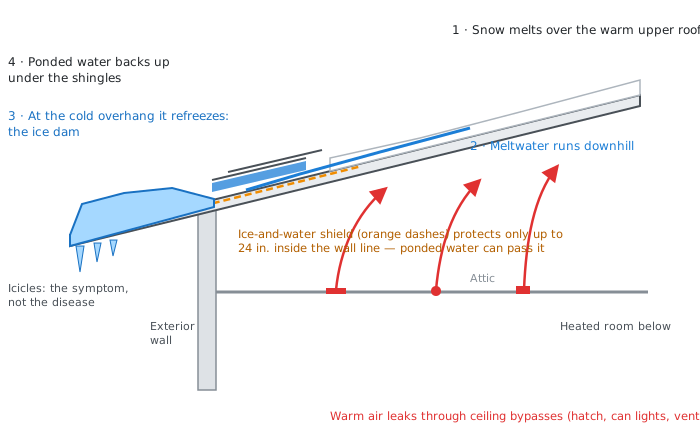
Ice Dams: How to Remove One Safely, What Removal Costs, and How to Stop the Next One
An ice dam is an attic problem wearing a roof costume. How the melt-and-refreeze cycle works, the safe removal methods (rake, calcium chloride, steam), what pros charge, what insurance will and won't pay, and the air-sealing fix that ends it for good.
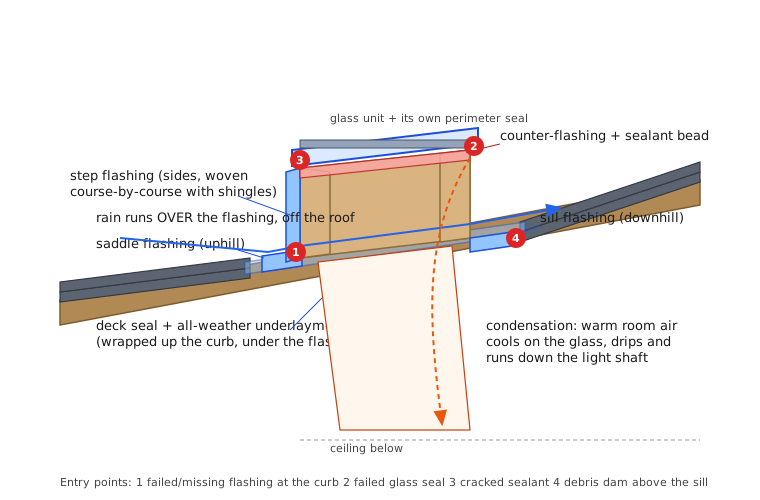
Skylight Leaking? Tell Flashing From Condensation First — Then Fix the Right Thing
A drip under a skylight has two completely different causes — rain getting past the flashing, or your own room air condensing on cold glass. The timed test that tells them apart, the failure points in order, what each fix costs in 2026, and when replacement beats repair.