 Keep
How to Find Your Septic Tank: Records, Clues, and Probing, Step by Step
 Daniel Mercer · Editor & Researcher·
Published November 16, 2026·
Updated November 16, 2026
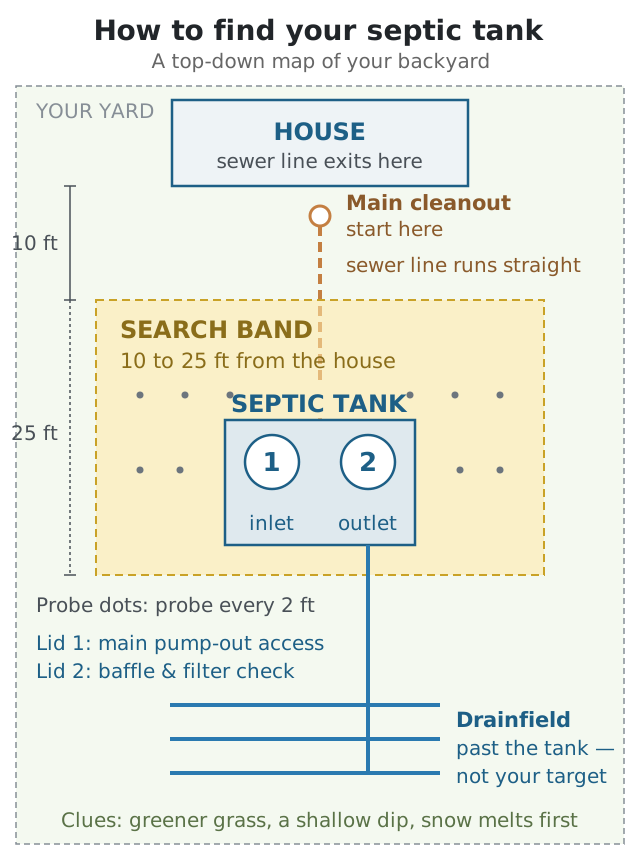
Somewhere in your yard there is a buried concrete, fiberglass, or plastic box holding roughly a thousand gallons of wastewater, and everything your household sends down a drain passes through it. If you bought a house with a septic system, there is a fair chance nobody showed you where that box is. No marker, no map, no little flag in the grass. Then the first septic bill comes due, or a drain slows down, or the pumper you called asks the question you cannot answer: "Where's the tank?"
This guide is the complete method for answering that question, in the order you should actually work: paperwork first, then the geometry of the yard, then a probe rod, and only then paid help. It also covers what most find-your-tank guides skip entirely — what to do in the ten minutes after you find it, so that you (and the next owner of your house) never have to search again.
First, know that having no idea where it is is completely normal
If it helps, you are in the majority. Tanks were often installed decades ago by a crew that left nothing behind but a permit filed at the county. Sellers forget, or never knew. Home inspectors check that the system works; many never locate the lids. Landscaping grows over everything. The result is that "find the septic tank" is a standard first-year task for septic owners, and pumping companies build it into their day — they would rather you find it first, because their locating and digging time is billed to you.
There are also practical reasons to do this before anything goes wrong:
- You cannot pump a tank you cannot find. Pumping is the single most important maintenance job on a septic system, and the truck needs the lids exposed. Our guide to how often you should pump your septic tank explains the schedule; this guide is what makes the schedule possible.
- You cannot protect it. Owners unknowingly park cars, build sheds and decks, plant trees, and set fence posts over tanks and lids. A collapsed lid or a crushed pipe turns a cheap search into an expensive repair.
- Emergencies charge by the hour. If sewage is backing up and the crew has to spend the first hour hunting for the tank, you pay for that hour at emergency rates.
- It is part of what you bought. If you are still in the purchase process, the inspection described in our guide to buying a house with a septic system should pin down the tank's location before closing. If you are already moved in, that job is now yours.
One safety note before any of the steps below. A septic tank is a confined space filled with gases that can kill quickly and without warning. Everything in this guide happens from the surface, with lids opened only enough to confirm what you found, and never, ever by climbing in. Locating the tank is safe, ordinary yard work. Entering one is not, under any circumstances.
What you are actually looking for
It helps to picture the target before you search. A typical residential septic tank is a rectangular box, roughly 8 to 10 feet long and 4 to 5 feet wide, holding 750 to 1,500 gallons. The top of the tank usually sits anywhere from a few inches to about 3 feet underground. On top of the tank are access lids — most tanks have two, round or square, roughly 18 to 24 inches across. One sits toward the end where wastewater enters from the house (the inlet side), and one sits toward the end where clarified water leaves for the drainfield (the outlet side). Some older tanks have a single lid in the middle; a few have three.
You do not need to uncover the whole tank, and you should not try. Everything a pumper or inspector needs — pumping, measuring the sludge and scum layers, checking the outlet baffle or effluent filter — happens through those lids. Your real target is two lid positions you can mark, measure, and find again.
Tank material matters for one of the search methods later. Older tanks are almost always concrete, sometimes steel (which rusts and is a collapse risk in old age). Newer tanks are often fiberglass or polyethylene plastic. Keep that in mind when we get to metal detectors: a detector can only help with some of these.
Step 1: Records — the answer is often already on paper
The cheapest search is a phone call. Septic systems are permitted, inspected, and pumped by people who keep records, and any one of those records can end your search in minutes. Work this list in order; stop as soon as one source gives you a location you can verify in the yard.
The county health department as-built
In most counties, the health department (sometimes the environmental health division, sometimes the building or permitting office) holds the permit file for your system. In that file there is usually an as-built drawing: a sketch made at installation showing the house, the tank, and the drainfield, with measurements from fixed points like the foundation corners. This one page is the single best source that exists. Call and ask for the septic permit or as-built record for your address. Many counties will email a scan for free or for a few dollars; some have online permit portals you can search by address or parcel number.
Two honest caveats. First, records thin out with age: a system from the 1960s may have a permit card with no drawing, or nothing at all. Second, as-builts are occasionally wrong — drawn from the plan rather than the installation, or measured carelessly. Treat the drawing as a very strong lead, then confirm with a probe before you dig. If the county has nothing, ask them anyway who inspected or pumped systems in your area back then; staff often know which local companies keep old files.
Your closing and inspection documents
Go back through the paperwork from when you bought the house. Places a tank location hides:
- The septic inspection report, if one was done. Inspectors record lid locations, often with measurements or photos.
- The property survey or site plan in your closing packet. Surveys sometimes mark the tank and drainfield, especially in states where septic disclosure is strict.
- The seller's disclosure form. In many states the seller had to state the tank's location, age, and last pumping date — or state that they did not know, which is itself useful information.
- The appraisal or lender file, which occasionally includes a site sketch.
The previous pumper
Septic pumping companies keep route records: address, tank size, lid depth, and where the lids are, because their crews do not want to search either. If you know which company the previous owner used — from an old invoice in a drawer, a sticker on the tank lid (later), or by asking the seller or a neighbor with a similar system — call them. A two-minute call can hand you the exact measurements. Even the company that pumped it once, ten years ago, may still have the card on file.
Neighbors and the previous owner
On streets where every house has a septic system, layouts repeat: the same builder or installer often placed tanks in the same relative position on every lot. A neighbor who has found theirs can tell you where to start looking on yours. And if you can still reach the previous owner through your agent, ask directly. People who lived with a system for years usually know exactly where the lids are, even if they never wrote it down.
If the paper trail gives you a location, skip to the probing section to confirm it before digging. If it gives you nothing, do not worry — the physical method below is how most tanks are actually found, and it works.
Step 2: Follow the line — the pipe tells you where the tank is
A sewer line is not a mystery route. Wastewater flows by gravity, so the pipe from your house to the tank runs straight and gently downhill, with no turns it does not need. That single fact turns a whole-yard search into a line you can walk.
Find where the sewer leaves the house
Your starting point is the main sewer line's exit. Look for it in one of these places:
- The main cleanout. Most homes have a main cleanout: a capped pipe, usually 3 to 4 inches across with a square or raised plug, located near the foundation where the sewer exits, in the basement or crawlspace near the front or back wall, or just outside the foundation. If you find the cleanout, you have found the line itself — stand on it and you are standing at the start of the path.
- The basement or crawlspace. Go to the lowest level and find the largest pipe — the main stack and the horizontal drain that collects the house's wastewater. Follow it to the wall it passes through. That penetration point, extended straight out into the yard, is your line.
- The lowest bathroom. In a house without a basement, the main line usually exits on the side of the house nearest the lowest bathroom or the laundry, where the drains converge. The pattern of fixtures gives you a good guess at the exit side of the house.
Walk the straight line out
Stand at the exit point and sight along the pipe's direction. The tank will be on that line, or within a couple of feet of it — installers dig one straight trench because straight trenches are cheaper, and because every bend is a future clog. Mark the line with a string, a garden hose laid on the grass, or a row of small flags. This line is the spine of your search.
A few direction clues can confirm you are on the right side of the house:
- The drainfield gives it away from the other end. If you know where the drainfield is (a flatter, sometimes lusher area of the yard that you have been told not to drive on), the tank sits between the house and the drainfield, on the same line.
- Vent and pipe stubs. An occasional short pipe stub or vent in the yard can mark the line's path or the tank's far end.
- Old excavation scars. A faint linear depression running from the foundation into the yard can be the settled trench itself, still visible years later, especially in the low light of early morning or late evening when shadows show shallow contours.
If the house has had additions, be careful: the line exits from the original plumbing core, not necessarily from the newest wall. Work from the cleanout or the main stack, not from the shape of the current house.
Step 3: Search the band — 10 to 25 feet out, inches to 3 feet down
Now combine the line with the distance. Health and building codes in most places require the tank to sit at least about 10 feet from the foundation, and installers rarely bury it much beyond 25 feet from the house, because trench, pipe, and effort all cost money. So the overwhelming majority of tanks sit in a band: 10 to 25 feet from the house, straddling the line you marked in Step 2. That band, maybe 15 feet deep and 10 to 15 feet wide around the line, is your search area. It is a few hundred square feet at most — a probe-able amount of ground.
Depth follows the pipe. The line leaves the house below the frost line and slopes down gently (about a quarter inch per foot is typical), so the top of the tank is usually a few inches to about 3 feet below the surface, deeper if the lot slopes down away from the house or the tank sits at the far end of the band. Knowing this keeps you from giving up on a probe hole too early: a strike at 2 feet down is normal, not a fluke.
Read the grass before you probe
Before you start poking holes, walk the band slowly and look. Tanks announce themselves in small ways:
- Greener, lusher grass in a rectangle or strip. The soil over a tank is shallower and warmer, and moisture patterns differ. In a dry spell, the grass over a tank and along the line often stays greener — or, in some soils, stresses and browns first. Either way, a rectangular patch that behaves differently from the lawn around it is a lead.
- A shallow dip or slight mound. Soil over the tank settles differently from undisturbed ground. A subtle rectangular sag, or a faint rise where excavated soil was replaced loosely, can outline the pit the tank was set into.
- Snow melts first. If you are searching in winter, check after a light snow or hard frost: the ground over the tank holds the system's warmth, and a rectangle that melts or thaws before the rest of the yard is one of the most reliable free clues there is.
- Bare or thin soil over a shallow lid. Lids buried only a few inches down sometimes sit under a patch where grass never quite establishes, especially if a previous owner dug there and backfilled with different soil.
- What is NOT there. Tanks are not placed under driveways (usually), big trees, or planned building spots, and the area over the tank is often suspiciously empty in an otherwise planted yard — no shrubs, no garden beds, because someone knew.
None of these clues proves anything on its own. Together with the line and the band, they tell you where to start probing — and probing is what turns a suspicion into a find.
Step 4: Probe — the rod does the finding
Probing is the method that actually locates most tanks. The tool is simple: a probe rod (also sold as a soil probe or tile probe) — a thin steel rod about 4 to 5 feet long with a T-handle and a slightly bulbous tip. Septic and utility suppliers sell them for roughly $20 to $40. A long, stout screwdriver or a length of thin rebar can substitute in soft soil, but a real probe is worth it: the tip is designed to slide through soil and stop dead on something solid, and the T-handle saves your palms.
Technique
Push the rod straight down with steady pressure, working it in small twists. You are reading what the tip touches:
- Plain soil offers even, gritty resistance the whole way down.
- A rock gives a sharp, pointy stop that shifts or deflects the rod, and probing a few inches to the side finds soil again at a different depth.
- A tank lid or tank top gives a broad, flat, unmistakable stop. Move the rod a foot in each direction and the stop is still there, at the same depth, across a wide area. Flat, level, and consistent is the signature — concrete feels hard and dead, fiberglass and plastic feel hard with a faintly hollow note when you tap the handle.
Work a grid: start where the line from Step 2 crosses the band from Step 3, and probe every 2 feet along the line, then on parallel rows 2 feet to each side. Mark each solid strike with a small flag. You are not looking for one strike — you are mapping an edge. When your flags trace a rectangle roughly 8 to 10 feet long in the direction of the line, with strikes at a consistent depth, you have found the tank's top. The lids sit on top of that rectangle, usually a foot or two in from each end.
Probe gently. You are locating, not excavating, and the rod should never be hammered through soil — if the tank is an older fiberglass or plastic unit, violent probing can crack what you are trying to find. Steady body weight on the T-handle is all it takes in most soils. In dry clay, wait for a day after rain, or wet the ground first; a probe in concrete-hard summer clay is miserable work and reads badly.
Confirm before you dig deep
Once the grid says "tank," dig a small test hole — a foot across is plenty — down to the surface you struck, at the spot where a lid should be. Dig by hand or with a small trowel near the surface you found. What you want to see is the lid itself: a round or square concrete, fiberglass, or plastic cover, often with a handle or a slight seam. Clear just enough soil to confirm it and to see its edges. Do not pry it open yet, and do not clear the whole tank; the next sections explain what to check first, because the moment of finding the lid is exactly when the one real danger in this job appears.
The safety rules that are not optional
- Never step-test a lid. A concrete lid that has spent 30 years underground can be rotted through and look fine. Old steel lids rust to foil thickness. Every year, people are seriously hurt when a lid gives way underfoot. Check a suspect lid from beside it, with a tool — tap it, lever an edge from solid ground — never with your body weight standing on it.
- Never enter the tank. Not to look, not to retrieve a tool, not for any reason. Tank gases (hydrogen sulfide, methane, and simple oxygen displacement) can overcome a person in seconds, and would-be rescuers are a well-documented second victim. Anything that falls in stays in until a professional with breathing equipment deals with it.
- Open lids only as far as the job needs. Once you confirm the lid, you can lift it a crack to verify you are over the tank (you will know by the smell and the dark liquid below), then set it back. Full opening is the pumper's job, with the truck's hose ready.
- Mind the hole. An open, uncovered excavation over a tank is a hazard to kids, pets, and anyone crossing the yard. Cover test holes or fence them off if you leave them, and backfill anything you are not actively using.
- Call before you dig anywhere else. Probing by hand is shallow work, but if your search turns into real digging, a free call to 811 locates buried utility lines first. Your septic line will not be on their map — that part is yours — but power, gas, and water lines might cross the same ground.
Metal detectors: useful on some tanks, blind on others
A metal detector is the most-asked-about shortcut, so here is the honest version. A detector finds metal, and only metal:
- Concrete tank: often findable. The concrete itself is invisible, but most concrete tanks and lids contain steel rebar, and many lids have metal handles or rings. If the lid is within about a foot of the surface, a rental detector can pick up the rebar grid.
- Steel tank or cast-iron lid: the easiest target of all — a big, shallow metal object.
- Fiberglass or plastic tank: invisible. There is nothing for the detector to find unless a previous owner buried a metal marker over it (some installers do exactly this, dropping a piece of rebar or a metal tag above the lid — one more reason the detector is worth a try even when you do not know the tank material).
- Depth is the other limit. Consumer detectors lose small targets quickly with depth. A lid 3 feet down is effectively out of range, whatever it is made of.
Renting a detector for $30 to $60 a day is a reasonable middle step when you have narrowed the search to the band and suspect a concrete tank — sweep slowly in overlapping rows and mark every repeatable signal, then probe the marks. But treat a silent detector as no information, not as proof there is no tank. Plastic and deep tanks pass straight under it, and the next step finds those.
Hard cases: when the tank is not where the rules say
The line-and-band method finds most tanks. A stubborn minority break the pattern, and knowing the usual exceptions keeps you from concluding your tank does not exist.
- The house grew. Additions, converted garages, and added bathrooms can move the plumbing core or add a second line. A few homes even have two tanks, or a tank and a separate dry well for laundry water (a common older arrangement). If the band on the main line is empty, search for a second exit point and a second line before paying for a locate.
- The system was replaced. When a failing system is replaced, the new tank sometimes goes in a different spot, and the old tank is pumped, crushed, or filled and abandoned in place. Probing that strikes a broad flat surface that turns out to be a lid over a dry, empty, or filled tank has found the old system. Your county records (Step 1) usually show the replacement permit and the new location — one more reason the paper search comes first.
- The tank is under something. It should not happen under modern codes, but older tanks sit under patios, decks, sheds, and even later driveway extensions. If your line runs straight toward a structure and the band beyond it is empty, the tank may be under the structure's near edge. Probe along the edges and check for an access hatch in the deck or patio before assuming anything — and if it is truly buried under concrete, this becomes a professional job, both to locate and to plan access.
- It is not a tank at all. Very old rural properties may have a cesspool (a lined pit rather than a two-lid tank) or an even older arrangement. A cesspool probes differently — no flat lid, sometimes a domed or collapsing top — and it changes the conversation from "find and maintain" to "plan a replacement." If your probing finds a suspicious soft or domed area rather than a flat lid, stop digging and get a septic professional to assess it; a deteriorating cesspool cover is a genuine collapse hazard.
- Deep frost and hardpan. In cold climates a tank can sit deeper than the standard range, and in rocky or hardpan soil a probe may be stopped by stone a dozen times per square yard. If every probe reads as a strike, switch tactics: probe after rain when the ground softens, lean harder on records and the transmitter ladder below, and do not burn a weekend fighting geology.
When probing finds nothing: the escalation ladder
Sometimes the band is empty. The as-built was wrong, the tank is deeper than your probe, the soil is full of rocks that cry wolf, or the installer put the tank somewhere no rule predicts. Do not start digging random holes — work up this ladder, cheapest first. Each rung exists because the one below it failed.
Rung 1: Re-check the line, not the yard
Most failed searches are a wrong line, not a missing tank. Go back to Step 2 and verify the exit point from a second source: if you worked from the lowest bathroom, confirm it from the basement stack or the cleanout. Houses with additions, rerouted plumbing, or a replaced sewer line can exit in a direction that surprises you. Also widen the band: probe a second band on the other likely side of the house, and extend the first band out to 30 or 40 feet before concluding anything. Tanks on big rural lots sometimes sit farther out than the standard band.
Rung 2: The dye test (tells you direction, sometimes more)
A septic dye test — a strong, non-toxic tracer dye flushed down a toilet, then watched for at likely spots — is mainly a drainfield test, but it has a locating use: if any part of your system surfaces (a wet spot, a seep, a low area that stays damp), dye appearing there confirms the line's direction and roughly how far the system runs. It will not pinpoint a buried lid, and it is the weakest rung on this ladder, but it costs a few dollars and can rescue a search that is pointed the wrong way entirely.
Rung 3: Camera and transmitter locating (the reliable one)
This is what the professionals use, and it does not depend on records, soil, or tank material. A plumber or septic locator runs a sonde — a small radio transmitter — into your sewer line, either on a camera snake pushed through the cleanout or as a flushable transmitter that is flushed down a toilet and carried by the flow into the tank itself, where it stops. The technician then walks the yard with a receiver that tracks the signal and marks the exact spot and depth. It is accurate to inches, works on plastic and fiberglass, and typically takes under an hour. Expect roughly $250 to $500 when a camera run is involved, less when a simple sonde locate is all that is needed.
Rung 4: Hire the locating outright
If you would rather skip straight to certainty, septic companies and locating services will find the tank as a standalone job: typically $100 to $300, or $125 to $250 per hour where it is billed by time. That sounds like a lot next to a free afternoon of probing, until you price the alternative — a weekend of digging up the wrong half of the yard, or an emergency pump-out where the crew bills the same search at emergency rates. Ask whether the fee drops if you book the pump-out or inspection at the same visit; it often does, because you have saved them the search on the job they actually wanted.
One more source worth trying before you pay anyone: the company that will eventually pump your tank may locate it as part of a first service visit for little or nothing beyond a digging fee. Get two or three quotes and ask each company exactly what "locating" includes — finding it, uncovering the lids, or both. Those are different amounts of work and different prices.
Found it is not the finish: the two lids, and checking them
You have struck the tank, cleared a test hole, and confirmed a lid. Here is where most guides stop — and where the useful part actually starts.
Find BOTH lids
Remember the picture from the top of this guide: most tanks have two access lids. One is toward the inlet end, where wastewater enters from the house; the pumping hose does most of its work through this main opening. The second sits over the outlet, where the baffle or effluent filter keeps solids from escaping to the drainfield — that lid is the inspection opening, and a pumper who cannot open it cannot check or clean the filter, which is one of the most common causes of a system that backs up despite a recently pumped tank.
Probe along the tank's top, in line with the sewer pipe's direction, until you have found the second lid's position (it is usually a foot or two in from the far end of the tank). Older single-lid tanks exist, and if careful probing finds only one opening, note that too — but assume two until proven otherwise. When you book your first pump-out, tell the company what you found: two lids, their depth, and the tank material, if you could tell. You will sound like the easiest customer on their route, and you will be quoted accordingly.
Check the lid's condition before anything stands on it
While the lid is exposed, look at it properly:
- Concrete lids: look for cracks, crumbling edges, spalling (flaking surface), and exposed, rusting rebar. Hairline surface cracks are common and usually cosmetic; a lid that flexes, rocks, or has a chunk missing is not.
- Steel lids and steel tanks: rust is the verdict. Heavy scaling or any perforation means the lid is at the end of its life.
- Fiberglass and plastic lids: look for cracks around the rim and UV-brittled, chalky plastic on any part that has been exposed to sun.
A damaged lid is replaced, not repaired — it is a standard part a septic company can swap in minutes once it is exposed, and it is vastly cheaper than the accident it prevents. Until it is replaced, mark the spot, keep people and animals off it, and do not let the matter slide: a failed lid over a full tank is one of the few genuinely dangerous things in a residential yard.
If you open the lid to confirm the find, do it from the side, levering with a pry bar from solid ground, and open it only enough to confirm. Then set it back exactly as it was. The full open, hose-in pumping job belongs to the truck.
The riser retrofit: dig once, never dig again
You have just spent real effort finding lids buried under a foot or three of soil. Here is the uncomfortable arithmetic: at every future pump-out — every 3 to 5 years, for as long as you own the house — someone has to dig those lids up again, and if that someone is the pumping company, you pay a digging fee each time, commonly $50 to $200 or more depending on depth. There is a one-time fix, and the moment you have the lids exposed is the cheapest moment to do it.
A riser is a stackable plastic or concrete cylinder, typically 24 inches across, that mounts over the lid opening and extends it up to the surface, where it is finished with a secure, visible cover at grade level. With risers on both lids, a pump-out starts the moment the truck arrives: pop the surface covers, hose in, done. No digging, no searching, no fee.
Expect $300 to $600 per lid installed, less if you do the digging and fitting yourself while the hole is already open (riser kits are a standard DIY-friendly product — the critical details are a watertight seal to the tank and a secured, child-safe surface lid, often screwed down). It is also the moment to fix the other small things you found: replace a cracked lid, note the tank's material and approximate size, and photograph everything before the soil goes back.
Run the payback honestly. Two risers at, say, $800 to $1,200 total, against a $100 to $200 digging fee at every pump-out for the next several decades, plus one avoided emergency search — the risers usually pay for themselves within two or three service visits, and they make every visit after that faster and cheaper. They also raise the system's value at resale, because the next buyer inherits a system they can actually service.
Record the find — the step that makes this the last search
Everything above is wasted if the knowledge lives only in your memory. Memory moves out; records stay with the house. Spend ten minutes making the find permanent:
- A measured sketch. On paper or in a note, draw the house outline and mark both lids with two measurements each, taken from fixed points that will not move: the foundation corners are best ("Lid 1: 14 ft from the back-left corner of the house, 6 ft out from the back wall, in line with the cleanout"). Two measurements per lid let anyone triangulate the exact spot later.
- A phone GPS pin. Stand on each lid and drop a pin in your maps app, saved with a label like "Septic lid 1 (inlet)". GPS is only accurate to several feet, which is not enough alone — but combined with the sketch, it gets the next person to the right square yard instantly.
- Photos. Photograph the exposed lids, the open tank if the pumper opens it, and the finished risers, with something in frame for scale. File them with your house documents.
- Tell your pumper. At the first pump-out, hand the crew your sketch and ask them to confirm and record it in their route file, along with the tank size and lid depth. Now the location exists in two places.
- Put the record with the house papers. Closing documents, the home file, wherever the next owner will look. In states with septic disclosure at sale, a documented tank location, pumping history, and risers are a selling point, not a footnote — buyers and their inspectors treat an unlocatable system as a risk to be priced, and a documented one as a maintained asset.
Then mark the spot in the yard itself, discreetly: a flat paver, a garden stone, or a small marker at the edge of the bed nearest the lids. Not a sign — just something that lets you walk straight to it in three years without the sketch in your hand.
What the whole search costs, honestly
For most owners, this job costs a phone call and an afternoon: county records are free or a few dollars, a probe rod is $20 to $40, and the clues are free. A detector rental adds $30 to $60 if you choose that step. Owners who go all the way up the ladder pay $100 to $300 for a professional locate, or $250 to $500 when a camera or transmitter run is involved — real money, but still a fraction of the cost of the things an unfindable tank eventually causes: emergency-rate searches, digging fees at every pumping, or a lid replacement discovered the hard way. The risers ($300 to $600 per lid) are the only genuinely optional spend, and they are the one that keeps paying you back.
DIY or pro: where the line is
Do it yourself: the records search, reading the yard, probing, careful hand-digging to confirm a lid, the sketch and the record-keeping, and (if you are handy and the hole is already open) fitting risers. None of this needs a license, and the skills are an afternoon's learning.
Call a pro when: the ladder's lower rungs fail and you need a sonde or camera locate; a lid is cracked, rusted, or otherwise unsafe to disturb; the tank turns out to be steel and old, which raises collapse questions beyond locating; or anything about the job would require opening the tank fully. And the absolute line, worth repeating: no one enters a septic tank, ever — not you, not a helpful neighbor, not a contractor without confined-space equipment and training. Pros who service tanks work from the surface, and so should you.
How urgent is this, really?
Finding your tank is not an emergency, and it does not need to happen this weekend. It needs to happen before the first pump-out comes due, before you plan any digging, building, tree-planting, or heavy-vehicle work in that part of the yard, and ideally in your first year in the house, while the closing documents are still findable and the previous owner's knowledge is still reachable. Pick a mild weekend, work the steps in order, and by Sunday afternoon a permanent unknown about your house becomes a pin on a map and two measurements in a folder. Every septic job you ever book after that starts easier because of it.
Cost at a glance
| Item | Typical cost | Notes |
|---|---|---|
| DIY search (records, clues, probing) | $0–$50 | County records are often free or a few dollars; a probe rod costs $20–$40 and you keep it |
| Metal detector rental | $30–$60 per day | Only helps on concrete tanks with steel rebar or a metal lid; useless on plastic and fiberglass |
| Professional tank locating | $100–$300 | Quoted flat by some companies, $125–$250 per hour by others; usually under an hour once on site |
| Camera or flushable-transmitter locating | $250–$500 | The escalation step when there are no records and probing finds nothing |
| Riser installation (per lid) | $300–$600 | One-time cost that brings the lid to the surface and ends digging at every future pump-out |
Frequently asked questions
How do I find my septic tank if there are no records?
Work the physical method instead. Find the main cleanout or the point where the sewer line leaves the house, then follow that line's direction straight out into the yard — sewer pipes run straight to the tank. Search the band 10 to 25 feet from the foundation, probing with a thin steel rod every couple of feet until you strike a flat, hard surface. Watch for clues along the way: a strip of greener grass, a shallow dip, or snow that melts first in one rectangle. If probing finds nothing, a locating service with a camera or a flushable transmitter will find it the same day, usually for $100 to $300.
How far from the house is a septic tank usually buried?
Most tanks sit 10 to 25 feet from the foundation. Building and health codes generally require a minimum setback of about 10 feet from the house, and installers rarely run the pipe much farther than they have to, because every extra foot of trench costs money. Older systems and unusual lots can break the pattern — a tank can sit closer, farther, or off to the side if the original installer was working around rock, a slope, or a well — which is why the distance is a search band, not a promise.
How deep is a septic tank buried?
The top of the tank is typically anywhere from a few inches to about 3 feet below the surface, and lids are sometimes buried deeper on sloped lots where the ground rises away from the house. Depth follows the slope of the sewer line: the pipe leaves the house below the frost line and drops gently, so the farther the tank is from the house, the deeper its top tends to be. If you are probing, expect the rod to travel 6 inches to 3 feet before it strikes the lid.
Can a metal detector find a plastic or fiberglass septic tank?
No. A metal detector only finds metal: the steel rebar inside a concrete tank, a cast-iron or steel lid, or a marker someone buried with the tank. Plastic and fiberglass tanks are invisible to it, and even on concrete tanks the signal fades if the lid is deep. A detector is a cheap rental worth trying when you already suspect a concrete tank in a small area, but probing and, failing that, a flushable transmitter are the reliable methods.
How much does it cost to have a professional locate a septic tank?
Most homeowners pay about $100 to $300. Some companies quote a flat locating fee in that range; others bill $125 to $250 per hour, and the job usually takes under an hour once they are on site because they use a sonde or transmitter that is flushed into the line and tracked from the surface. If the tank also needs to be uncovered and pumped at the same visit, ask for a combined quote — the locating fee is sometimes reduced when it is part of a bigger job.
Do I need to find the lid, or the whole tank?
The lids are what matter. Pumping, inspection, and effluent-filter cleaning all happen through the access lids on top of the tank, so you need their exact positions, not the tank's outline. Most tanks have two lids: one toward the inlet side, used as the main pump-out opening, and one over the outlet, where the baffle or effluent filter is checked. Mark both. If you later add risers, they go on the lids, and the rest of the tank can stay buried and forgotten.
Once I find it, is it safe to walk or drive over the tank?
Walking over it is fine. Driving and parking are not: a standard residential tank and its lids are not built for vehicle weight, and a rotted or cracked lid can collapse under far less than a car. Keep vehicles, heavy equipment, and building projects off the tank and the drainfield, and never step-test a lid you have just uncovered if it looks cracked, crumbling, or rusted through — check it from the edge with a tool, not your body weight. And no one should ever enter a septic tank, for any reason: the gases inside can overcome a person in seconds.
Checked November 16, 2026. This guide is general information, not a substitute for a licensed professional.
Related guides
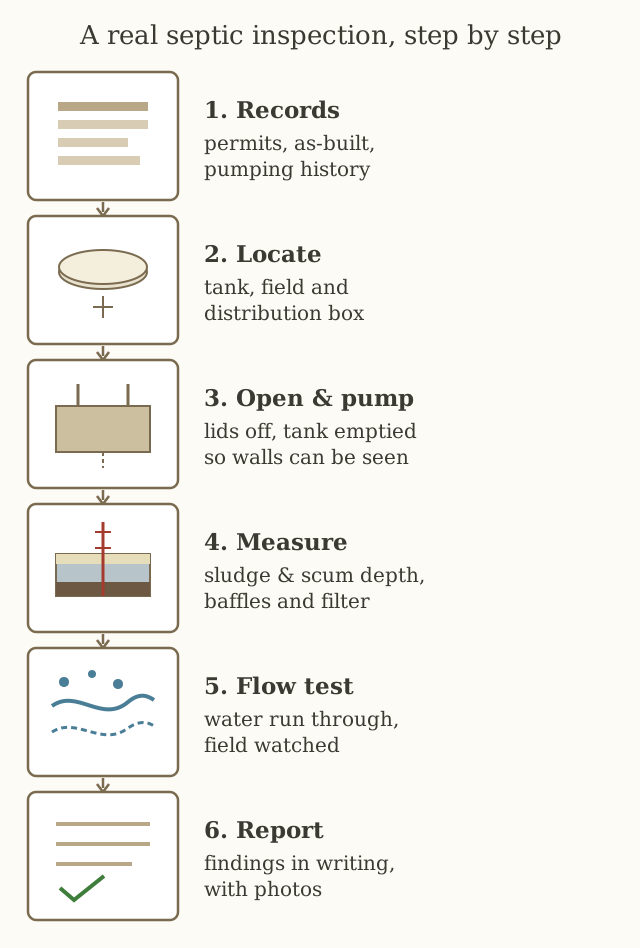
Buying a House With a Septic System? The Inspection That Can Save You $20,000
A standard home inspection barely touches the septic system. Here's what a real septic inspection includes, what it costs, the records to demand, and the contract wording that protects you.
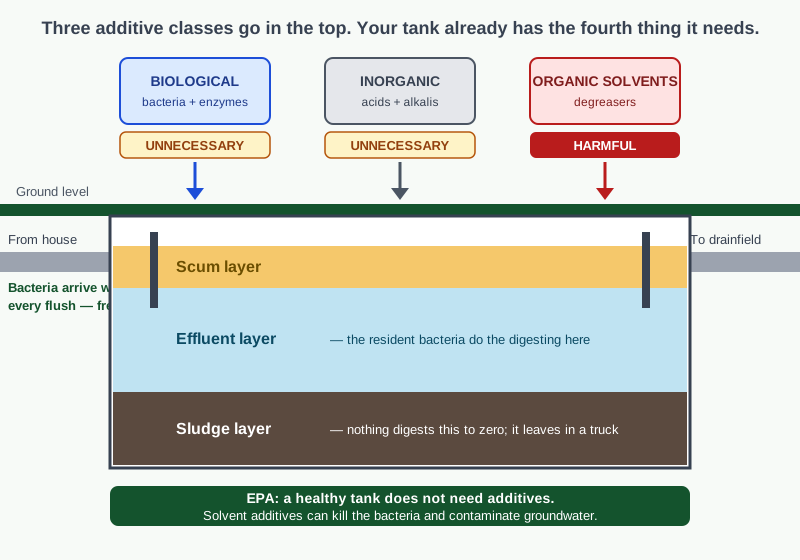
Do Septic Tank Additives Work? What the EPA and the Studies Actually Found
The EPA does not recommend septic additives, a 48-tank double-blind study found no measurable benefit, and one additive class is actively harmful. The evidence, the money maths, and the one narrow exception.
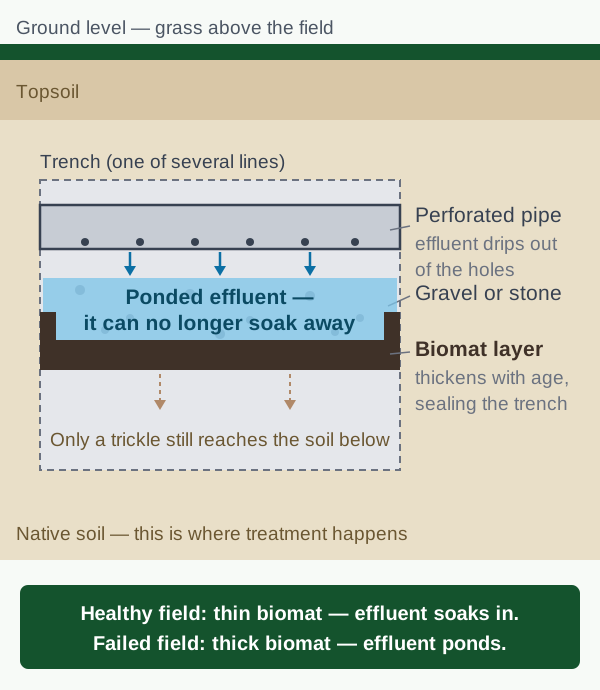
Drain Field Failure Signs: Soggy Ground, Green Stripes and Surfacing Effluent
A failing drain field announces itself in the yard first: lush green stripes, spongy ground, odors, then standing water. The early vs late signs, the look-alikes that aren't failure, a homeowner diagnosis sequence, and what repair or replacement really costs.