 Keep
How to Descale a Tankless Water Heater: The Flush That Decides Whether It Lasts 8 Years or 20
 Daniel Mercer · Editor & Researcher·
Published November 16, 2026·
Updated November 16, 2026
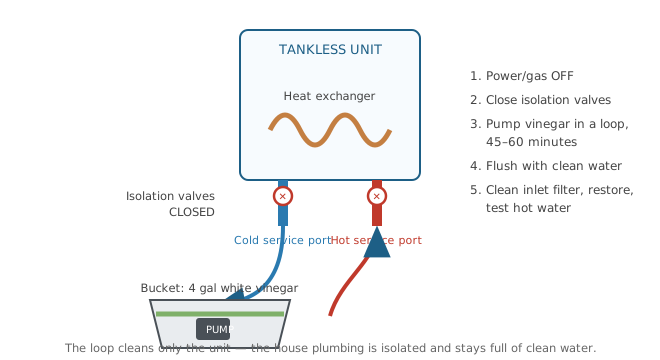
A tankless water heater has exactly one significant maintenance job, and this is it. There's no tank to rust, no anode rod to sacrifice itself, no sediment layer to flush from a vessel. There is only a heat exchanger — a compact coil of narrow waterways with fire (or an electric element) on one side and your shower on the other — and the mineral scale that hard water steadily plates onto the inside of it.
Everything about a tankless unit's life follows from how that one job gets done. Plumbers who service these units for a living tell the same story in every hard-water region: flushed on schedule, a tankless heater runs 18–22 years; never flushed, the same unit commonly fails at 6–8. The difference is a pump, a bucket of vinegar, and an hour a year. Here's the whole thing, properly.
Why scale is the enemy (the physics in one paragraph)
Your water carries dissolved calcium and magnesium. Heat makes them crystallise — that's what hardness is — and the hottest surface in the system is the heat exchanger's inner wall, so that's where the crystals plate out. The growing layer then attacks on three fronts at once. It insulates: scale conducts heat far worse than metal, so the burner must fire harder and longer to get the same heat into the water (a film just 1/32 of an inch thick costs roughly 10% efficiency; a quarter inch of buildup can cost 25–40%). It narrows: the waterways in a tankless exchanger are small by design, and scale closes them like plaque in an artery, cutting flow. And it hotspots: water trapped under scale against superheated metal flashes to steam in pockets — the rumbling, popping kettling you'll hear — while the metal beneath overheats unevenly, which is how exchangers eventually crack. One substance, three failure modes, and a single cure: dissolve it out regularly, before it hardens into geology.
Condensing models have a second, forgotten maintenance item
If your gas tankless is a high-efficiency condensing unit — most premium models now are — it makes a by-product a basic unit doesn't: acidic condensate, drained away through a small trap and, in most installations, a neutraliser cartridge filled with limestone media that the condensate passes through on its way out. That media is consumed doing its job, and it is a wear item: typically checked yearly and replaced every one to three years depending on usage and your water. A spent neutraliser means acidic water (pH can run as low as 3–5) dripping toward drains it can corrode, and a clogged trap or drain line can shut the unit down with an error code that has nothing to do with scale. While you're set up for the flush, look at the condensate trap, confirm the drain line runs clear, and check the neutraliser media level against your manual. Owners flush faithfully for a decade and get ambushed by a $30 cartridge — don't be that story.
The seven signs yours is overdue
Scale builds silently for a year or two, then starts sending signals in a rough order. Any one of these earns a flush; two or more means this week:
- Temperature swings mid-shower — hot, lukewarm, hot again, with the setpoint untouched. The exchanger can't transfer heat evenly through its coating.
- Falling hot-water flow — hot taps deliver less than they used to while cold taps are unchanged. The restriction is inside the unit.
- Longer waits for hot water at distant fixtures, as the narrowed passages slow delivery.
- Rumbling, popping, crackling during operation — the kettling described above.
- Climbing gas or electric bills for the same usage — you're paying to heat scale.
- Error codes, especially overheating or ignition-related ones that recur after resets. The unit is protecting itself from its own hot spots.
- Shutdowns mid-use — the late-stage signal. The safety limits trip because the exchanger can't shed heat. Descale immediately, and if codes persist after a thorough flush, stop flushing and call a tankless specialist: by then the exchanger or a sensor may already be damaged, and acid can't repair metal.
How often: set the interval by your water
The manual says "annually," and the manual was written for average water. Your actual interval is a function of hardness, which you can learn in one minute: your water utility publishes its hardness figure (in grains per gallon, gpg, or mg/L — divide mg/L by 17 to get grains), or a test strip from any hardware store will tell you.
- Soft water (under ~3 gpg): every 12–24 months.
- Moderately hard (3–7 gpg): every 12 months.
- Hard (7–10 gpg): every 12 months, firmly — this is the standard recommendation because it's where most homes sit.
- Very hard (10+ gpg), no softener: every 6–9 months. Much of the Southwest, Texas and California live here, and units scale up measurably within a single year.
- Whole-house softener fitted and maintained: every 18–24 months. The softener removes the minerals, but a periodic flush still clears sediment and keeps components honest.
One more consideration that isn't about chemistry: warranty. Major manufacturers treat descaling in hard water as required maintenance, and a heat exchanger that fails scaled-solid on a unit with no service history can be denied as neglect. Keep a dated record of every flush — a phone note with the date and what you used is genuinely enough — and the question never arises.
What you need
The kit is short and mostly reusable: a small submersible utility pump (1/6 hp is plenty — the same pump sold in "tankless flush kits" for $80–$150 with hoses and bucket), two washing-machine or garden hoses, a 5-gallon bucket, and 4 gallons of undiluted white vinegar (5% acidity, the plain grocery kind). Or substitute a commercial citric-acid descaler made for tankless units — faster and stronger, the better choice for a unit that's been neglected or lives in very hard water. Total consumable cost per flush: the vinegar, $15–$40.
The pump deserves one more sentence, because it's the piece people undersize. What you want is a submersible utility pump in the 1/6 hp class, rated around 350–500 gallons per hour — that's the spec bundled in purpose-sold tankless flush kits, and it's not arbitrary. The pump has to push solution through the exchanger's narrow coil against real resistance for the better part of an hour; a little fountain or aquarium pump will move water around the bucket happily and barely trouble the inside of the unit. The 1/6 hp utility pump is also the same tool that drains a water heater, empties a flooded corner and clears a pool cover, so it earns its shelf space between flushes. The hoses are equally unglamorous: two washing-machine hoses or short garden hoses, long enough to run from the service ports down into the bucket without kinks — six feet each is comfortable for most installs. Set the bucket directly under the unit if you can; every foot of lift costs the pump flow.
Price the whole setup once and the DIY case makes itself. A complete flush kit — pump, hoses, bucket — runs $80–$150 bought as a kit, and often less assembled from parts you may already own. A single professional flush costs $150–$300. So the kit is cheaper than the second hired flush, and from the third year onward every flush costs you the vinegar alone. The honest exception: if your unit is still inside a service plan that requires professional maintenance records, the pro's invoice is part of what you're paying for — see the warranty section below before deciding the kit replaces him entirely.
And the prerequisite that decides whether this is a DIY article or a phone call: isolation (service) valves. Look at the pipes directly under your unit. A proper install has a valve assembly on each line with a capped service port — the hot and cold connections the hoses attach to. If they're there, proceed. If your unit connects straight to plain pipe with no service ports, stop: have a plumber install a valve kit once ($150–$400), and every flush after that is yours.
Vinegar or commercial descaler? The head-to-head
Both chemicals in this guide do the same job — dissolve carbonate scale with a mild acid — but they are not interchangeable in every situation, and the choice matters more the longer a unit has gone unflushed. Here they are side by side:
| Undiluted white vinegar (5%) | Commercial descaler (citric-acid based) | |
|---|---|---|
| Cost per flush | $15–$40 (4 gallons) | $25–$50 per treatment |
| Circulation time | 45–60 minutes | 30–45 minutes |
| Strength on scale | Gentle and steady; dissolves a maintained film completely | Stronger per pass; chews through heavy, layered, long-neglected buildup |
| Best for | Units flushed on schedule, soft-to-moderate water | Neglected units, very hard water, a first flush with unknown history |
| Warranty acceptance | Named as acceptable in most manufacturers' manuals | Tankless-specific products are formulated to be manual-safe; check yours lists citric descalers |
| Handling | Food-grade; drain-safe, biodegradable | Mild irritant; gloves sensible, still drain-safe in flush quantities |
The rule for choosing is about the unit in front of you, not brand loyalty. A unit that has been flushed on schedule gets vinegar — there is only a film to remove, vinegar removes it completely, and it is the cheapest, mildest thing that works. A unit with symptoms, an unknown history, or years of neglect gets the commercial descaler — you are not maintaining a film, you are excavating, and the stronger agent in a shorter circulation is the honest tool. A unit in very hard water that kettles or throws codes gets the descaler and a second cycle if the first bucket comes back loaded with debris. What neither column contains, deliberately: muriatic acid and generic industrial descalers. They are stronger still, and they are how a maintenance job becomes an exchanger replacement — no manufacturer sanctions them, and no saving justifies them.
Before you flush: the two-minute brand check, and why it protects a warranty
Your unit's manual — paper copy, or the PDF on the manufacturer's site — states two things worth two minutes before you open a single valve: the descaling interval the brand itself specifies for your water conditions, and the cleaning agents it approves. Intervals and approved agents differ by brand, and where this guide's general schedule and your manual disagree, the manual wins, because the manual is the document a warranty claim gets judged against.
This is not bureaucratic caution. The major manufacturers — Rinnai, Navien, Rheem and Noritz among them — write periodic descaling into their maintenance requirements, and in hard-water areas they treat it as a condition of heat-exchanger warranty coverage. The logic from their side is simple: scale damage is preventable maintenance failure, not a defect, and a heat exchanger that fails scaled-solid on a unit with no descaling history can have its claim denied as neglect. The exchanger is the most expensive part of the machine, and its coverage is the warranty that actually matters. Two habits keep you on the right side of that line: flush on the brand's stated interval for your hardness, and keep the dated record described at the end of the procedure below. Owners on a paid service plan should also check its terms — some plans require the maintenance to be performed professionally, and a DIY flush, however well done, may not count toward the plan's conditions even though it satisfies the manufacturer's.
No paper manual? It takes three minutes to replace. The model number on the unit's data plate, typed into the manufacturer's support site, brings up the exact manual for your model — including its maintenance schedule, its approved cleaning agents and its full error-code list, three things this guide deliberately keeps general because brands state them specifically. Save the PDF to the same phone note or folder where your flush log will live. Owners of inherited units should do this before their first flush, not after their first error code: the manual for a ten-year-old model is still published, and it is the document that defines what "maintained" means for the machine actually hanging on your wall.
The flush, step by step
Budget 60–90 minutes the first time, about an hour once it's familiar.
- Power down. Switch the unit off and unplug it or turn off its breaker; on a gas unit, also close the gas valve to the unit. You'll be opening water connections, and the burner must not fire.
- Close the isolation valves — both hot and cold — separating the unit from the house plumbing. Open the service ports' caps. (Expect a small spill; have a towel down.)
- Relieve and drain. Open the pressure-relief/service port briefly to let pressure off, and drain the unit's small internal volume into the bucket.
- Connect the loop. Pump sits in the bucket. Hose one: pump outlet → cold service port. Hose two: hot service port → back into the bucket. Pour the 4 gallons of vinegar into the bucket, submerging the pump.
- Circulate 45–60 minutes (30–45 for a commercial descaler, per its label). The vinegar loops through the exchanger, dissolving scale as it goes. You'll often see the returning liquid cloud and fizz early on — that's the chemistry working, and heavily scaled units turn the bucket genuinely murky. Two things to mind while it runs: keep the pump fully submerged — top the bucket up if the level drops toward the pump's intake, because a pump sucking air is circulating nothing — and glance at the return hose every ten minutes or so. A strong, steady return stream is the whole job working. A return that weakens as the cycle goes on usually means loosened scale is loading the solution, which is information for your second cycle, not a reason to stop this one. You don't need to stand over it; set a timer. But a flush nobody checks for an hour can spend forty of its minutes moving air.
- Flush with clean water. Dump the vinegar (it's biodegradable and drain-safe in these quantities), refill the bucket with clean water, and circulate 5–10 minutes to rinse the exchanger. Some people run a second rinse; in hard-water homes it's cheap insurance against a vinegar taste in the first shower.
- Clean the inlet filter screen. While things are apart: the cold-water inlet has a small mesh screen (check your manual for its exact location — usually a small plug at the cold inlet). Pull it, rinse the grit out, replace it. This five-minute job, done every six months between flushes, prevents a whole family of low-flow faults.
- Restore and test. Close the service ports and cap them, reopen the isolation valves (cold first, then hot), check every connection for drips, restore power/gas, and run a hot tap. The water should arrive at a steady temperature with the flow you remember from when the unit was young. Note the date in your maintenance record.
Write it down: the flush log
Step 8 ended with "note the date" — here is what that note should actually contain, because this small record is the difference between a warranty claim that gets paid and one that gets argued. Manufacturers and service plans don't dispute that a scaled exchanger was neglected because they're cynical; they dispute it because "I flushed it every year" with nothing behind it is indistinguishable from never having flushed it at all. Five lines per flush close that gap:
- Date of the flush.
- Solution used — vinegar or the named commercial descaler, and how much.
- Circulation time — how long the solution actually looped.
- What came out — clear, milky, gritty, flakes; a phone photo of the bucket costs nothing and says plenty.
- Anything else done or seen — inlet screen cleaned, error codes present before the flush and cleared after, neutraliser media checked on a condensing unit.
Keep it wherever it will survive: a notebook page in the unit's document pouch, a running note on your phone, a card taped inside the cover. If a pro does the flush, file the invoice in the same place — it records all five lines professionally. An entry, in full, takes under a minute and looks like this: 14 March — flushed, 4 gal white vinegar, 55 min, bucket milky with fine grit, screen rinsed, no codes before or after, neutraliser media about half-used. Water 8 gpg; next due next March. That single sentence, repeated yearly, is a maintenance history. Why this matters in practice: if the exchanger ever fails inside its warranty period, the claim conversation starts with maintenance history, and the owner who produces a dated log showing on-schedule flushes with approved agents has answered the only question that could sink the claim. Two minutes of writing per year, defending the most expensive component you own. It is the cheapest insurance in this entire guide.
Reading the flush: what the bucket is telling you
The returning solution is a report on your exchanger, and it's worth reading before you pour it away. Fizzing and cloudiness in the first minutes is normal chemistry — acid meeting carbonate — and a healthy annual flush usually runs from milky to mostly clear over the cycle. Grit and flakes circulating mean the scale had reached the shedding stage: the unit was further gone than a film, and if the bucket is still full of debris at 45 minutes, drain it and run a second cycle with fresh solution rather than declaring victory — the first batch spent itself on the outer layer. Solution that comes back nearly clear and calm from the start is the signature of a well-kept unit on soft water, and permission to stretch your interval toward the longer end of the schedule. And rust-coloured water is different information entirely: that's not scale, that's corrosion products, and it belongs in a service call rather than a second flush. One bucket, four diagnoses — look before you dump.
The error codes that mean scale
Guides usually say "watch for error codes" and stop there, which is not much use at 7 a.m. with a cold shower and a blinking display. Scale announces itself through a small, specific family of codes — the ones tied to overheating and heat-exchanger protection — and they differ from the ignition and sensor codes that mean something else is wrong. The representative scale-related codes from the major brands:
| Brand | Code | What the unit is telling you | Your move |
|---|---|---|---|
| Rinnai | LC | Scale buildup detected in the heat exchanger — this is the unit's own flush reminder, not a failure | Descale now; the code clears with the maintenance reset in your manual |
| Rinnai | 14 | Thermal fuse / overheating protection tripped — the exchanger ran too hot, classically through scale insulation | Descale, then monitor; if it returns after a thorough flush, call — the exchanger or fuse needs a technician |
| Navien | E016 | Heat exchanger overheating — outlet temperature beyond limits, a signature of scaled, restricted waterways | Descale promptly; recurring E016 after flushing is a service call |
| Noritz | 16 | Abnormal temperature increase — the unit detects a rise it can't explain except by poor heat transfer | Descale; check the inlet filter screen at the same visit |
| Any brand | Repeated flame-failure / shutdown codes after resets | Often downstream of overheating: the unit lights, overheats through its scale layer, and protects itself by shutting down | One proper flush is the test — codes that survive it are no longer a scale problem |
Two honest caveats. Code lists vary by model and generation, so treat the table as the pattern to recognise and your manual's code list as the authority for your exact unit. And the dividing line matters: a code that appears, gets flushed, and stays gone was scale introducing itself. A code that returns within days of a thorough flush — especially overheating codes — means the problem has moved past what acid can fix, and continuing to reset and run the unit is how a serviceable exchanger becomes a replaced one. Flush once, properly, and let the result make the diagnosis.
Mistakes that turn maintenance into a repair
The flush is forgiving, but four errors recur. Using the wrong acid: muriatic/hydrochloric acid and industrial descalers can attack the exchanger's metals and seals — vinegar or a citric product made for the purpose, nothing else. Forgetting the power: circulating solution through a unit that fires mid-flush is a genuine hazard; step 1 exists first for a reason. Skipping the rinse: vinegar left in the exchanger keeps working on it and flavours the hot water; the clean-water loop is part of the job, not a garnish. And flushing a unit that's already failing: if error codes, shutdowns or kettling persist after a thorough flush, the problem has graduated from scale to damage — repeating flushes won't reverse it, and the next step is a specialist with the exchanger's service manual, not a stronger bucket.
The professional option, priced honestly
None of the above is an argument that you must DIY. A professional descale runs $150–$300, takes the plumber under an hour, and usually bundles the inlet-filter clean, a look at the venting and connections, and an error-history check — plus an invoice that is the strongest warranty documentation there is. The honest maths: a DIY kit pays for itself at the first flush and saves $120–$270 a year thereafter; a pro visit buys back your Saturday and adds an inspection your eyes aren't trained for. Many owners alternate — DIY on the off-years, a professional service every second or third year for the inspection value. Either rhythm beats the third option, which is the one that ends at year seven with a heat exchanger quote.
If a pro does your flush, ask for two lines on the invoice before they leave: the solution used and any error codes found in the unit's history. A bare "descale service" receipt proves a visit; those two details turn it into the flush-log entry described above — the version that answers questions if a warranty claim ever asks what was done, with what, and what the unit had been reporting. Good tankless specialists write this down unprompted. Asking takes ten seconds either way.
The softener question: prevention is not the same as flushing
If your water is very hard, someone will eventually sell you a cure so you can stop flushing. Know what the two cures actually do. A salt-based water softener genuinely removes calcium and magnesium, exchanging them for sodium — the water reaching your heater is truly soft, scale formation slows to a crawl, and your flush interval stretches to the 18–24-month end of the schedule. It's the real fix, at real money ($800–$2,500 installed, plus salt and its own maintenance) and with whole-house benefits beyond the heater — fixtures, laundry, the tank toilet valves all live easier.
A scale inhibitor (the cartridge or electronic units marketed as "salt-free softeners") does something different: it changes the minerals' crystal behaviour so they tend to stay suspended and pass through rather than plating out. The hardness is still in the water — a test strip won't change — and buildup slows rather than stops. Owners with inhibitors should flush on roughly a 9-month rhythm in hard water and treat the device as a brake, not a cure. Neither device eliminates flushing; both change its frequency. Beware any pitch that promises otherwise, and beware especially the implication that a softener makes the existing scale disappear — it doesn't. Descale first, then let prevention hold the line.
Electric tankless units: same scale, a few different details
Everything above applies to electric tankless heaters too — their elements sit directly in the water path, and scale plates onto them and the small internal passages exactly as it does in a gas exchanger, with the same efficiency loss and the same flow restriction. The practical differences are at the margins. There's no gas valve or venting to think about, which simplifies step 1 to the breaker alone. Some compact electric units lack full-size service ports and lean on their manual's specific procedure, so the brand instructions outrank this guide's general loop. And an electric unit that's scaled often announces itself through its elements: laboured heating, tripped breakers on high demand, or one stage of a multi-element unit quietly dead. Flush on the same hardness schedule — the minerals don't care what heated the water.
Small point-of-use units
The little tankless heaters under a sink or feeding one bathroom follow the same physics at a smaller scale, and the same maintenance logic in miniature. Many have simpler strainer screens that clog before scale becomes the issue, and their manuals often specify a plain water flush or a small-volume vinegar circulation rather than the full pump loop. The principles transfer exactly: know your hardness, keep the interval, clean the screen, write the date down. What doesn't transfer is neglect tolerance — a small unit's passages are smaller, so it chokes sooner on the same water.
The neglected unit's first flush: what to realistically expect
One arrival at this guide deserves its own paragraph before the general case: you just bought the house, and the tankless heater came with it — no records, no service stickers, no idea whether it has ever been flushed. Treat unknown history as no history. Start by reading the unit's data plate (model, serial, and usually a manufacture or install date) and photographing it for your records; then find your water hardness, because hardness plus unknown years is the whole risk calculation. If the house sits in hard-water country and the unit is more than a couple of years old, assume the exchanger carries real scale and plan the neglected-unit version below from the outset: commercial descaler rather than vinegar, a full morning rather than an hour, and a second cycle budgeted in. Check for isolation valves before flush day — inherited installs are exactly the ones that sometimes skipped them. Then make this flush the first entry in a new log, marked plainly as the baseline: whatever the previous owner did or didn't do, your documented history starts here, and for warranty purposes a clean record from your ownership forward is worth far more than an argument about theirs.
If you're reading this guide in year six of no maintenance — the most common way anyone arrives here — set expectations before you set up the pump. A unit that has scaled for years may need two or three cycles with fresh solution, and it deserves the commercial citric descaler from the start rather than vinegar; budget a whole morning, not an hour. Improvement may also arrive in stages: flow and temperature stability often return with the first good flush, while a kettling noise that's been baked in for years can take another cycle or two to quiet — or may not fully quiet if the exchanger's surface has already been damaged by hot spots. Judge the result after a week of normal use, not in the first shower.
And hold the honest limit in view: descaling removes scale, and if the symptoms survive a thorough, repeated flush — error codes returning, shutdowns continuing, flow still strangled — the exchanger itself is the problem, and further buckets of acid are just delay. That's the specialist call, made with useful information: you can tell them exactly what you flushed, with what, and what changed. A unit that gets that call at year six sometimes still has a decade in it. The same call at year nine, after three more seasons of scale, is usually a replacement conversation. The flush you do this weekend is what decides which of those calls you eventually make.
The rest of the rhythm: five-minute jobs around the flush
Descaling is the annual headline, but a tankless unit rewards a light six-month touch, and the whole routine takes less time than the shower it protects. Rinse the inlet screen (five minutes, described in step 7) — in many homes this alone is the difference between steady flow and mysterious low-flow faults. Look the unit over: any drips at the connections, rust staining, a condensate line that's kinked or draining onto the floor, error codes in the unit's history if your model stores them. On gas models, glance at the venting — joints seated, no sagging or separation, the exterior termination clear of nests and snow. On condensing models, check the neutraliser media while you're there rather than waiting for the flush. And on any model with a maintenance reminder, reset it only after the work is actually done — a reminder cleared without a flush is worse than none, because it silences the one witness who was paying attention. Put the six-month check on the opposite season from the flush and the unit never goes more than half a year without eyes on it.
Finding your hardness number (two minutes, once)
Every schedule in this guide keys off one number, so get the real one rather than guessing from your postcode's reputation. If you're on city water, your utility's annual water quality report (the Consumer Confidence Report, posted on their website) lists hardness, usually in mg/L — divide by 17 for grains per gallon. Many utilities also state it plainly on a "water hardness" FAQ page, because coffee people and aquarium people ask constantly. If you're on a well, no report exists — a $10 pack of hardness test strips gives a close-enough figure in a minute, and the lab test from our well-water guide gives an exact one as part of its baseline panel. As a rough national map: the Great Lakes and Pacific Northwest run soft-to-moderate; the Southwest, the Texas limestone belt, Florida and much of the Midwest run hard to very hard — but treat the map as a hint and your own number as the fact. Write it on the same card as your flush dates. A year from now, when you're deciding whether the interval should be nine months or twelve, that number is the whole argument.
Set the rhythm now
The owners who get two decades from these machines aren't more mechanical than you; they just picked two dates and kept them. Tie the flush to something you already do — the spring clock change, the autumn furnace-filter swap — and put the inlet-screen rinse on the six-month opposite. Write the dates on a card taped inside the unit's cover or in your phone's notes, with the hardness figure for your water at the top. A tankless heater asks for almost nothing. It asks for this, on schedule — and it pays the debt back in years.
Cost at a glance
| Item | Typical cost | Notes |
|---|---|---|
| DIY flush — vinegar + supplies (pump owned) | $15–$40 | 4 gallons of white vinegar and an hour of your time |
| DIY flush kit (pump, hoses, bucket) — first time | $80–$150 | Pays for itself against one professional visit; reusable for years |
| Professional descale service | $150–$300 | Usually includes inlet-filter cleaning and a general inspection |
| Isolation valve kit installed (one-time) | $150–$400 | Only if your install skipped the service valves — enables every future DIY flush |
| Heat exchanger replacement (the cost of neglect) | $1,000+ in parts and labour | Often the point where full unit replacement ($2,500–$5,500 installed) enters the conversation |
Frequently asked questions
How often should you descale a tankless water heater?
Set the interval by your water, not by the sticker. Soft water (under ~3 grains per gallon): every 12–24 months. Moderately hard (3–7 gpg): yearly. Hard (7–10 gpg): yearly, no stretching. Very hard (10+ gpg) with no softener: every 6–9 months. With a maintained whole-house softener: every 18–24 months. Manufacturers write 'annual' into their manuals as the baseline, and several make documented maintenance a condition of warranty coverage on the heat exchanger — so keep a dated note of every flush, whoever does it.
Can I use something stronger than vinegar?
A commercial tankless descaler — usually citric-acid based and sold for exactly this job — is the approved step up: it works faster (30–45 minutes) and clears heavy, long-neglected scale better than vinegar. What you must not use is muriatic (hydrochloric) acid or generic industrial descalers: they can attack the heat exchanger's metals and seals, and no manufacturer sanctions them. The ladder is vinegar for maintained units, citric descaler for neglected ones, professional help for damaged ones — there is no fourth rung you should climb at home.
What happens if you never descale a tankless water heater?
A predictable decline. Scale insulates the heat exchanger (a film of 1/32 inch costs roughly 10% efficiency; a quarter inch can cost 25–40%), so bills creep up first. Then flow narrows and temperatures start swinging mid-shower. Then come the rumbling and popping as water trapped under scale flashes to steam, and the overheating error codes and protective shutdowns. Finally the exchanger develops hot spots and fails — in hard water, plumbers routinely see unflushed units die at 6–8 years against the 18–22 a flushed unit delivers. Descaling doesn't just maintain a tankless heater; it's most of the difference between its two possible lifespans.
My tankless has no isolation valves. Can I still flush it?
Not practically, and don't improvise around it. The flush works by circulating solution through the unit in a closed loop, which requires the service ports that isolation valve kits provide. Without them you'd have to disconnect the water lines themselves — at which point the sensible move is paying a plumber once ($150–$400) to install a proper valve kit, which converts every future flush into the one-hour DIY in this guide. Ask any installer quoting a new tankless whether service valves are included; on a new install they should be non-negotiable.
Does descaling void or protect my warranty?
Protect — when it's documented. Major manufacturers (Rinnai and Navien among them) treat regular descaling in hard water as required maintenance, and heat-exchanger failures on units with no maintenance history can be denied as neglect. The flush itself, done per the manual with vinegar or an approved descaler, does not void anything. What protects you is the paper trail: date, solution used, who did it. A notebook page or a phone note is enough; a paid invoice from a pro is bulletproof. Keep either.
Why does my tankless rumble and pop like a kettle?
Because it has become one. Scale on the heat exchanger traps thin layers of water against metal far hotter than boiling point; the trapped water flashes to steam in tiny pockets, and the popping and rumbling is those pockets collapsing — the same 'kettling' a scaled kettle makes, at plumbing scale. It's one of the clearest overdue signals there is: the unit is telling you the exchanger is coated. Descale promptly; persistent kettling overheats the metal in spots and is part of how exchangers crack.
Should I descale a brand-new tankless heater?
Not immediately — there's nothing to remove yet — but do start the clock and the habit. Note the install date, find out your water hardness (your utility publishes it, or a test strip takes a minute), and set the first flush by the schedule in this guide: a year out in average water, six months in very hard water. Also confirm at installation that you have service valves and know where the inlet filter screen is. Owners who start the rhythm in year one describe year ten very differently from owners who meet this guide in year seven via an error code.
Checked November 16, 2026. This guide is general information, not a substitute for a licensed professional.
Related guides
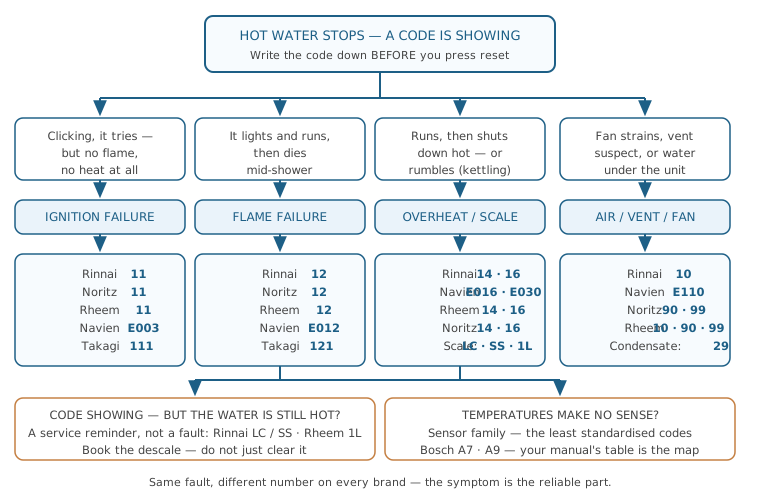
Tankless Water Heater Error Codes, Decoded by Symptom (All Major Brands)
The code on the display is a symptom report, not a diagnosis. Find your fault by what the unit did — no ignition, flame loss, overheating, venting trouble, bad sensors — with the Rinnai, Navien, Noritz, Rheem and Takagi codes for each family, the safe owner checks, the reset rules, and what each fix costs.
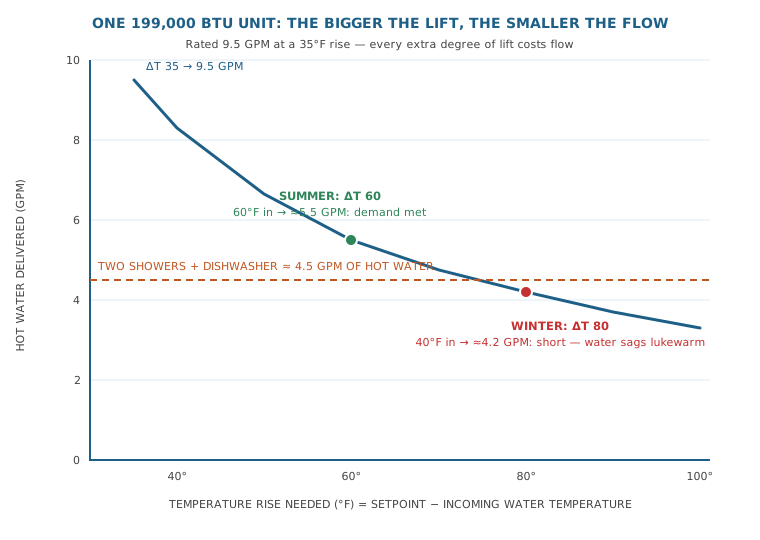
Tankless Water Heater Not Hot Enough? It's a Capacity Problem — Temperature Rise, Explained With Your Own Numbers
Your tankless runs, fires and shows no error — it just never gets properly hot, especially in winter or when two showers run together. That is a temperature-rise problem, not a breakdown. Work the worksheet with your own unit's numbers, split the symptom four ways, and fix the real cause: capacity, scale, gas supply or crossover.
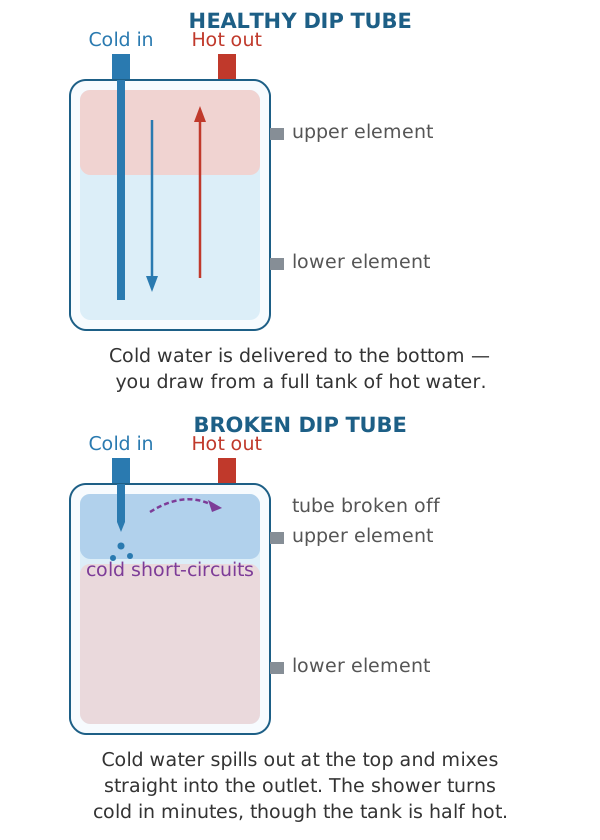
Why Your Hot Water Runs Out So Fast — and the Bucket Test That Tells You Why
Showers going cold in minutes? The bucket test measures how much hot water your tank actually delivers, then splits the causes: broken dip tube, dead lower element, sediment, thermostat, cross-connection, or a tank that is simply too small now.